
As I sifted through my pantry, the unassuming jar of Biscoff cookie butter caught my eye, sparking a wave of delicious inspiration. That’s when I decided to create the ultimate Biscoff Cheesecake—an indulgent twist on the classic dessert that’s sure to impress friends and family alike. With its creamy, rich filling and a crunchy Biscoff cookie crust, this cheesecake not only satisfies sweet cravings but also offers a memorable homemade experience. It’s perfect for those moments when you want to treat yourself without the fuss of complicated baking! Plus, it’s an excellent way to elevate your dessert game for special occasions or cozy nights at home. Ready to bake this delightful treat? Let’s dive into the process!

Why is Biscoff Cheesecake a Must-Try?
Decadent Delight: The Biscoff Cheesecake combines smooth creaminess with a crunchy cookie crust, creating a heavenly dessert that’s both rich and satisfying.
Effortless Elegance: With straightforward steps and simple ingredients, you can whip up this show-stopper dessert without breaking a sweat.
Perfect for Any Occasion: Whether it’s a cozy night in or a special celebration, this cheesecake is a guaranteed crowd-pleaser that will impress your guests.
Incredible Versatility: Swap out Biscoff for Nutella or even make mini cheesecakes for a fun twist. The flavor possibilities are truly endless!
Make-Ahead Marvel: Prepare this stunning cheesecake in advance; it actually tastes better when chilled overnight, making it a time-saver for busy bakers.
Biscoff Cheesecake Ingredients
• Dive into the deliciousness of this Biscoff Cheesecake and gather your ingredients for a treat that’s sure to impress!
For the Crust
- Biscoff Cookies – These form the crust and provide the perfect flavor; ginger snaps work as a tasty substitute.
- Unsalted Butter – Binds crumbs together for a solid base; margarine can be used if needed.
- Granulated White Sugar – Sweetens the crust and filling; consider brown sugar for a deeper flavor profile.
For the Cheesecake Filling
- Cream Cheese – Adds creaminess and structure; make sure it’s at room temperature for easy mixing.
- Corn Starch – Helps stabilize the mixture and prevent cracks; all-purpose flour is a good alternative in a pinch.
- Biscoff Cookie Butter – The star ingredient that enriches the cheesecake with its delightful flavor; you can substitute with Speculoos spread if necessary.
- Sour Cream – Provides tanginess and moisture; Greek yogurt is a great healthier alternative.
- Vanilla Extract – Enhances the overall flavor profile; opt for Madagascar vanilla for an extra special touch.
- Eggs and Egg Yolks – Important for setting the cheesecake; use full eggs for different textural results.
Optional Topping
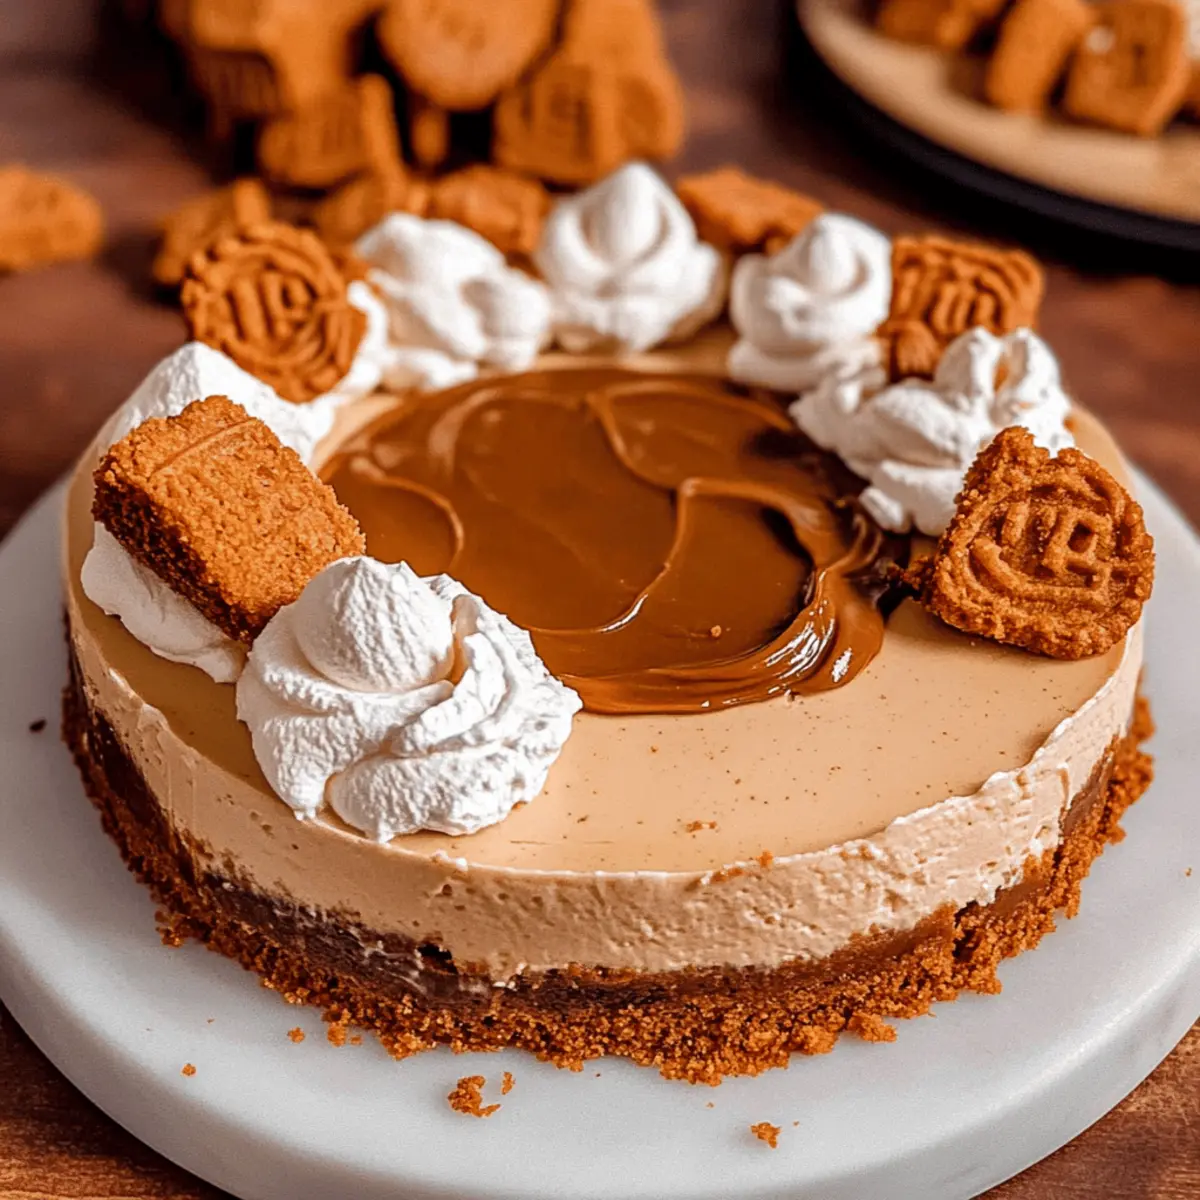
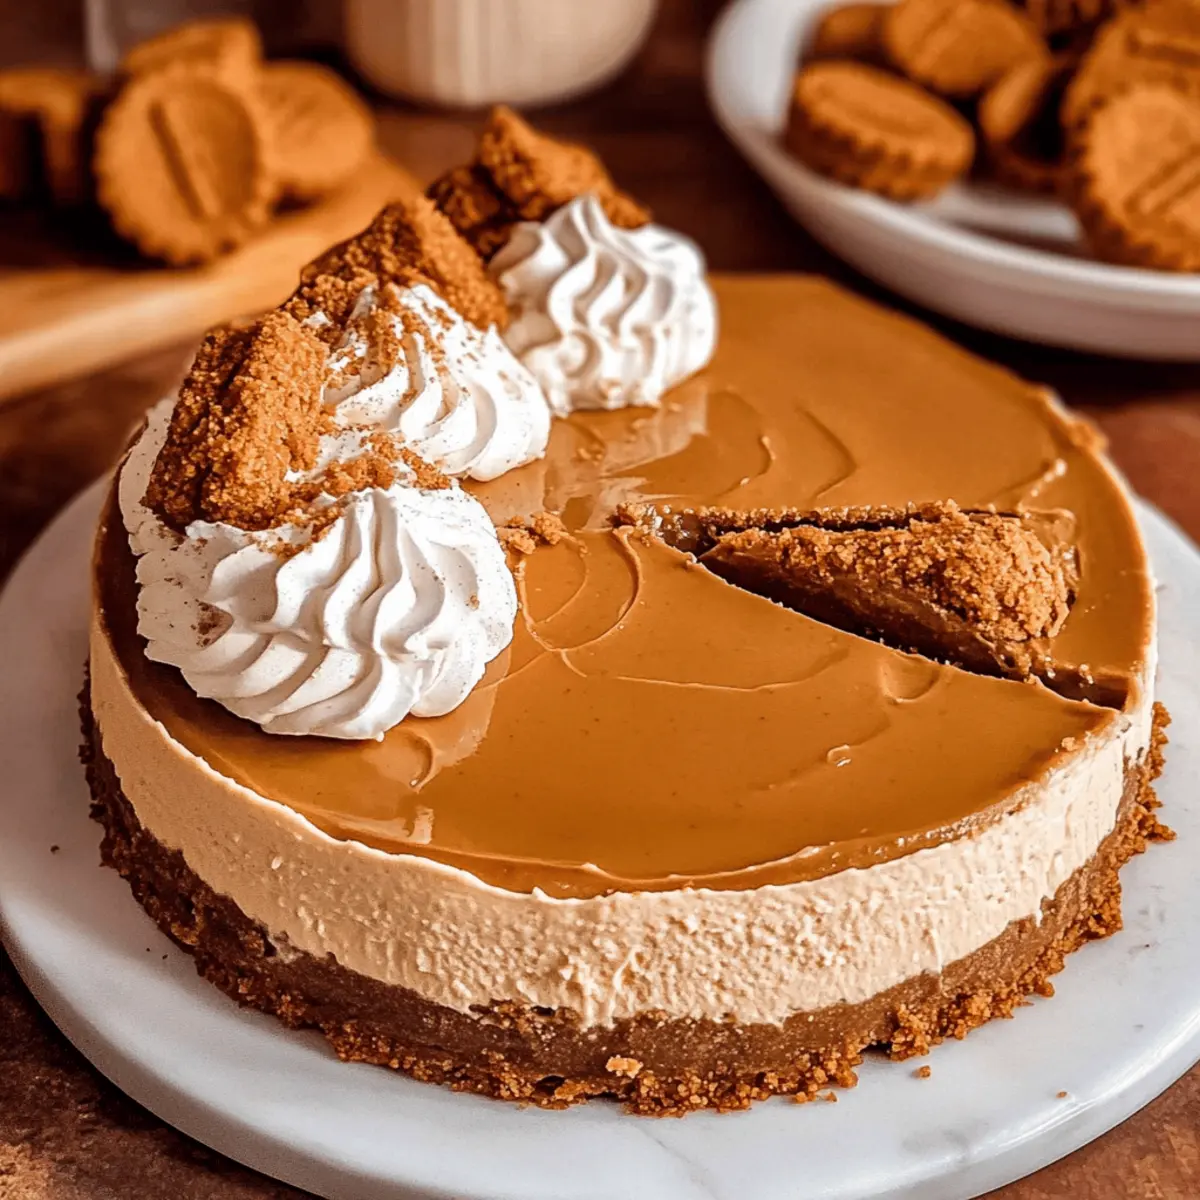
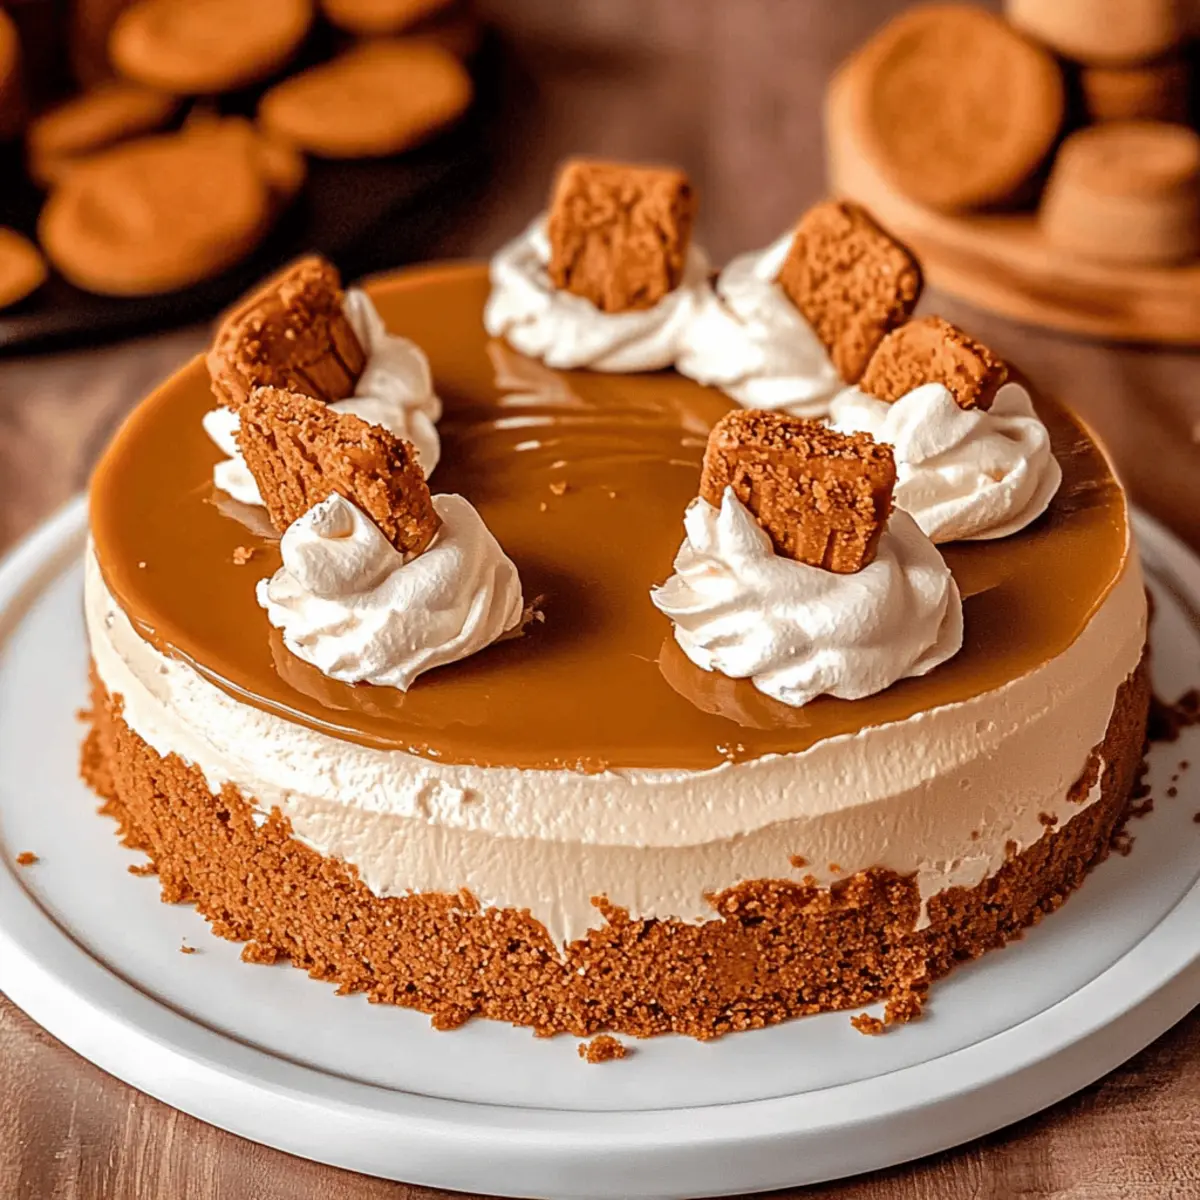
- Melted Biscoff Cookie Butter – Drizzle on top for extra indulgence; this enhances the overall Biscoff flavor.
- Whipped Cream – A delightful addition for serving; add extra cookie crumbs for a lovely crunch.
Step‑by‑Step Instructions for Biscoff Cheesecake
Step 1: Preheat the Oven
Begin by preheating your oven to 350°F (175°C). This is an essential step that ensures your Biscoff Cheesecake bakes evenly and achieves that perfect creamy texture. While the oven is warming up, prepare your crust, so it’s ready to bake once the temperature is reached.
Step 2: Prepare the Cookie Crust
In a food processor, pulse your Biscoff cookies until they transform into fine crumbs. Combine these crumbs with melted butter and sugar in a mixing bowl, stirring until well mixed. Press the mixture firmly into the bottom and slightly up the sides of a springform pan, creating a solid crust to hold your creamy cheesecake filling.
Step 3: Bake the Crust
Once the crust is pressed into the pan, place it in the preheated oven and bake for 10 minutes. This short baking time will help set the crust and enhance its flavor. When done, remove the pan from the oven and allow the crust to cool completely, ensuring a firm base for your Biscoff Cheesecake filling.
Step 4: Mix the Cheesecake Filling
In the bowl of a stand mixer, beat together the softened cream cheese, corn starch, and granulated sugar until the mixture is smooth and creamy, about 2-3 minutes. Make sure there are no lumps, as a smooth filling is key to a luscious Biscoff Cheesecake. Afterward, incorporate the Biscoff cookie butter, vanilla extract, and sour cream, mixing until fully combined.
Step 5: Add the Eggs
With the mixer running on low, add the eggs and egg yolks one at a time to the cheesecake mixture. This step is crucial for achieving a creamy texture, so take care not to overmix. Mix just until the eggs are incorporated and the filling is smooth, ensuring that air bubbles do not form, which could lead to cracks.
Step 6: Pour the Batter
Prepare to pour the heavenly cheesecake filling into the cooled crust. Gently scoop the mixture from the bowl and spread it evenly into the crust, smoothing the top with a spatula. This ensures that your Biscoff Cheesecake has a uniform shape, which will make for beautiful slices after it’s set.
Step 7: Create a Water Bath
Place your cheesecake pan into a larger roasting pan. Carefully add hot water to the roasting pan until it reaches halfway up the sides of your cheesecake pan. This water bath technique helps to gently cook the cheesecake, preventing cracks and ensuring a smooth, creamy consistency throughout.
Step 8: Bake the Cheesecake
Put the assembly back into the oven and bake for 1 hour. You’ll know it’s done when the edges are set, but the center is slightly jiggly. This indicates that the Biscoff Cheesecake will continue to set as it cools, leaving you with a perfectly creamy center.
Step 9: Cool the Cheesecake
Once the hour is up, turn off the oven and crack the door open slightly, allowing the cheesecake to cool inside for an additional hour. This gradual cooling helps prevent cracking, creating a smooth and appealing surface for your Biscoff Cheesecake once finished.
Step 10: Chill Before Serving
After the cheesecake has cooled, carefully loosen the edges with a knife and let it cool on the counter for about 30 minutes. Once at room temperature, transfer the cheesecake to the refrigerator and chill for at least 8 hours, preferably overnight. This allows the flavors to meld beautifully and sets the cheesecake to perfection.
Step 11: Add the Topping
Before serving, gently heat some Biscoff cookie butter until it becomes pourable. Drizzle this over the chilled cheesecake for a deliciously indulgent topping. If desired, add a generous dollop of whipped cream and sprinkle extra Biscoff cookie crumbs on top for added texture and flavor, completing your Biscoff Cheesecake masterpiece.
Biscoff Cheesecake Variations & Substitutions
Feel free to mix things up and create your dream cheesecake with these delightful tweaks!
- Nutella Twist: Substitute Biscoff cookie butter with Nutella for a rich chocolate-hazelnut flavor that will leave you swooning.
- Ginger Snap Crust: Swap Biscoff cookies for ginger snaps in the crust for a spicy, warm twist that’s perfect for the fall season.
- Mini Cheesecakes: Use a muffin tin to bake bite-sized mini Biscoff cheesecakes, making them ideal for parties and easy to share.
- Reduced Sugar: Opt for a sugar substitute like monk fruit or erythritol to lower the sweetness while still enjoying a creamy treat.
- Vegan Version: Make a vegan cheesecake using cashew cream or vegan cream cheese and coconut oil for a dairy-free delight everyone can enjoy!
- Extra Crunch: Fold in some crushed Biscoff cookies or chopped nuts into the cheesecake filling for added texture and flavor in every slice.
- Spiced Up: Add a pinch of cinnamon or nutmeg to the filling for a warm spiced flavor profile that elevates your cheesecake experience.
- Fruity Add-In: Incorporate fresh berries or a berry compote on top of the cheesecake for a fresh, fruity contrast to the creamy, rich filling.
Whatever variation you choose, you can’t go wrong with this luscious dessert. If you’re feeling adventurous, why not explore more baking inspirations for your next sweet project? Or consider giving a classic cheesecake a unique twist with all these delectable ideas!
Make Ahead Options
These Biscoff Cheesecakes are perfect for meal prep enthusiasts! You can prepare the crust and filling up to 3 days in advance for effortless entertaining. Simply make the crust by pressing the Biscoff cookie mixture into the pan and bake it as directed. The filling can be mixed and poured over the cooled crust, but avoid baking until the day you plan to serve. To maintain quality, refrigerate the unbaked cheesecake tightly wrapped in plastic wrap. When you’re ready to delight your guests, simply bake it, cool it, and let it chill in the refrigerator for at least 8 hours overnight—you’ll be rewarded with a perfectly creamy dessert that’s ready to impress!
What to Serve with Biscoff Cheesecake
Indulging in a slice of this creamy delight isn’t complete without the perfect accompaniments to elevate your dessert experience.
-
Fresh Berries: Juicy strawberries or tart raspberries offer a refreshing contrast to the rich cheesecake, making each bite a balance of flavors.
-
Vanilla Ice Cream: A scoop of creamy vanilla ice cream melts beautifully against the cool Biscoff cheesecake, enhancing the overall dessert experience.
-
Chocolate Ganache: Drizzling a silky chocolate ganache adds a touch of decadence, while its richness beautifully complements the caramel notes of Biscoff.
The smoothness of the ganache pairs wonderfully with the cheesecake’s texture, creating an indulgent symphony of flavors.
-
Espresso or Coffee: A cup of rich espresso or coffee acts as a perfect palate cleanser, enhancing the dessert flavors and providing a warm contrast to the chilled cheesecake.
-
Whipped Cream Topping: A dollop of freshly whipped cream adds a light and airy touch, emphasizing the creamy richness of the cheesecake while looking lovely on your plate.
-
Toasted Almonds: Crunchy, toasted almonds sprinkled on top lend a delightful crunch and a nutty flavor, nicely contrasting with the smooth filling.
How to Store and Freeze Biscoff Cheesecake
Fridge: Store leftover Biscoff Cheesecake in an airtight container for up to 5 days; this keeps it fresh and delicious for your sweet cravings.
Freezer: For longer storage, freeze the cheesecake wrapped tightly in plastic wrap and then in aluminum foil for up to 2 months; this preserves its creamy texture.
Thawing: To enjoy frozen cheesecake, transfer it to the fridge 8–12 hours before serving, allowing it to defrost slowly for the best results.
Reheating: If you like your cheesecake slightly warm, place individual slices in the microwave for about 10-15 seconds—but be careful not to overheat!
Helpful Tricks for Biscoff Cheesecake
-
Room Temperature Ingredients: Always start with cream cheese and sour cream at room temperature; this ensures a smooth and lump-free filling for your Biscoff Cheesecake.
-
Water Bath Wonder: Using a water bath while baking helps maintain moisture and prevents cracking; a key step for achieving that velvety texture.
-
Gentle Mixing: When incorporating eggs, mix on low speed and just until combined; overmixing can introduce air bubbles, leading to cracks during baking.
-
Chill Time is Key: Allowing your cheesecake to chill overnight not only enhances the flavor but also improves firmness, ensuring the perfect slice every time.
-
Plan for Presentation: For an elegant touch, drizzle melted Biscoff cookie butter on top before serving, and don’t forget to garnish with whipped cream and cookie crumbs for a delightful finish.
Biscoff Cheesecake Recipe FAQs
What is the best way to select ripe ingredients for this cheesecake?
Absolutely! For the best flavor and texture, ensure your cream cheese and sour cream are at room temperature before mixing. This prevents lumps and helps achieve a smooth, creamy filling. As for eggs, use large, fresh eggs for optimal results. Freshness impacts both flavor and setting, so always check the expiration date!
How should I store my leftover Biscoff Cheesecake?
Great question! Store any leftover Biscoff Cheesecake in an airtight container in the refrigerator. It will stay delicious for up to 5 days. Protect that creamy goodness, and make sure to cover it well so it stays moist!
Can I freeze Biscoff Cheesecake?
Absolutely! To freeze your cheesecake, wrap it tightly in plastic wrap, followed by a layer of aluminum foil. This will help preserve its creamy texture. You can freeze it for up to 2 months without losing flavor. Simply transfer it to the fridge 8-12 hours before serving to thaw it gently.
What if my cheesecake cracks while baking?
Very! Cracking can happen sometimes, but don’t worry! To prevent this, ensure you’re using a water bath while baking. The moisture in the oven helps regulate the temperature and prevent cracking. If cracks do appear, you can cover them with a delicious topping, like melted Biscoff cookie butter—no one will know!
Are there any dietary considerations I should be aware of?
For those with allergies, keep in mind this Biscoff Cheesecake contains gluten, dairy, and eggs. If you’re baking for someone with dietary restrictions, you might try gluten-free cookies for the crust and a dairy-free cream cheese alternative. Always check the labels to ensure they meet your needs!
Irresistible Biscoff Cheesecake for Cookie Lovers
Ingredients
Equipment
Method
- Preheat your oven to 350°F (175°C).
- In a food processor, pulse Biscoff cookies into fine crumbs, then combine with melted butter and sugar in a mixing bowl.
- Press the mixture firmly into the bottom and slightly up the sides of a springform pan, creating a solid crust.
- Bake the crust for 10 minutes, then remove and let cool completely.
- In a stand mixer, beat cream cheese, corn starch, and granulated sugar until smooth. Incorporate Biscoff cookie butter, vanilla extract, and sour cream.
- With the mixer on low, add eggs and egg yolks one at a time until just combined.
- Pour the cheesecake filling into the cooled crust and smooth the top.
- Place the cheesecake pan into a larger roasting pan and add hot water halfway up the sides of the cheesecake pan.
- Bake the cheesecake for 1 hour until edges are set but center is slightly jiggly.
- Turn off the oven and crack the door open, allowing the cheesecake to cool inside for an hour.
- Loosen the edges with a knife and let the cheesecake come to room temperature, then chill in the refrigerator for at least 8 hours.
- Before serving, drizzle melted Biscoff cookie butter on top and add whipped cream and cookie crumbs if desired.
Leave a Reply