
As I eagerly rummaged through my pantry, a burst of nostalgia hit me with the sight of those dusty vanilla wafers. It whisked me back to childhood gatherings filled with the sweet aroma of banana pudding, and suddenly, I knew I had to create a delightful twist: Banana Pudding Easter Truffles! These delightful no-bake treats blend the creamy goodness of banana pudding with the crunch of crushed wafers, all encased in a pastel chocolate shell. Not only are they incredibly easy to whip up—perfect for a fun day in the kitchen—but they’re also a guaranteed crowd-pleaser, making them the ideal dessert for your Easter celebrations. So, whether you’re a seasoned home chef or just looking to escape the fast-food routine, come along as we craft these little bites of joy together. Ready to make some memories and indulge your sweet tooth? Let’s dive in!
Why Are These Truffles a Must-Try?
Irresistible Flavor: Each bite offers a dreamy combination of creamy banana pudding and crunchy vanilla wafers, delivering a nostalgic taste that warms the heart.
No-Bake Convenience: Whip these up in no time—perfect for those who want a delicious treat without the oven.
Kid-Friendly Fun: Easy to make, these truffles are perfect for little hands to help out in the kitchen. Check out my Pumpkin Spice Pudding for another fun dessert idea!
Easter-Ready Presentation: Decorated with colorful sprinkles, they’ll brighten any spring gathering and delight guests of all ages.
Versatile Variations: Get creative with flavors—try adding peanut butter or mint for a unique twist. You can even opt for different coatings to suit your preference!
Banana Pudding Easter Truffles Ingredients
For the Truffle Mixture
- Crushed Vanilla Wafers – Base ingredient providing texture and sweetness. Can substitute with graham cracker crumbs for a different flavor.
- Cream Cheese – Adds creaminess and richness to the filling. Use mascarpone for a lighter option.
- Banana Pudding Mix (dry) – Delivers the classic banana flavor. A high-quality mix enhances flavor.
- Milk – Helps bind the mixture together and adds moisture. Use almond milk for a dairy-free version.
- Vanilla Extract – Enhances overall flavor profile. Replace with almond extract for a nutty twist.
For the Coating
- White Chocolate Chips or Candy Melts – Coating that adds sweetness and smoothness. Substitute with milk or dark chocolate for a richer taste.
- Food Coloring (pastel colors) – Optional for decorating the chocolate coating. Use natural dyes for a healthier alternative.
For Decoration
- Crushed Vanilla Wafers – Adds texture and visual appeal. Felted coconut or nuts for additional crunch.
- Easter Sprinkles – Fun decoration for a festive touch. Can replace with edible glitter or colored sugar.
Step‑by‑Step Instructions for Banana Pudding Easter Truffles
Step 1: Make the Truffle Mixture
In a large mixing bowl, combine 1 and ½ cups of crushed vanilla wafers, 8 ounces of softened cream cheese, 1 package of dry banana pudding mix, ¼ cup of milk, and 1 teaspoon of vanilla extract. With an electric mixer, beat until smooth and well-combined, resembling a thick dough. This takes about 3-5 minutes, and you’ll know it’s ready when it pulls away from the sides of the bowl.
Step 2: Shape the Truffles
Using a tablespoon, scoop out portions of the mixture and roll them into smooth balls, about 1 inch in diameter. Place each truffle on a parchment-lined baking sheet, ensuring they have some space between them. Once all the mixture is shaped, refrigerate the truffles for 30-45 minutes to firm up, allowing them to hold their shape during coating.
Step 3: Melt the Chocolate
While the truffles chill, prepare the coating. In a microwave-safe bowl, add 1 cup of white chocolate chips or candy melts. Heat in the microwave in 30-second intervals, stirring between each session until fully melted and smooth. This should take about 1-2 minutes total. The chocolate should be glossy and free of lumps when it’s ready.
Step 4: Coat the Truffles
Carefully remove the chilled truffles from the refrigerator. Using a fork or skewer, dip each truffle into the melted chocolate, ensuring it’s fully coated. Lift it out, gently shaking off any excess chocolate before placing it back on the parchment paper. Repeat this process until all truffles are coated, creating a lovely shiny exterior.
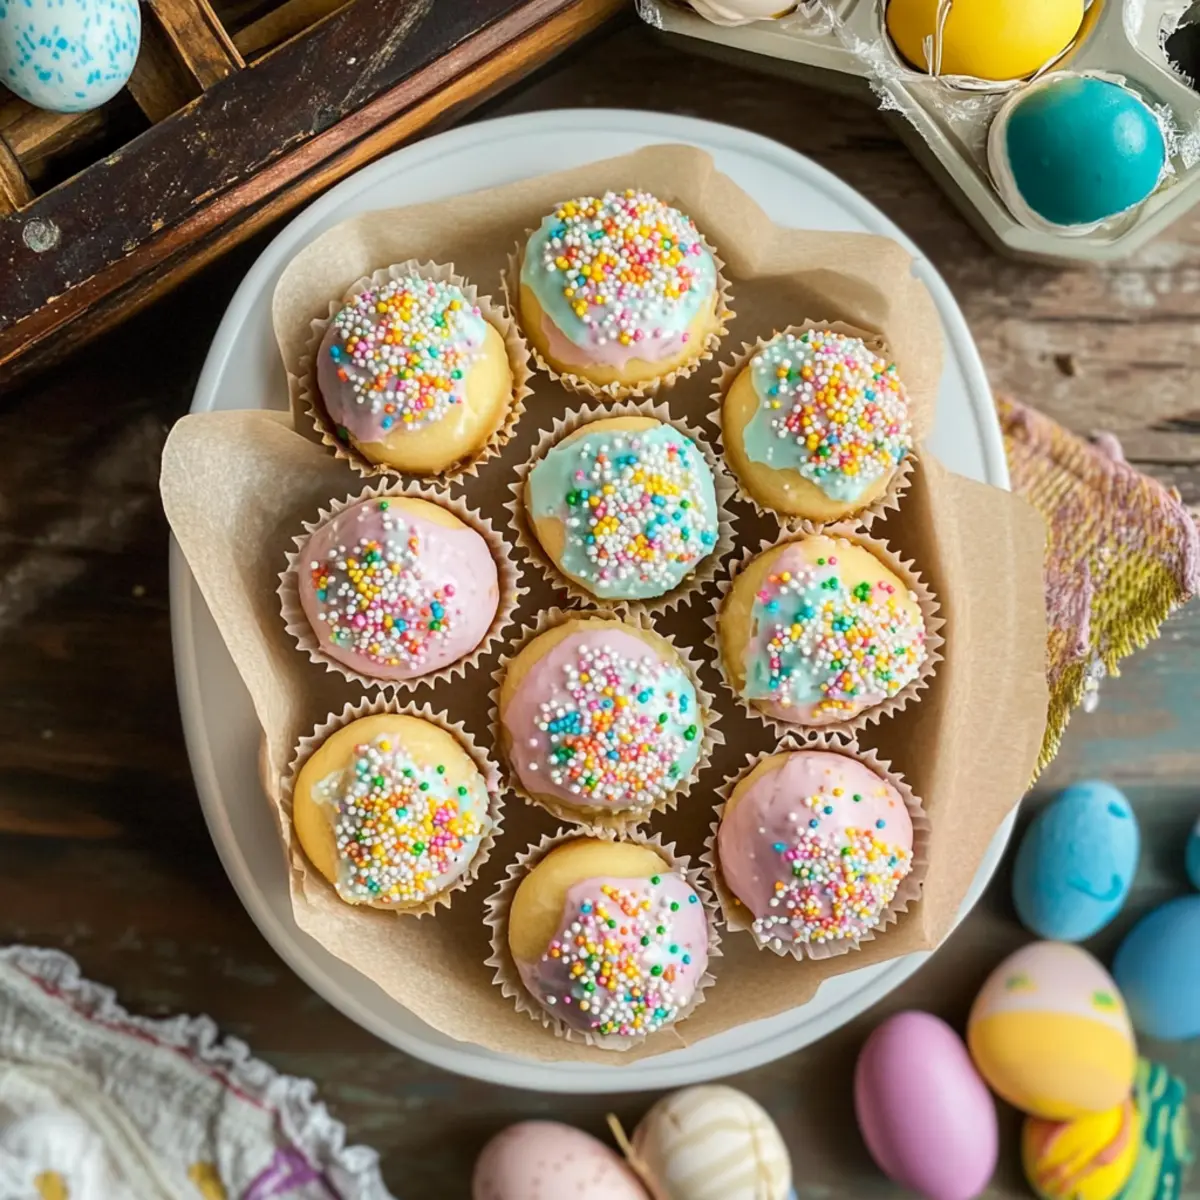
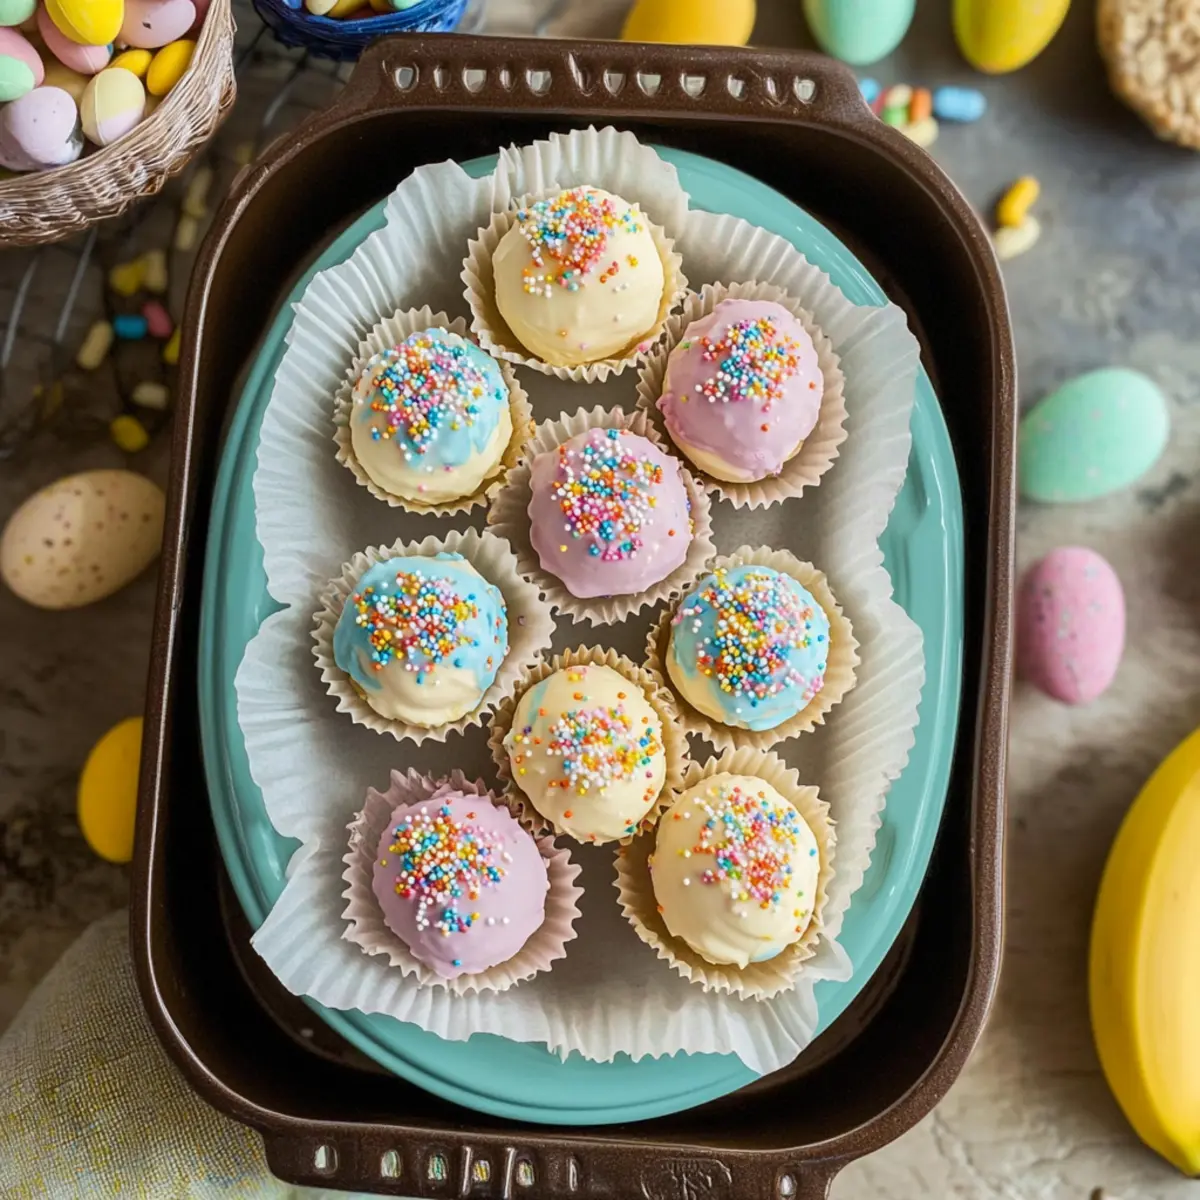
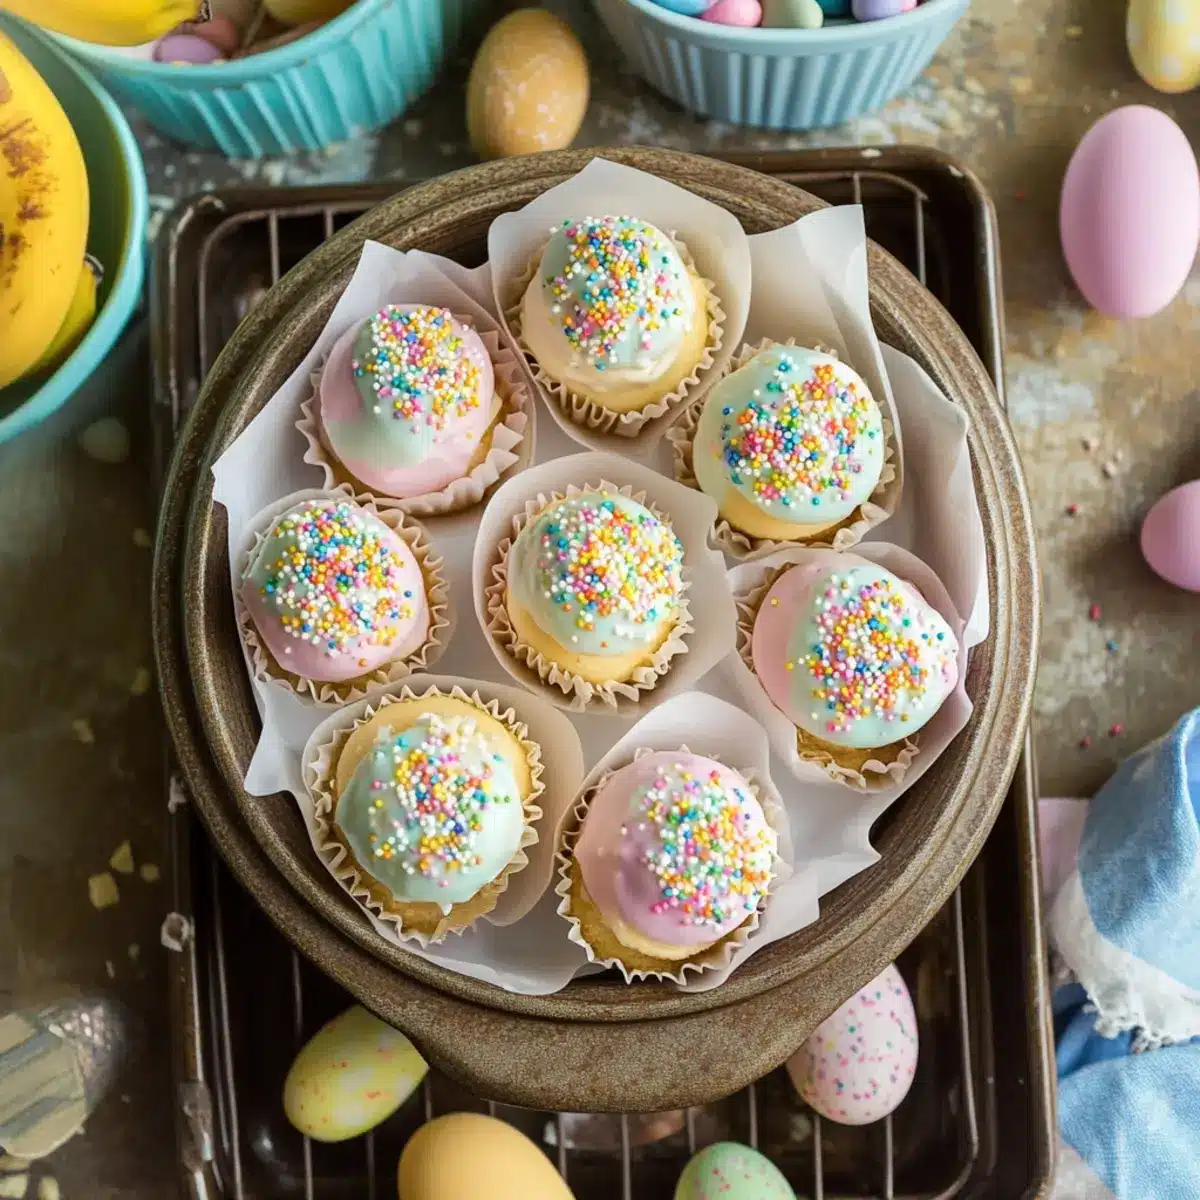
Step 5: Decorate
Before the chocolate coating sets, sprinkle the top of each truffle with crushed vanilla wafers and colorful Easter sprinkles for a festive touch. This step should be done quickly, as the chocolate will firm up within minutes. The decorations will add both visual appeal and an extra crunch to your delightful Banana Pudding Easter Truffles.
Step 6: Set and Serve
Let the decorated truffles set at room temperature for about 15-20 minutes, or place them in the refrigerator for faster firming. You’ll know they are ready when the chocolate has hardened and feels solid to the touch. Once set, serve the truffles as a delightful treat, perfect for celebrating Easter with family and friends!
Storage Tips for Banana Pudding Easter Truffles
Room Temperature: Keep these truffles in a cool, dry place for up to 2 hours. Beyond that, they should be stored in the fridge to maintain freshness.
Fridge: Store truffles in an airtight container for up to 5 days. Make sure they’re not in direct sunlight, as this can cause the coating to melt.
Freezer: For longer storage, freeze truffles in a single layer on a baking sheet for about 1 hour, then transfer to an airtight container or freezer bag. They can be frozen for up to 2 months.
Thawing: When ready to enjoy your Banana Pudding Easter Truffles, simply transfer them from the freezer to the fridge to thaw for a few hours before serving.
Banana Pudding Easter Truffles Variations
Feel free to get creative with these Banana Pudding Easter Truffles and make them your own!
-
Chocolate Banana Truffles: Swap the white chocolate for milk or dark chocolate for a richer flavor. The chocolatey coat elevates the experience, making every bite feel indulgent and luxurious.
-
Coconut Banana Truffles: Roll the coated truffles in shredded coconut for a tropical twist. This adds a chewy texture that beautifully complements the creamy filling.
-
Peanut Butter Banana Truffles: Add 2 tablespoons of peanut butter into the filling before shaping the truffles. The combination of banana and peanut butter is a match made in heaven!
-
Mint Banana Truffles: Incorporate a drop of mint extract into the melted chocolate for a refreshing kick. The minty flavor will surprise and delight everyone at your Easter gathering.
-
Almond Vanilla Truffles: Replace vanilla extract with almond extract to give the truffles a nutty flavor. This small change provides a wonderful depth and new dimension to classic banana pudding.
-
Nutty Crunch Truffles: Mix in crushed nuts into the truffle mixture for added crunch. Pecans or walnuts would give a delightful texture contrast as you savor each bite.
-
Colorful Fruity Surprise: Add a handful of mini chocolate chips or dried fruits like cranberries or cherries into the mixture for a sweet surprise in every truffle. That’s a delicious way to give your truffles a fruity lift.
-
Pastel Chocolate Coating: Use natural food colorings to tint your chocolate coating in pastel shades before dipping the truffles. This makes them visually striking and festive, perfect for Easter celebrations. Enhance the appeal of your desserts while keeping them fun for kids and adults alike!
For another delicious treat to enjoy, I’ve got a lovely recipe for Pumpkin Spice Pudding that’s also kid-friendly!
Expert Tips for Banana Pudding Easter Truffles
-
High-Quality Mix: Use a premium banana pudding mix to maximize flavor. This makes a noticeable difference in your truffles’ taste.
-
Chill Time: Don’t skip the chilling step! Chilling the truffles for 30-45 minutes helps them hold their shape when coating.
-
Gentle Melting: Melt chocolate slowly and gently to prevent seizing. Stir frequently to achieve that perfectly smooth consistency.
-
Creative Coatings: Experiment with alternative coatings like dark or milk chocolate for a richer experience. Each variation can alter the flavor profile significantly.
-
Texture Boost: Consider adding crushed nuts or shredded coconut on top for an added crunch. This enhances the visual appeal and leaves a delightful texture in every bite.
Make Ahead Options
These Banana Pudding Easter Truffles are perfect for busy home cooks looking to save time! You can prepare the truffle mixture up to 24 hours in advance; simply follow the mixing instructions and refrigerate it tightly wrapped. The truffle balls can be shaped and chilled for up to 3 days before coating. To maintain their quality, keep them in an airtight container to prevent drying out. When you’re ready to serve, just dip them in the melted chocolate, decorate with sprinkles, and let them set—offering a delightful, homemade treat with minimal last-minute effort! With these make-ahead tips, you’ll impress your guests without the stress.
What to Serve with Banana Pudding Easter Truffles?
There’s something magical about creating a complete feast, especially when these tempting truffles steal the show!
- Fresh Fruit Salad: Bright and refreshing, a medley of seasonal fruits balances the sweetness of the truffles and adds a splash of color to your table.
- Creamy Vanilla Ice Cream: A scoop of velvety ice cream pairs perfectly with the rich flavors of the truffles, creating a delightful contrast in textures.
- Chocolate-Covered Strawberries: Indulge in these elegant bites that complement the banana notes in the truffles, making for a decadent dessert experience.
- Easter-themed Cookies: These whimsical treats offer a playful addition to the dessert spread, keeping the festive spirit alive for both kids and adults alike.
- Mint Lemonade: This refreshing drink not only quenches the thirst but also adds a hint of zing, perfectly countering the sweetness of your truffles.
- Coffee or Espresso: The bold flavors of a well-brewed cup create a lovely, adult-oriented pairing, enhancing the cozy vibes of your dessert moment.

Banana Pudding Easter Truffles Recipe FAQs
What type of banana pudding mix should I use?
I recommend using a high-quality banana pudding mix, as this will significantly enhance the flavor of your truffles. Look for well-known brands that offer rich, authentic banana flavor without any artificial aftertaste.
How should I store the truffles?
Store your Banana Pudding Easter Truffles in an airtight container. They will last up to 5 days in the refrigerator. If you keep them at room temperature, they should be consumed within 2 hours to prevent the chocolate coating from melting.
Can I freeze the truffles, and if so, how?
Absolutely! To freeze your truffles, place them in a single layer on a baking sheet lined with parchment paper and freeze for about 1 hour. Once firm, transfer them to an airtight container or a freezer bag. They can be stored this way for up to 2 months. When you’re ready to enjoy them, thaw in the fridge for a few hours.
What should I do if my chocolate coating is not smooth?
If your chocolate isn’t melting smoothly, it might be seizing due to heat. To fix this, you can add a small amount of vegetable oil or shortening to the chocolate while melting. Stir frequently and melt in shorter intervals to avoid overheating. Don’t hesitate to start again with new chocolate if it gets too thick or gritty.
Are there any dietary concerns with this recipe for pets or allergies?
When making Banana Pudding Easter Truffles, be cautious with any ingredients, especially for those with nut allergies or lactose intolerance. For pets, avoid sharing these treats, especially due to the chocolate and cream cheese, which can be harmful to them. Always double-check food labels for potential allergens before making the truffles.
Can I modify the recipe for a different flavor?
Yes! You can easily customize the flavor of your truffles. For instance, try adding 2 tablespoons of peanut butter to the filling for a richer taste or use dark chocolate for a bolder coating. Alternatively, a drop of mint extract mixed into the chocolate coating can give your truffles a refreshing twist. Feel free to experiment!
Banana Pudding Easter Truffles: Your New Favorite No-Bake Treat
Ingredients
Equipment
Method
- In a large mixing bowl, combine 1 and ½ cups of crushed vanilla wafers, 8 ounces of softened cream cheese, 1 package of dry banana pudding mix, ¼ cup of milk, and 1 teaspoon of vanilla extract. With an electric mixer, beat until smooth and well-combined, resembling a thick dough. This takes about 3-5 minutes, and you'll know it's ready when it pulls away from the sides of the bowl.
- Using a tablespoon, scoop out portions of the mixture and roll them into smooth balls, about 1 inch in diameter. Place each truffle on a parchment-lined baking sheet, ensuring they have some space between them. Once all the mixture is shaped, refrigerate the truffles for 30-45 minutes to firm up.
- In a microwave-safe bowl, add 1 cup of white chocolate chips or candy melts. Heat in the microwave in 30-second intervals, stirring between each session until fully melted and smooth. This should take about 1-2 minutes total.
- Carefully remove the chilled truffles from the refrigerator. Using a fork or skewer, dip each truffle into the melted chocolate, ensuring it's fully coated. Lift it out, gently shaking off any excess chocolate before placing it back on the parchment paper.
- Before the chocolate coating sets, sprinkle the top of each truffle with crushed vanilla wafers and colorful Easter sprinkles for a festive touch.
- Let the decorated truffles set at room temperature for about 15-20 minutes, or place them in the refrigerator for faster firming.
Leave a Reply