
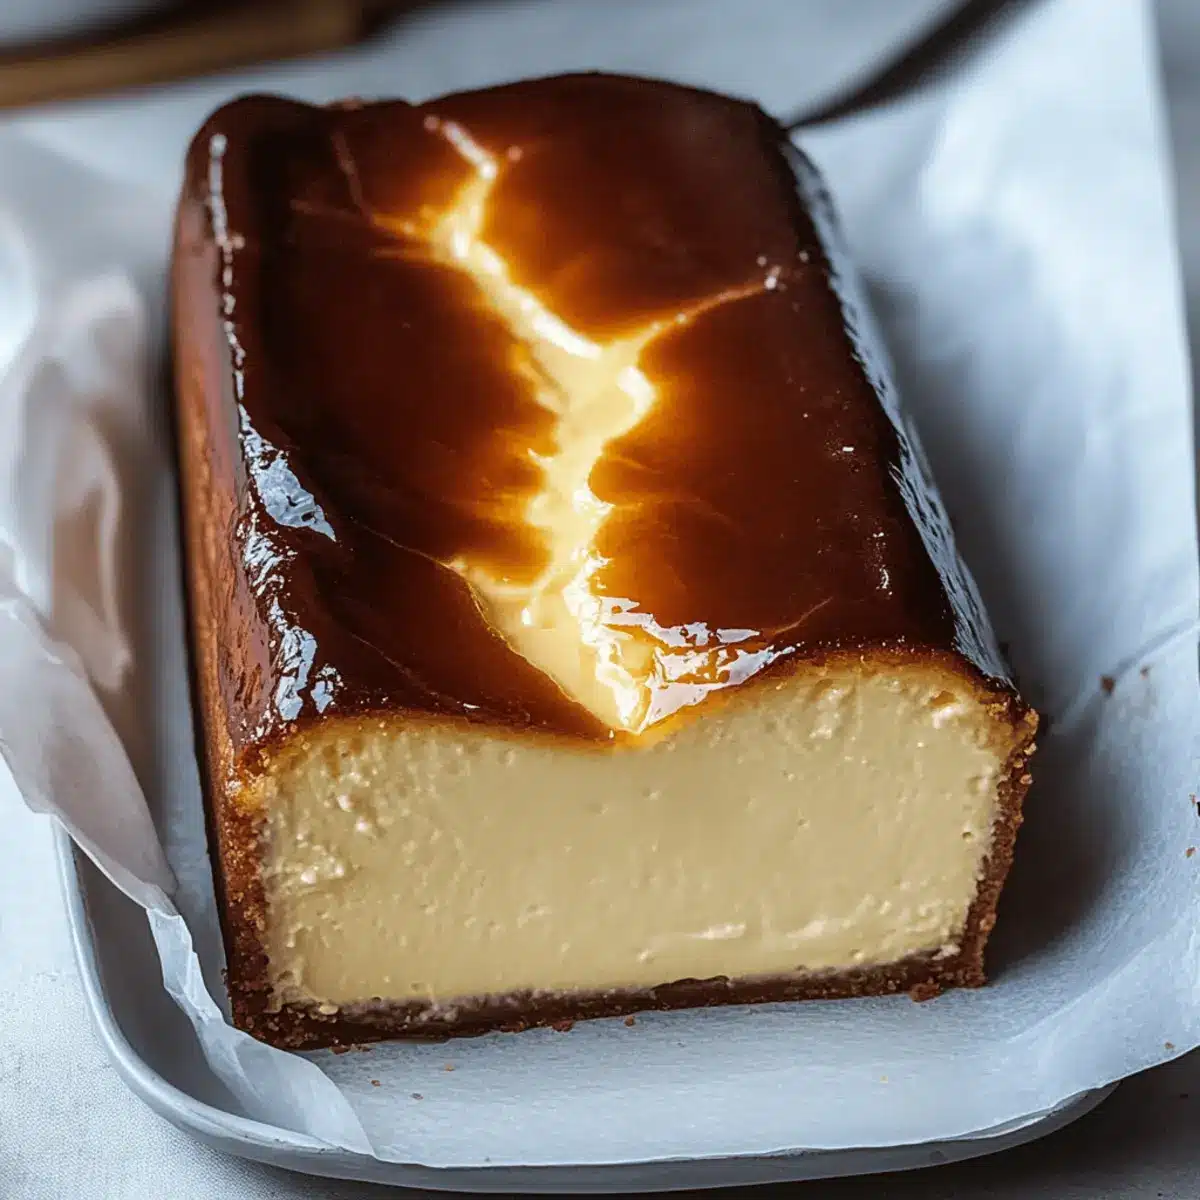
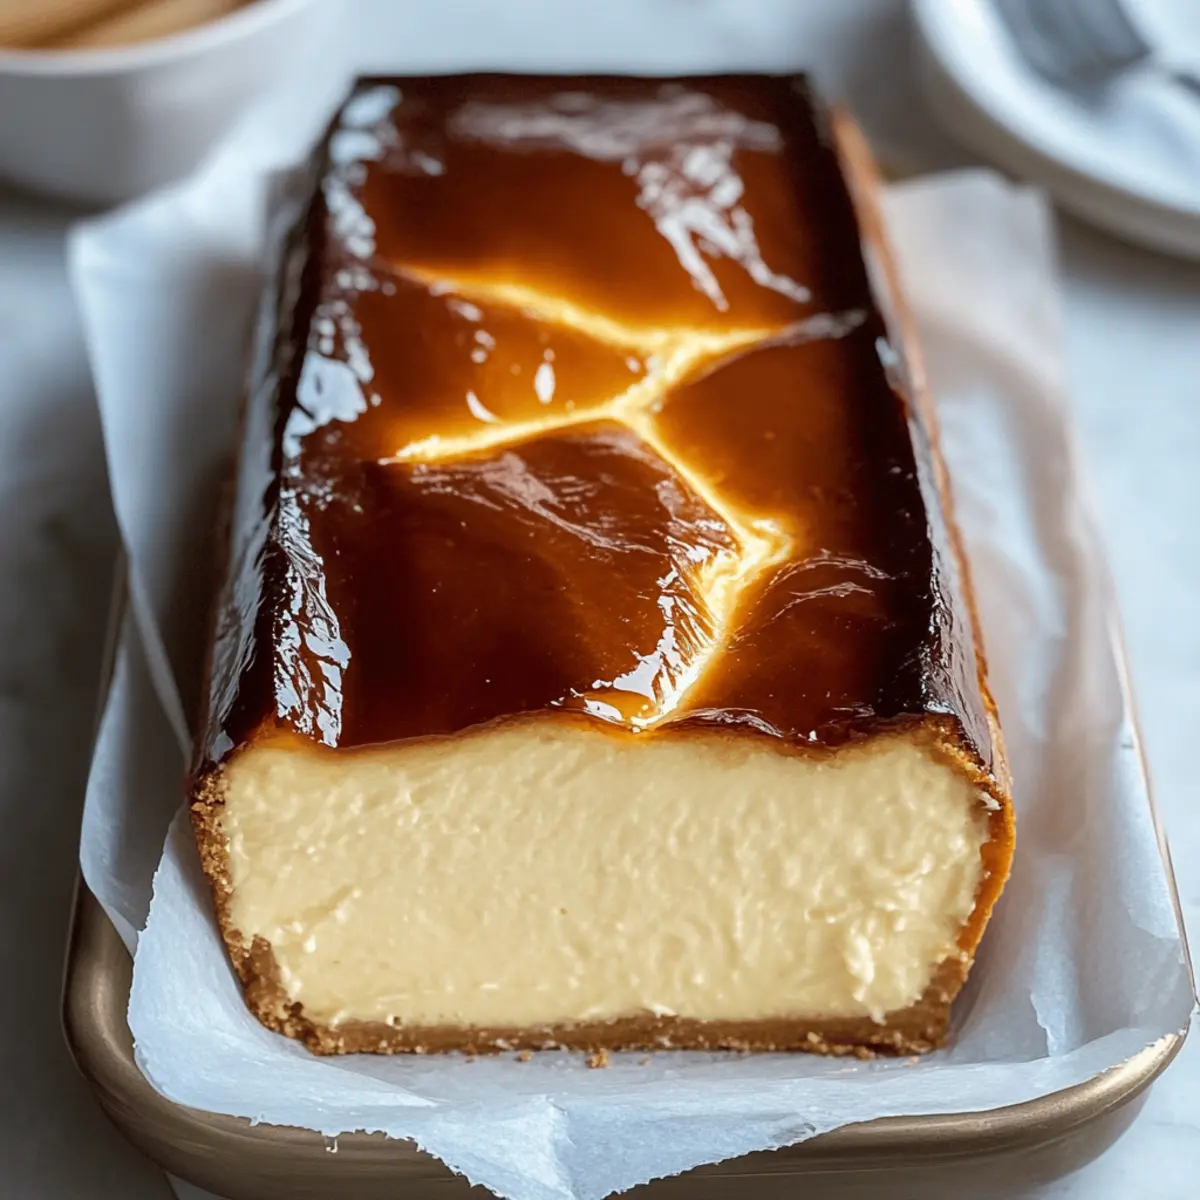
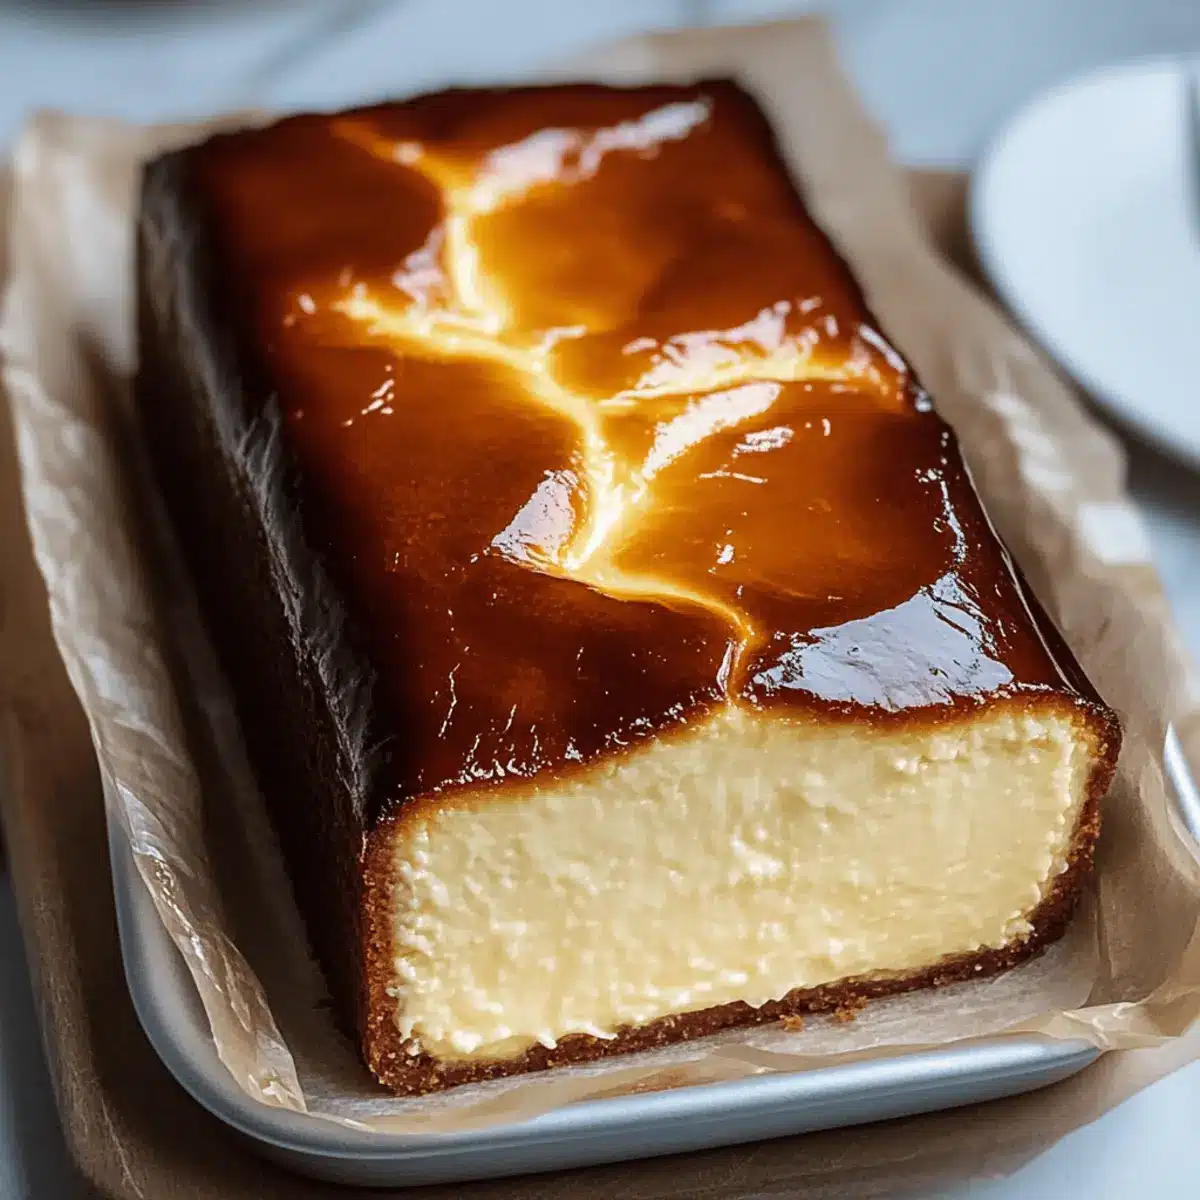
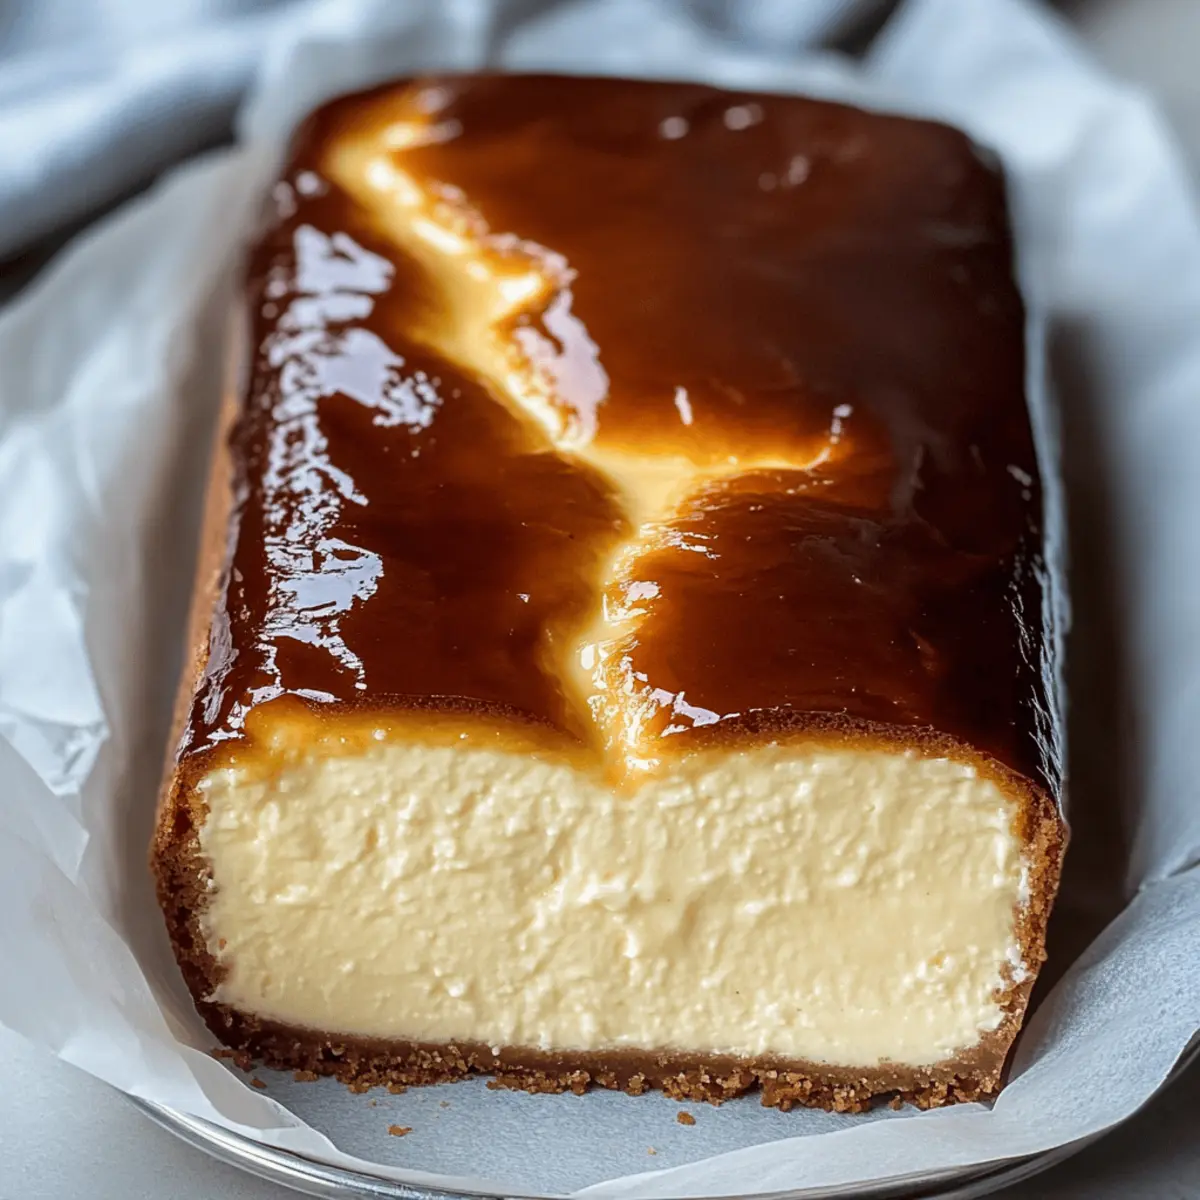
There’s something magical about the simplicity of a delicious dessert that looks impressive without demanding hours in the kitchen. Enter the Easy Burnt Basque Cheesecake in a Loaf Pan—your new go-to recipe for satisfying that sweet tooth with minimal fuss. This decadent treat brings together a rich, creamy interior with a beautifully charred top, perfectly showcasing that rustic charm we all love. Plus, it’s beginner-friendly and low-effort, making it an ideal choice for both seasoned bakers and those just starting out. Whether you’re planning a cozy dinner or simply craving a slice of something sweet, this cheesecake adapts to your dietary preferences without sacrificing taste. Will you be tempted to add a twist with fresh berries or a drizzle of caramel? Let’s dive into the details!
Why is this cheesecake so special?
Simplicity at its finest: This Burnt Basque Cheesecake is made in a loaf pan, eliminating complicated techniques and still delivering that wow factor!
Rich, creamy layers: The decadent filling contrasts beautifully with the caramelized top, creating an irresistible flavor profile.
Limitless versatility: Feel free to add citrus zest or flavored extracts to customize the taste to your liking.
Perfect for any occasion: Whether it’s a casual family dinner or a fancy gathering, this dessert is sure to impress and satisfy all your guests.
Time-saving: With just a few ingredients and straightforward steps, you’ll have a show-stopping dessert ready to enjoy in no time!
Crowd-pleaser: This beloved classic will leave everyone craving more—just cut into thick slices or elegant rectangles and watch it disappear!
Burnt Basque Cheesecake Ingredients
For the Cheesecake
• Cream Cheese – Ensures a luscious, creamy texture; always soften before mixing for optimal results.
• Granulated Sugar – Sweetens the cheesecake and aids in creating a smooth texture.
• Eggs – Essential for binding ingredients; using room temperature eggs facilitates better incorporation.
• Heavy Cream – Adds richness and enhances the creamy consistency; opt for full-fat for best flavor.
• All-Purpose Flour – Provides a bit of structure, balancing the creaminess to prevent it from being too soft.
• Salt – Enhances the overall flavor while balancing the sweetness wonderfully.
• Vanilla Extract – Infuses aromatic warmth, elevating the flavor profile.
For the Pan Setup
• Butter/Parchment Paper – Grease the pan well and line it with parchment, ensuring easy removal and an appealing rustic look.
This Burnt Basque Cheesecake recipe, made in a loaf pan, is so accessible yet delivers a high-reward dessert that will impress everyone at your table!
Step‑by‑Step Instructions for Burnt Basque Cheesecake
Step 1: Preheat and Prepare the Pan
Begin by preheating your oven to 400°F (205°C). While it heats up, take a standard loaf pan and generously grease it with butter. Line the pan with parchment paper, allowing it to overhang the edges. This will make removal easy later and adds to the rustic charm of your Burnt Basque Cheesecake.
Step 2: Beat the Cream Cheese
In a large mixing bowl, add the softened cream cheese. Using an electric mixer, beat it on medium speed until smooth and creamy, about 2-3 minutes. You’ll want a velvety texture without any lumps, so be patient and scrape down the sides of the bowl as needed to ensure even mixing.
Step 3: Incorporate the Sugar
Gradually add the granulated sugar to the creamy mixture, continuing to beat on medium speed for an additional 2-3 minutes. The mixture should become fluffy and light, indicating that the sugar has fully dissolved into the cream cheese. This step is crucial for achieving the perfect texture for your Burnt Basque Cheesecake.
Step 4: Add the Eggs
One by one, add the room temperature eggs, mixing well after each addition. Allow each egg to be fully incorporated before adding the next, this will help bind the ingredients together, ensuring a smooth and stable cheesecake. Aim for a uniform batter that is well combined without overmixing.
Step 5: Mix in Vanilla and Cream
Once the eggs are fully combined, add the vanilla extract and salt, mixing until just incorporated. Slowly pour in the heavy cream while continuing to beat on low speed. This addition enriches the cheesecake’s creamy consistency, resulting in a luxuriously smooth batter.
Step 6: Fold in the Flour
Sift the all-purpose flour over the batter and gently fold it in with a spatula until just combined. Make sure not to overmix, as this could lead to a denser texture. The batter should be thick yet smooth, indicating that your Burnt Basque Cheesecake is ready for the next step.
Step 7: Pour the Batter
Carefully pour the cheesecake batter into the prepared loaf pan. Tap the pan gently on your countertop to release any trapped air bubbles, promoting an even bake. The generous volume and rustic appearance will make your Burnt Basque Cheesecake a true showstopper once it’s baked.
Step 8: Bake to Perfection
Place the loaf pan in the preheated oven and bake for 45-50 minutes. You’ll know it’s done when the top is deeply caramelized and dark brown, while the center still jiggles slightly when gently shaken. This textural contrast is key to the classic Burnt Basque Cheesecake experience.
Step 9: Cool and Chill
Remove the cheesecake from the oven and let it cool in the pan for about 30 minutes. Afterward, refrigerate it for a minimum of 4 hours, allowing the flavors to develop and set. This chilling period is essential for achieving that perfect creamy texture when slicing into your delicious dessert.
What to Serve with Burnt Basque Cheesecake
Elevate your dessert experience with delightful pairings that beautifully complement the rich flavors of this rustic cheesecake.
- Fresh Berries: Their bright acidity provides a refreshing contrast to the creamy cheesecake, cutting through the richness with every bite.
- Whipped Cream: Light and airy, a dollop of freshly whipped cream adds a touch of indulgence without overwhelming the cheesecake’s flavors.
- Caramel Sauce: Drizzling warm caramel over the cheesecake enhances its sweetness and adds a luscious depth, creating an irresistible combination.
- Zesty Citrus Salad: A refreshing mix of citrus fruits brings brightness and balance, offering a delightful tangy twist after the creamy dessert.
- Espresso or Coffee: The bold, rich flavors from a good cup of coffee perfectly counterpoint the creamy cheesecake, making for a cozy pairing.
- Dark Chocolate Shavings: Sprinkling some finely grated dark chocolate on top adds a touch of elegance while its bitterness gives contrast to the sweet cheesecake.
- Toasted Nuts: A handful of toasted nuts such as almonds or pecans introduce satisfying crunch and a lovely nutty flavor that pairs beautifully with the cheesecake’s texture.
- Vanilla Ice Cream: A scoop of creamy vanilla ice cream not only complements the cheesecake but also adds an extra layer of sweet warmth for those indulgent moments.
How to Store and Freeze Burnt Basque Cheesecake
Fridge: Keep your Burnt Basque Cheesecake in an airtight container for up to 5 days. This allows the flavors to deepen, making it taste even better!
Freezer: If you want to store it longer, slice it and wrap individual pieces tightly in plastic wrap, then place them in a freezer-safe bag. It can last for up to 2 months.
Thawing: When ready to enjoy, simply transfer the cheesecake slices to the fridge to thaw overnight, ensuring they maintain their creamy texture.
Reheating: If you prefer your cheesecake slightly warmed, heat a slice in the microwave for about 10-15 seconds—this will enhance its rich, velvety experience!
Make Ahead Options
These Burnt Basque Cheesecakes are perfect for meal prep enthusiasts wanting to save time on busy weeknights! You can prepare the cheesecake batter up to 24 hours in advance; simply mix all ingredients, pour the batter into the prepared loaf pan, and refrigerate it until you’re ready to bake. To maintain quality, ensure the batter is tightly covered to prevent any odors from affecting the flavor. When you’re ready to bake, preheat your oven and place the refrigerated batter directly into the oven, allowing for a delightful treat that tastes just as fresh and creamy as if made the same day. This thoughtful prep will have you serving an impressive dessert with minimal effort!
Helpful Tricks for Burnt Basque Cheesecake
-
Use Room Temperature Ingredients: For a smooth, creamy batter, ensure all ingredients, especially cream cheese and eggs, are at room temperature before mixing.
-
Avoid Overmixing: Gently fold in the flour to keep your cheesecake light and airy. Overmixing can lead to a dense texture that detracts from that heavenly melt-in-your-mouth experience.
-
Generously Line the Pan: Use enough parchment paper to hang over the sides of the loaf pan. This not only prevents sticking but creates a lovely rustic look when you remove the cheesecake.
-
Monitor Baking Time: Keep an eye on the cheesecake as it bakes. A jiggle in the center is a good sign—overbaking can dry it out and affect its creamy consistency.
-
Chill Before Serving: Patience pays off! Refrigerate the cheesecake for at least 4 hours, or overnight if possible, to enhance flavor and texture, making every bite more delightful.
These simple yet effective tips will help you master the art of making a delightful Burnt Basque Cheesecake that everyone will adore!
Burnt Basque Cheesecake: Exciting Variations Await!
Feel free to explore these creative ideas that allow you to make this delightful cheesecake your own.
-
Citrus Zest: Add a fresh twist by mixing in zest from lemon or orange for a bright flavor burst. The citrus notes elevate the richness of the cheesecake beautifully!
-
Flavored Extracts: Swap vanilla extract for almond or coffee to create a unique taste profile. Each extract brings its own personality, making the cheesecake wonderfully versatile.
-
Berry Topping: Serve with fresh berries or a berry compote for a pop of color and flavor. The tartness beautifully contrasts the creamy richness, making each bite an explosion of delight!
-
Nutty Crunch: Mix in some crushed nuts like pecans or almonds into the batter for added texture. This delightful crunch pairs exquisitely with the cheesecake’s creamy smoothness, creating an irresistible experience.
-
Chocolate Drizzle: Drizzle melted chocolate over the cooled cheesecake or mix in cocoa powder for a chocolate lover’s twist. This adds a decadent touch that chocolate aficionados won’t be able to resist!
-
Caramel Swirl: Fold in some caramel sauce before baking for a sweet surprise. A heavenly caramel flavor will enrich the cheesecake, taking it to a whole new level of indulgence!
-
Spicy Kick: Introduce a pinch of cayenne pepper or cinnamon to add warmth and depth. This unexpected element elevates the flavor profile, making the cheesecake an exciting dessert choice.
Remember, the beauty of the Burnt Basque Cheesecake is its simplicity, which allows for endless customization. Whether you fancy a classic vanilla or want to try something adventurous, your taste buds are in for a treat! If you enjoy baking with unique flavors, you might also love to explore our Delicious Citrus Cheesecake or our Decadent Chocolate Cake recipes. Happy baking!
Burnt Basque Cheesecake Recipe FAQs
How do I choose the right cream cheese for my cheesecake?
Absolutely! When selecting cream cheese, look for a block variety rather than spreadable cream cheese, as it contains less moisture, giving your cheesecake a richer texture. Be sure to check the expiration date and opt for a full-fat option—this ensures maximum creaminess and flavor, and room temperature is crucial for smooth mixing.
How should I store my Burnt Basque Cheesecake?
You’ll want to keep your cheesecake stored in an airtight container in the refrigerator for up to 5 days. This can enhance the creaminess and deepen flavors. If you make it a day ahead, it will taste even better! Just remember to slice it before refrigerating to allow chilling of individual pieces.
Can I freeze my Burnt Basque Cheesecake?
Very! For longer storage, slice your cheesecake into portions and wrap each piece tightly in plastic wrap. Place the wrapped slices in a freezer-safe bag or container, and they can last for up to 2 months. When you’re ready to enjoy it, simply transfer the slices to the refrigerator to thaw overnight.
What should I do if my cheesecake cracks on top?
Don’t worry! A few cracks are perfectly normal and don’t affect the taste. To help prevent this, ensure you don’t overmix your batter and avoid opening the oven door too often while baking. If it does crack, you can always serve it with a dollop of whipped cream or fresh fruit to cover it up and add a delightful touch!
Are there any dietary considerations I should be aware of?
Yes, it’s important to consider allergies or dietary restrictions. This cheesecake contains gluten due to the all-purpose flour and dairy products, so feel free to substitute with gluten-free flour and vegan cream cheese if needed. Always check with your guests before serving to accommodate any allergies.
How long should I let my cheesecake cool before refrigerating?
Let your Burnt Basque Cheesecake cool in the pan for about 30 minutes before transferring it to the refrigerator. This cooling period helps set the texture, and chilling for at least 4 hours (or preferably overnight) ensures it’s perfectly creamy and ready to slice.
Burnt Basque Cheesecake: Easy Loaf Pan Delight to Savor
Ingredients
Equipment
Method
- Preheat your oven to 400°F (205°C) and grease the loaf pan with butter. Line the pan with parchment paper, allowing it to overhang.
- In a large bowl, beat the softened cream cheese on medium speed until smooth and creamy, about 2-3 minutes.
- Gradually add the granulated sugar, beating for an additional 2-3 minutes until fluffy.
- Add the eggs one at a time, mixing well after each addition until fully incorporated.
- Mix in the vanilla extract and salt, then slowly pour in the heavy cream while beating on low speed.
- Sift the all-purpose flour over the batter and fold in gently until just combined.
- Pour the cheesecake batter into the prepared loaf pan and gently tap to release air bubbles.
- Bake in the preheated oven for 45-50 minutes until the top is caramelized and dark brown with a jiggly center.
- Let the cheesecake cool in the pan for 30 minutes, then refrigerate for a minimum of 4 hours before slicing.
Leave a Reply