
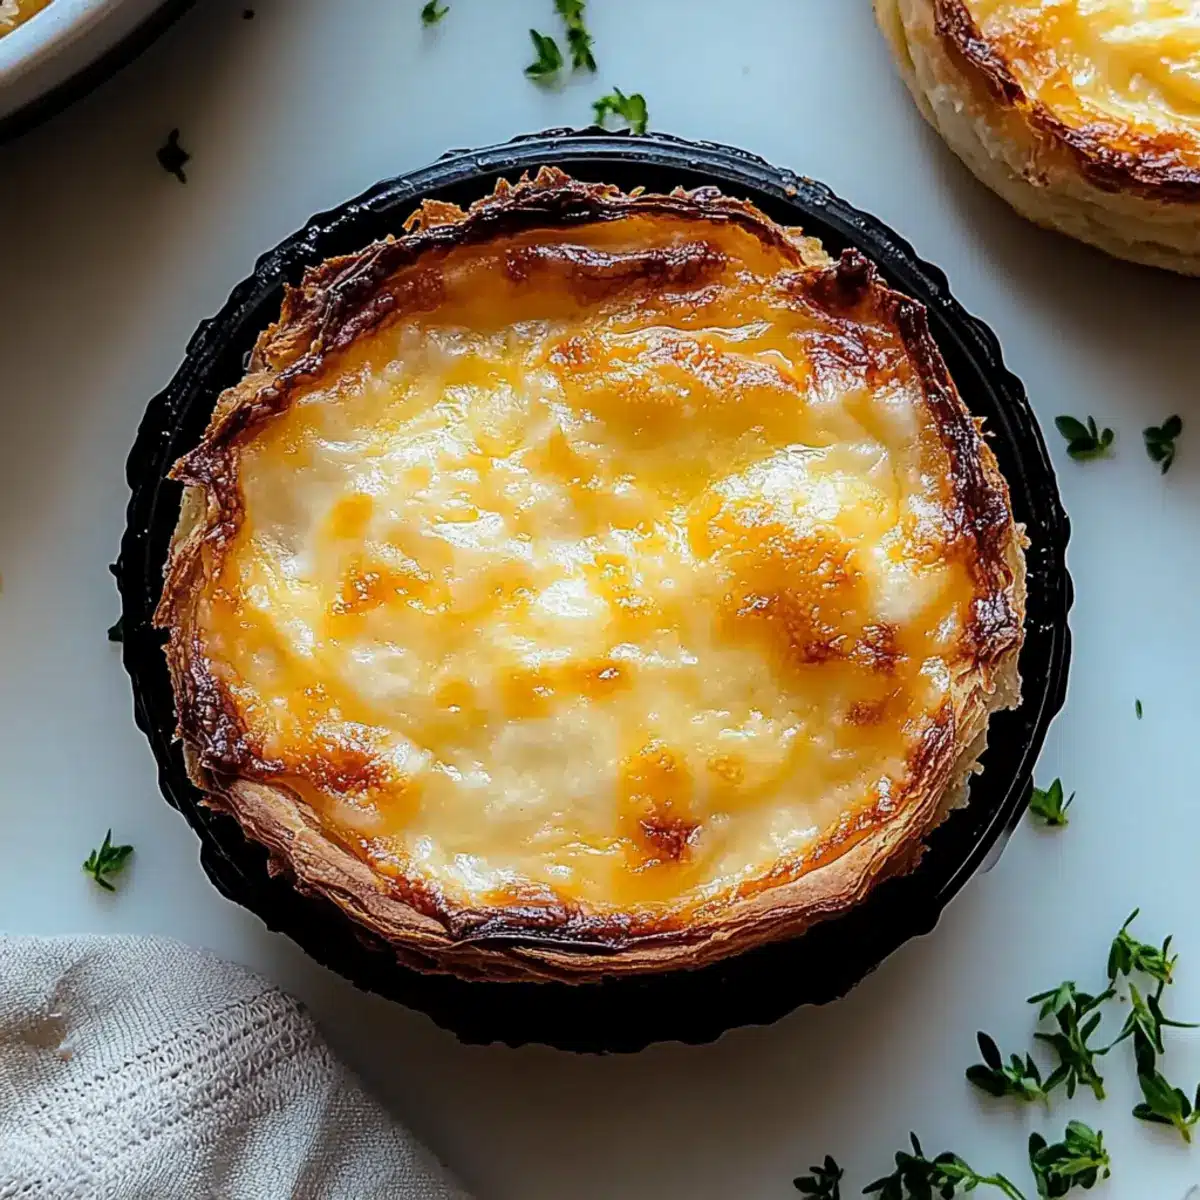
The aroma wafting from my kitchen was nothing short of a culinary embrace; it was just the right moment for a crunchy yet cheesy delight—the Cheesy Garlic Cruffin. These flaky, savory creations take snacking to a whole new level, with melted cheese and aromatic garlic combining for the perfect indulgent treat. Whether you’re hosting a casual brunch or simply craving a comforting lunch that feels special, this recipe hits the sweet spot between decadence and simplicity. Not only are they quick to whip up, but they also promise to please even the pickiest of eaters. Ready to elevate your kitchen game and make your taste buds dance? Let’s dive into the delicious world of cruffins!
Why Are Cheesy Garlic Cruffins Irresistible?
Savory Delight: These cruffins are a glorious union of flaky pastry and rich, gooey cheese. Each bite bursts with that beloved garlic flavor, making them an unforgettable experience.
Effortless Prep: You don’t have to be a baking pro; this recipe is simple and quick, so you can enjoy gourmet taste without the fuss.
Crowd-Pleasing: Perfect for gatherings—everyone loves their cheesy allure, whether served with a side of Country French Garlic soup or as a savory brunch treat!
Versatile Options: Feel free to switch up the cheeses or add herbs to make them uniquely yours. Want a heartier option? Toss in some cooked bacon bits for an indulgent twist!
Ideal Snack or Lunch: These cruffins are perfect for any occasion, whether as a midday treat or a comforting meal paired with a salad.
Get ready to impress your friends and family with these delightful bites!
Cheesy Garlic Cruffin Ingredients
For the Dough
- All-purpose flour – Essential for structure and body, creating the perfect cruffin base.
- Granulated sugar – Adds a hint of sweetness to balance the savory flavors; sugar substitutes can work if needed.
- Salt – Enhances overall flavor; no substitutes recommended to maintain taste.
- Instant yeast – Key for dough rising and achieving lightness; use fresh yeast for optimal results.
- Warm milk – Hydrates the yeast for activation; plant-based milk is a suitable alternative.
- Unsalted butter (melted) – Infuses richness into the dough; coconut oil can provide a lighter option.
- Warm water – Essential for dough formation; make sure it’s warm, not hot, to activate the yeast effectively.
- Large egg – Binds and enriches the dough; consider flaxseed meal as an egg substitute for an egg-free option.
For the Filling
- Grated Parmesan cheese – Imparts a salty, nutty flavor; try pecorino for a different twist or nutritional yeast for a dairy-free option.
- Shredded mozzarella cheese – Delivers that gooey, melty goodness; cheddar can be swapped in for a sharper taste.
- Minced garlic – Provides robust, aromatic flavor; feel free to adjust the amount to your liking.
- Softened unsalted butter – Vital for the garlic filling; olive oil can replace it for a dairy-free version.
- Fresh parsley (chopped) – Adds a burst of freshness and color; can be omitted if not on hand.
With these ingredients, you’re on your way to creating the ultimate Cheesy Garlic Cruffin, a savory delight that is sure to impress!
Step‑by‑Step Instructions for Cheesy Garlic Cruffin
Step 1: Prepare the Dough
In a large mixing bowl, combine 3 cups of all-purpose flour, 1 tablespoon of granulated sugar, 1 teaspoon of salt, and 2 teaspoons of instant yeast. Whisk these dry ingredients together until evenly mixed. Create a well in the center and pour in 1 cup of warm milk, 1/4 cup of melted unsalted butter, 1/4 cup of warm water, and 1 large egg. Stir until a shaggy dough forms.
Step 2: Knead the Dough
Transfer the shaggy dough onto a lightly floured surface and knead for about 8–10 minutes until it becomes smooth and elastic. If the dough feels sticky, sprinkle a little more flour as needed. To check if it’s ready, perform the “windowpane test”—stretch a small piece of dough gently; it should hold together without tearing.
Step 3: Let It Rise
Place the kneaded dough into a lightly greased bowl, cover with a damp cloth, and let it rise in a warm area for about 1 hour, or until it has doubled in size. This allows the yeast to work its magic, creating that fluffy texture in your Cheesy Garlic Cruffin.
Step 4: Prepare the Filling
While the dough rises, mix 1/4 cup of softened unsalted butter, 4 cloves of minced garlic, and 1 tablespoon of chopped fresh parsley in a small bowl. Stir until well combined, creating a fragrant garlic butter filling that will enhance the savory experience of the Cheesy Garlic Cruffin.
Step 5: Preheat and Grease
Preheat your oven to 375°F (190°C) and lightly grease a standard muffin tin with non-stick spray. This ensures that your Cheesy Garlic Cruffin comes out easily after baking without any mess. Have your ingredients handy to keep the flow smooth.
Step 6: Roll the Dough
After the dough has risen, gently punch it down to release the air. Roll it out on a floured surface into a rectangle approximately 1/4 inch thick. This shape allows you to spread the garlic filling evenly and makes it easier to create those delightful layers in the cruффин.
Step 7: Spread the Filling
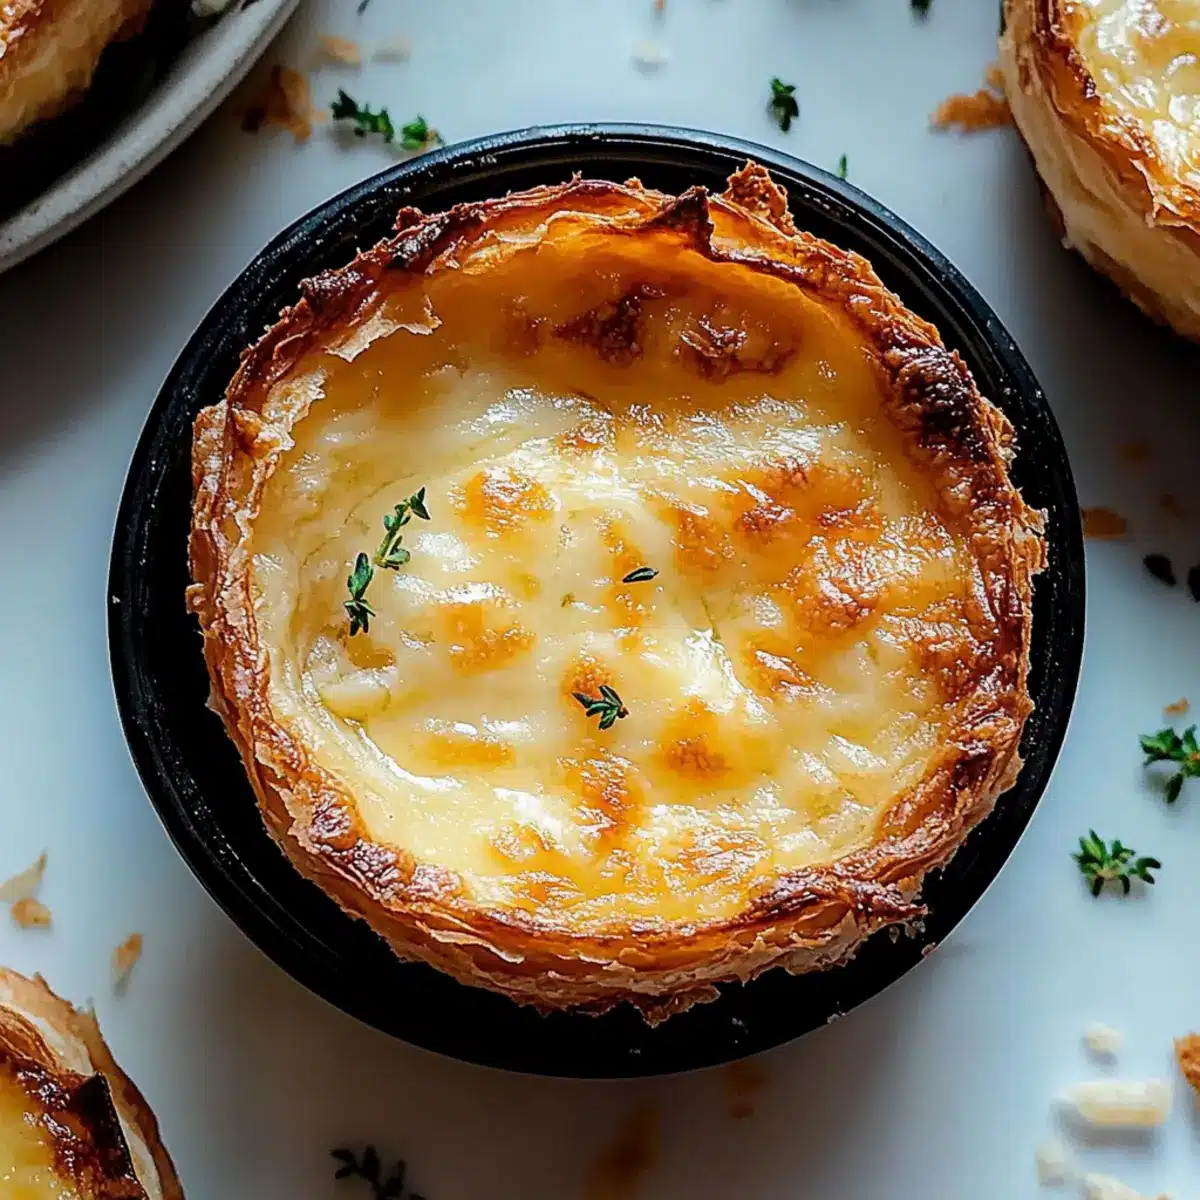
Spread the garlic butter mixture evenly over the rolled-out dough, leaving a small border around the edges for easy rolling. Then, sprinkle a generous amount of grated Parmesan and shredded mozzarella cheeses on top. This combination will melt and create that gooey interior we all love in a Cheesy Garlic Cruffin.
Step 8: Roll and Cut
Starting from one edge, roll the dough tightly into a log shape. Once rolled, slice the log into 8–10 equal portions using a sharp knife. These portions will form the individual Cheesy Garlic Cruffin, ready to rise again in the muffin pan.
Step 9: Arrange in Muffin Tin
Place each rolled slice vertically into the prepared muffin cups, allowing a little space between them. Cover lightly and let them rest for an additional 20 minutes to slightly rise and gain even more fluffiness before baking.
Step 10: Bake
Carefully transfer the muffin tin to your preheated oven and bake for 20–25 minutes, or until the tops are golden brown and the cheese is bubbly. The delicious aroma of garlic and cheese filling your kitchen will be irresistible—watch for those crispy edges!
Step 11: Cool and Serve
Once baked, remove the Cheesy Garlic Cruffin from the oven and let them cool in the tin for a few minutes. Gently lift them out, allowing them to cool slightly on a wire rack. Serve warm for the most delightful cheesy experience, perfect for snacking or a savory lunch treat!
Expert Tips for Cheesy Garlic Cruffin
Temperature Check: Ensure your ingredients, especially the yeast, are at room temperature for effective rising—this is crucial for your Cheesy Garlic Cruffin.
Kneading Know-How: Avoid over-kneading the dough, as this can lead to a tough texture. Aim for smooth and elastic!
Rest Period: Allow your cruffins to rest for about 20 minutes before baking to achieve that perfect fluffy texture and rise beautifully.
Cooling Time: Let the cruffins cool slightly after baking to maintain their structure and avoid burns from the gooey cheese—patience is a virtue!
Filling Variation: Don’t hesitate to experiment with different cheeses or add ins like crispy bacon bits or fresh herbs for a fun twist on the classic Cheesy Garlic Cruffin!
Make Ahead Options
These Cheesy Garlic Cruffins are perfect for meal prep! You can prepare the dough up to 24 hours in advance: just follow the kneading Steps 1 and 2, then cover the dough and refrigerate it. For the filling, mix your garlic butter and refrigerate it in an airtight container for up to 3 days, ensuring freshness and flavor. When you’re ready to bake, simply take the cold dough out, roll it out, spread the filling, cut, and allow to rise as instructed in Steps 8 and 9. This way, you’ll have fresh, cheesy goodness with less fuss, offering that delightful homemade touch whenever you need it!
What to Serve with Cheesy Garlic Cruffin
There’s nothing quite like a warm, cheesy treat that beckons to be paired with delightful sides to elevate your meal experience.
-
Tomato Soup: The classic pairing provides a comforting, tangy contrast to the rich flavors of the cruffins, creating a cozy dining experience. This duo is a match made in heaven, especially on a chilly day!
-
Simple Arugula Salad: A fresh, peppery arugula salad with lemon vinaigrette adds brightness and cuts through the indulgence. The lively flavors make it an ideal accompaniment!
-
Herbed Buttered Corn: Sweet, juicy corn brushed with herbed butter offers a delightful crunch that complements the gooey interior of each cruffin. It’s a taste of summer!
-
Garlic Butter Pasta: A light spaghetti tossed in garlic butter mirrors the flavors of the cruffins while adding a satisfying texture. This dish is like a hug for your taste buds.
-
Roasted Vegetables: Seasonal roasted vegetables drizzled with balsamic are both healthy and delicious, providing a contrast of textures and enhancing the cruffin’s savory notes.
-
Glass of Chardonnay: A chilled glass of Chardonnay pairs beautifully, adding a crisp, fruity backdrop that enhances the cheesy richness in your cruffins, making each sip a delight.
-
Chocolate Lava Cake: For dessert, indulge in a rich chocolate lava cake to balance out the garlic and cheese. The warm, gooey center is a perfect sweet finish to a savory meal.
-
Sparkling Water: Keep it refreshing with sparkling water infused with lemon or mint. It cleanses the palate between bites, enhancing the overall dining experience.
Cheesy Garlic Cruffin Variations
Feel free to let your creativity shine as you customize this delightful recipe with these fun twists!
-
Cheese Swaps: Experiment with different cheeses like gouda or provolone for a unique flavor profile that suits your taste.
-
Herb Infusion: Add fresh herbs such as chives, thyme, or basil to the filling for an aromatic lift that will tantalize your senses.
-
Bacon Boost: Incorporate crispy bacon bits into the filling for a smoky, savory punch that pairs beautifully with the cheesy goodness.
-
Spinach Surprise: Mix in some sautéed spinach for a nutritious spin, adding color and a delightful earthiness to your cruffins.
-
Sugar Substitute: If you’re cutting back on sugar, use a sugar alternative like stevia or monk fruit in place of granulated sugar without losing sweetness.
-
Spice it Up: For those who like a kick, sprinkle in some red pepper flakes or diced jalapeños to elevate the heat level of your cruffins.
-
Garlic Lovers: Increase the minced garlic quantity for a more intense flavor if you can’t get enough of that aromatic taste—perfect for garlic enthusiasts!
-
Serve with Style: Pair your cruffins with a bowl of Country French Garlic soup for a comforting meal that’s hard to resist, or enjoy them alongside a fresh salad for balance.
Customize your Cheesy Garlic Cruffin adventure and savor each delightful variation!
How to Store and Freeze Cheesy Garlic Cruffin
Room Temperature: Store leftover cruffins in an airtight container at room temperature for up to 2 days to keep them fresh and flaky.
Fridge: For longer storage, refrigerate them in an airtight container for up to 1 week. Reheat in the oven for a few minutes to revive their original texture.
Freezer: To preserve your Cheesy Garlic Cruffin for extended periods, wrap each one tightly in plastic wrap and place them in a freezer-safe bag. They can last up to 3 months frozen.
Reheating: When ready to enjoy, simply reheat the frozen cruffins directly from the freezer in a preheated oven at 350°F (175°C) for about 10-15 minutes until warmed through.

Cheesy Garlic Cruffin Recipe FAQs
What is the best way to select ripe ingredients for my Cheesy Garlic Cruffin?
Absolutely! For the best results, use fresh yeast that’s not expired; it should be crumbly, not dry or overly moist. Look for high-quality all-purpose flour with a moderate protein content for light and flaky results. When choosing cheese, opt for freshly grated varieties over pre-shredded ones, as they melt better. For garlic, select plump cloves without dark spots or softness to ensure a robust flavor in your cruffins.
How should I store my Cheesy Garlic Cruffin to keep them fresh?
To maintain that delightful texture, store leftover cruffins in an airtight container at room temperature for up to 2 days. If you plan to keep them longer, refrigerate them where they can last for up to a week. Just be sure to reheat them in a preheated oven for a few minutes to restore their flakiness and gooeyness before enjoying!
Can I freeze my Cheesy Garlic Cruffin? If so, how?
Very! To freeze your cruffins, individually wrap each cruffin tightly in plastic wrap and place them in a freezer-safe bag or container. They will retain their quality for up to 3 months. When you’re ready to indulge, simply reheat them straight from the freezer: preheat your oven to 350°F (175°C), place the cruffins on a baking sheet, and warm for about 10-15 minutes until heated through.
What should I do if my cruffins don’t rise properly?
If your cruffins aren’t rising as expected, first check if your yeast is active. To test, soak a small amount of yeast in warm water with a pinch of sugar; if it bubbles after 5-10 minutes, it’s good to go! Ensure that the ingredients, especially warm milk and water, are not too hot—ideally between 100°F to 110°F (37°C to 43°C) for proper yeast activation. If all else fails, give the dough an extra rise in a warm, draft-free spot to encourage that fluffy texture.
Are there any dietary considerations I should keep in mind with Cheesy Garlic Cruffin?
Absolutely! If you’re cooking for guests with allergies, be mindful that this recipe contains dairy, gluten, and eggs. For a dairy-free version, you can substitute unsalted butter for olive oil, milk for plant-based alternatives, and use flaxseed meal as a substitute for the egg. Ensure that any cheese options you choose align with dietary restrictions; nutritional yeast can provide a cheesy flavor for those who want to avoid dairy. Always check ingredient labels, especially when it comes to packaged items like flour and yeast.

Cheesy Garlic Cruffin: Indulge in Flaky, Savory Goodness
Ingredients
Equipment
Method
- In a large mixing bowl, combine flour, sugar, salt, and instant yeast. Whisk until evenly mixed. Create a well and add warm milk, melted butter, warm water, and egg. Stir until shaggy dough forms.
- Transfer the dough to a floured surface and knead for 8–10 minutes until smooth and elastic.
- Place dough in a greased bowl, cover with a cloth, and let rise in a warm area for about 1 hour, or until doubled.
- While dough rises, mix softened butter, minced garlic, and chopped parsley in a bowl until combined.
- Preheat oven to 375°F (190°C) and grease a muffin tin.
- Punch down the risen dough, roll it out to a 1/4 inch thick rectangle.
- Spread garlic butter mixture on the dough, then sprinkle grated Parmesan and mozzarella on top.
- Roll the dough tightly into a log and slice into 8–10 equal pieces.
- Place each piece in muffin cups, cover lightly, and let rest for another 20 minutes.
- Bake for 20–25 minutes until tops are golden brown.
- Cool slightly in the tin before transferring to a wire rack to serve.
Leave a Reply