
As I sunk my teeth into the first bite, it felt like a culinary celebration wrapped in my hands. My crispy Chicken Caesar Sandwiches take the comfort of a classic Caesar salad and transform it into a hearty meal in under 30 minutes. Layered with well-seasoned, golden fried chicken, creamy dressing, and loaded with Parmesan, all encased in garlic butter bread, these sandwiches tick off every box for a satisfying lunch or dinner. Plus, they’re incredibly quick to whip up, making them a go-to for busy days when you crave homemade goodness. Are you ready to elevate your sandwich game and take a taste trip to flavor town? Let’s dive in!

Why are Chicken Caesar Sandwiches a Must-Try?
Crispy Texture: The fried chicken cutlets deliver an irresistible crunch that elevates your sandwich experience.
Savory Garlic Butter: Each bite reveals the delightful warmth of garlic butter bread, making every sandwich unforgettable.
Quick Preparation: Perfect for those hectic days, you can whip this up in under 30 minutes without sacrificing flavor.
Versatile Ingredients: Customize with different greens or dressings, making it easy to cater to your taste preferences or dietary needs.
Crowd-Pleasing Flavor: These Chicken Caesar Sandwiches are sure to impress family and friends at gatherings, making them a welcome addition to any lunch or dinner table.
Elevate your culinary repertoire and keep your meal prep engaging by trying out varied recipes like Crispy Chicken Tacos or a fresh Classic Caesar Salad alongside these sandwiches!
Chicken Caesar Sandwiches Ingredients
For the Chicken Cutlets
• Chicken Breasts – Boneless makes for easy cooking.
• Egg and Milk – Essential for breading; use a flax egg mix for an egg-free option.
• Garlic Powder, Salt, Pepper – Adjust seasoning to your taste for flavorful breading.
• Breadcrumbs & Panko – Coating that provides a crispy texture; gluten-free alternatives work great too.
• Vegetable Oil – Crucial for frying, ensuring that perfect crispiness.
For the Garlic Butter Bread
• Salted Butter – Rich base for the garlic butter, enhancing flavor.
• Garlic (minced & grated) – Delivers freshness to the garlic butter.
• Chopped Fresh Parsley – Adds a herbaceous note; feel free to omit if necessary.
For the Caesar Dressing
• Mayonnaise – Creamy component for both garlic butter and dressing; Greek yogurt is a lighter substitute.
• Parmesan Cheese – Essential for flavor in the dressing and a delicious topping; nutritional yeast can be used for a vegan version.
• Sour Cream or Greek Yogurt – Gives tang to the dressing; you can swap with full-fat yogurt.
• Lemon Juice, Dijon Mustard, Anchovy Paste, Worcestershire Sauce – These enhance the flavor profile of the dressing; adjust according to personal preference.
For the Salad
• Romaine Lettuce – Provides a fresh crunch; kale or spinach can be great alternatives.
For the Sandwich Assembly
• Hoagies or Baguette – Choose any crusty bread as the sandwich base; it enhances the overall texture.
Dive into these delightful Chicken Caesar Sandwiches, where every layer combines to create a flavor explosion you’ll love!
Step‑by‑Step Instructions for Chicken Caesar Sandwiches
Step 1: Prepare Chicken Cutlets
Begin by slicing your chicken breasts into 4-6 thin cutlets, ensuring even cooking. Season both sides with garlic powder, salt, and pepper for that extra punch of flavor. Set up a breading station with one bowl for beaten egg mixed with a splash of milk and another for a combination of breadcrumbs and panko, making your Chicken Caesar Sandwiches irresistibly crunchy.
Step 2: Fry Cutlets
Heat vegetable oil in a large skillet over medium-high heat until it reaches 350°F. Dip each cutlet into the egg mixture, then coat it thoroughly with breadcrumbs, ensuring a nice even layer. Fry the chicken cutlets for about 5 minutes on each side or until they turn golden brown and crispy. Drain them on paper towels to remove excess oil as you continue your delicious journey.
Step 3: Make Garlic Butter
In a small bowl, combine softened salted butter, minced garlic, chopped parsley, and grated Parmesan cheese, mixing until everything is well incorporated. This garlic butter will enhance your Chicken Caesar Sandwiches’ flavor, creating a delightful spread for your bread. Set this aromatic mixture aside while you focus on toasting the bread, adding a warm, rich flavor to your sandwiches.
Step 4: Toast Bread
Preheat your oven to 450°F (232°C). Slice your hoagies or baguette in half lengthwise and place them on a baking sheet. Generously spread the prepared garlic butter on the cut sides of the bread. Toast the bread halves in the preheated oven for about 3-4 minutes, or until they become beautifully golden and crisp, creating the perfect nest for your Chicken Caesar Sandwiches.
Step 5: Prepare Dressing
In a mixing bowl, whisk together mayonnaise, sour cream or Greek yogurt, lemon juice, Dijon mustard, anchovy paste, Worcestershire sauce, and Parmesan cheese. Adjust these ingredients according to your taste preferences for creaminess and tang. Once combined, toss in chopped romaine lettuce until everything gets a velvety coating, adding a vibrant crunch to your Chicken Caesar Sandwiches.
Step 6: Assemble Sandwiches
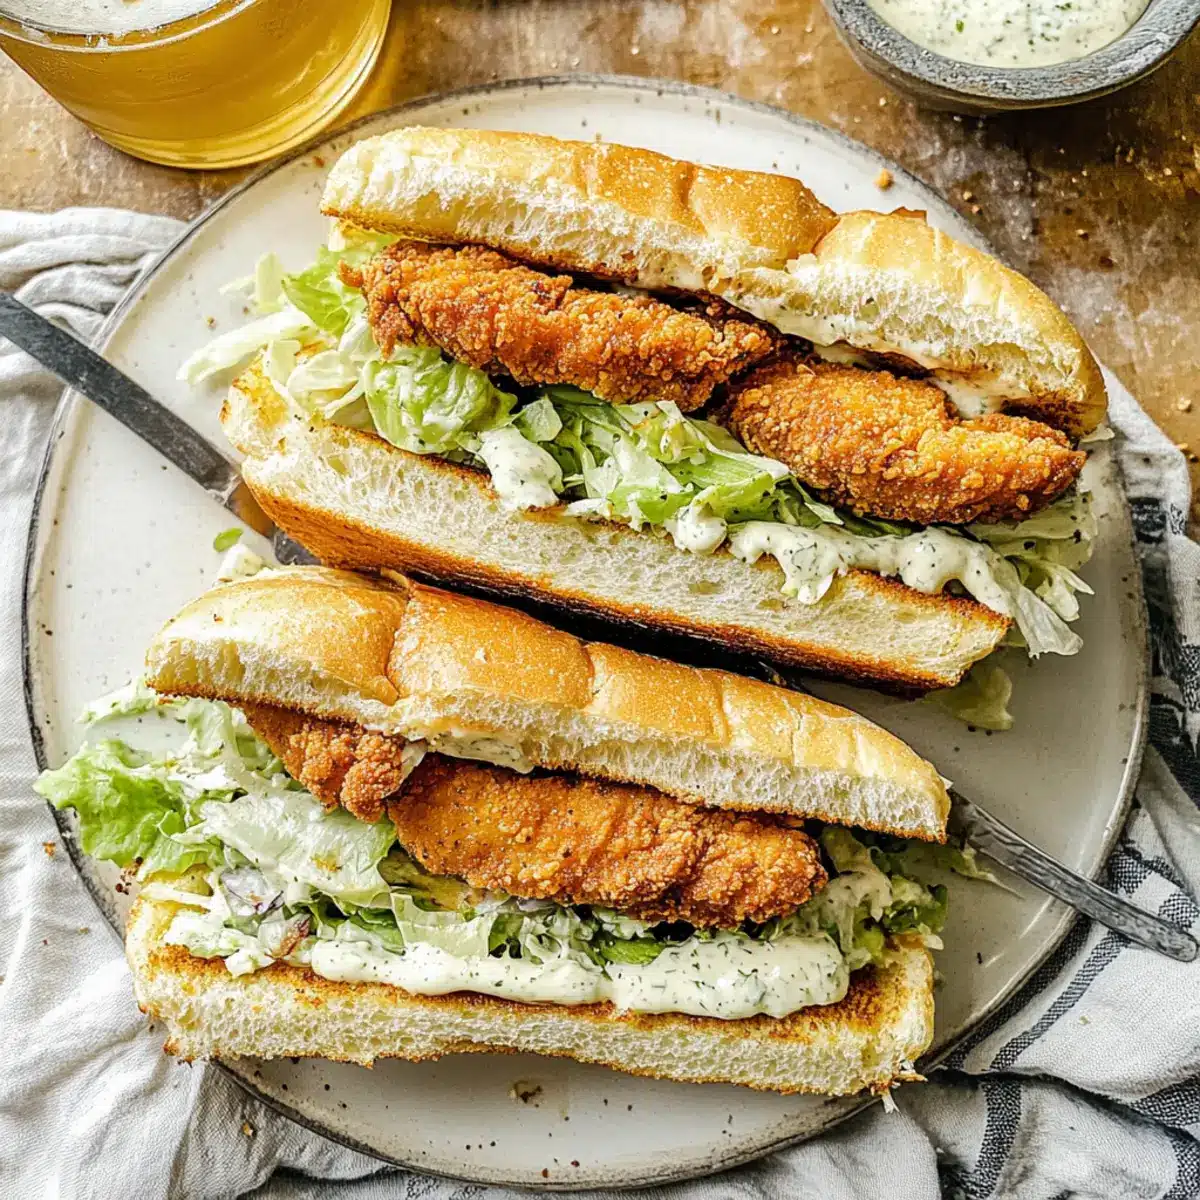
To assemble your Chicken Caesar Sandwiches, layer the crispy fried chicken cutlets on one half of the toasted garlic butter bread. Carefully spoon the creamy Caesar salad over the chicken, ensuring every bite is packed with flavor. Sprinkle additional Parmesan cheese on top, and place the other half of the toasted bread on top. Serve your hearty sandwiches immediately for the ultimate culinary experience!

Make Ahead Options
These Chicken Caesar Sandwiches are perfect for busy home cooks looking to save time without sacrificing flavor! You can prep the chicken cutlets up to 24 hours in advance by breading them and storing them in the refrigerator; just be sure to cover them tightly to maintain crispiness. The creamy Caesar dressing can be made 3 days ahead, allowing the flavors to meld beautifully. When you’re ready to serve, simply fry the chicken cutlets fresh to ensure they’re crispy. Assemble the sandwiches right before serving to keep the garlic butter bread crunchy, and enjoy a delightful meal that’s just as delicious as if you made it all at once!
What to Serve with Crispy Chicken Caesar Sandwiches
Elevate your meal with delightful companions that enhance your savory sandwich experience.
-
Crispy Potato Chips: The crunch of these go-to snacks complements the crispy chicken and adds a delightful saltiness that transforms your meal.
-
Waffle Fries: Their unique shape and fluffiness provide a satisfying contrast to the sandwich. Serve with ketchup or a spicy mayo for dipping.
-
Caesar Salad: A classic side that mirrors the sandwich’s flavors, with creamy dressing and crisp romaine to refresh your palate.
-
Coleslaw: The creaminess of coleslaw alongside the crispy chicken offers a pleasing texture combination that tantalizes the taste buds. Plus, the tangy flavor is a perfect match!
-
Grilled Vegetables: Seasonal veggies like zucchini and bell peppers add vibrant color and nutrition to your plate while complementing the savory taste of the sandwich.
-
Lemonade: Sip on a refreshing glass of lemonade to cleanse your palate, balancing the richness of the creamy caesar flavors in your sandwich.
-
Chocolate Chip Cookies: End your meal on a sweet note with warm, gooey cookies that satisfy your sweet tooth while rounding off the savory feast beautifully.
Expert Tips for Chicken Caesar Sandwiches
• Oil Temperature: Ensure your oil is at 350°F for frying; use a thermometer to avoid undercooked or soggy chicken cutlets.
• Fry Immediately: Fry chicken right after breading to keep it crispy. Letting it sit can lead to moisture absorption.
• Serve Fresh: Assemble sandwiches just before serving to maintain the crispness of the garlic butter bread and the freshness of the salad.
• Separate Storage: If prepping ahead, store cooked chicken, dressing, and salad individually to preserve texture and flavor until you’re ready to enjoy your Chicken Caesar Sandwiches.
• Customize Flavors: Don’t hesitate to mix in different spices or herbs in the breading or dressing to personalize your sandwiches to suit your taste preferences.
Chicken Caesar Sandwiches Variations & Substitutions
Feel free to play and personalize your Chicken Caesar Sandwiches to make them your own delightfully delicious creation!
-
Grilled Chicken: Swap fried chicken for grilled to lighten the meal without sacrificing flavor.
-
Lighter Dressing: Use Greek yogurt instead of mayonnaise for a tangy, healthier Caesar dressing option.
-
Spicy Kick: Add a dash of cayenne pepper or hot sauce to the dressing for a zesty heat that elevates every bite.
-
Avocado Twist: Layer slices of creamy avocado inside your sandwich for an extra rich texture and deliciousness.
-
Different Greens: Replace romaine with kale or spinach for a vibrant color and added nutrients.
-
Bread Variety: Experiment with different breads like ciabatta or whole wheat to change up the flavor and texture profile.
-
Herb Infusion: Sprinkle fresh herbs like basil or dill into the dressing for a fragrant upgrade to your sandwiches.
-
Crunchy Extras: Toss in some crispy bacon bits or toasted pine nuts for an added crunch and flavor explosion.
For more delectable ideas, consider pairing your meal with a fresh Classic Caesar Salad or whip up some spicy Crispy Chicken Tacos for a flavor galore experience!
How to Store and Freeze Chicken Caesar Sandwiches
Fridge: Keep assembled Chicken Caesar Sandwiches in an airtight container in the refrigerator for up to 3 days to maintain freshness.
Freezer: For longer storage, wrap each sandwich tightly in plastic wrap and then in aluminum foil. They can be frozen for up to 2 months.
Reheating: To reheat, remove from the freezer and thaw in the fridge overnight. Use an air fryer or oven at 350°F (175°C) for about 10-15 minutes to restore crispiness before serving.
Separate Components: If storing leftovers, keep the fried chicken, dressing, and lettuce separate until you’re ready to enjoy your Chicken Caesar Sandwiches again for better texture and flavor.

Chicken Caesar Sandwiches Recipe FAQs
What is the best way to choose ripe ingredients?
Absolutely! For the freshest taste, select ripe Romaine lettuce with crisp leaves and no dark spots. When it comes to chicken, look for boneless, skinless breasts that are firm and pink. Avoid any chicken with a slimy texture or unpleasant odor.
How should I store leftover Chicken Caesar Sandwiches?
To keep your Chicken Caesar Sandwiches fresh, store them in an airtight container in the refrigerator for up to 3 days. If you want to enjoy them later, avoid assembling the sandwiches entirely before storage; keep the fried chicken, dressing, and lettuce separate to maintain crispness.
Can I freeze my Chicken Caesar Sandwiches?
Very much! To freeze, first wrap each sandwich tightly in plastic wrap, then in aluminum foil to prevent freezer burn. They can be stored for up to 2 months. When you’re ready to enjoy, thaw them in the refrigerator overnight and reheat in an air fryer or oven at 350°F (175°C) for about 10-15 minutes. This helps restore that delightful crispiness.
What if my fried chicken isn’t crispy enough?
No worries! If your chicken cutlets turn out soggy, check the oil temperature—it should be at 350°F. Always fry right after breading to prevent moisture from seeping in. If you’ve already fried them and they’re a bit soft, give them a quick reheat in the air fryer for a few minutes; they’ll regain some crunchiness!
Are there any dietary considerations for the ingredients?
Absolutely! If you’re catering to specific dietary needs, there are great options. For a gluten-free version, use gluten-free breadcrumbs and panko. If you want to make it lighter, opt for Greek yogurt instead of mayonnaise in your dressing. Keep in mind any allergies, especially with ingredients like anchovy paste in the dressing—feel free to adjust or omit as needed.
How can I adjust the flavors in the dressing?
The more the merrier! If you want a creamier dressing, increase the mayonnaise or sour cream proportion. For a tangier flavor, add a bit more lemon juice or Worcestershire sauce—just whisk together until it meets your taste. Don’t hesitate to personalize your Chicken Caesar Sandwiches for the perfect meal!
Crispy Chicken Caesar Sandwiches for a Flavor Punch
Ingredients
Equipment
Method
- Begin by slicing your chicken breasts into 4-6 thin cutlets and season with garlic powder, salt, and pepper. Set up a breading station with egg and milk, and breadcrumbs mixed with panko.
- Heat vegetable oil in a large skillet over medium-high heat until it reaches 350°F. Dip each cutlet in the egg mixture, coat with breadcrumbs, and fry for about 5 minutes on each side until golden brown and crispy.
- Combine softened butter, minced garlic, chopped parsley, and grated Parmesan in a bowl to make garlic butter. Set this mixture aside.
- Preheat your oven to 450°F. Cut the hoagies or baguette in half and spread the garlic butter on the cut sides. Toast for about 3-4 minutes until golden and crisp.
- Whisk together mayonnaise, sour cream, lemon juice, mustard, anchovy paste, and Parmesan in a bowl. Fold in chopped romaine lettuce until coated.
- Layer the fried chicken cutlets on one half of the toasted bread, spoon over the Caesar salad, and sprinkle with Parmesan. Top with the other half of the bread.
Leave a Reply