
As the leaves begin to turn and the air gets crisp, there’s a certain magic in the kitchen that can’t be ignored. I love recreating that familiar comfort of autumn with my Easy Pumpkin Pie Bars—a delightful twist on the classic pumpkin pie that dazzles at every gathering. Not only are these bars incredibly easy to whip up, making them a perfect crowd-pleaser, but they also come together in a fraction of the time traditional pumpkin pie requires. Picture a crunchy shortbread crust cradling a lusciously creamy pumpkin filling, spiced just right with cinnamon and nutmeg. They’re just as cozy as they are delectable! So, why not elevate your fall dessert game and try your hand at these pumpkin pie bars? Your taste buds are in for a treat! Curious about how easy they are to make? Let’s dive into the recipe!

How Easy Are Pumpkin Pie Bars?
Simplicity at its Best: This recipe comes together quickly with only a few simple steps, perfect for those short on time!
Rich, Creamy Filling: The velvety pumpkin filling and crunchy crust create a delightful contrast, making each bite feel like a warm hug.
Versatile Variations: With options like a Biscoff cookie crust or a salted caramel drizzle, you can customize these bars to suit your taste.
Crowd-Pleaser: They’re great for sharing at holiday gatherings, sure to bring smiles and compliments from loved ones!
Make-Ahead Friendly: Prepare these bars a day in advance for an easy stress-free dessert option that can chill while you focus on other festive preparations.
Try them alongside a scoop of vanilla ice cream for an extra cozy touch!
Pumpkin Pie Bars Ingredients
For the Crust
- Butter – Adds richness and creates a tender shortbread crust. Substitute with margarine for dairy-free.
- Granulated Sugar – Sweetens the crust. Can be replaced with coconut sugar for a lower glycemic option.
- Brown Sugar – Provides depth of flavor to the filling. Light or dark brown sugar can be used interchangeably.
- Salt – Balances sweetness and enhances overall flavor. Use sea salt for a richer taste.
For the Filling
- Eggs – Binds the filling and contributes to the structure. Flax eggs can be used as a vegan alternative.
- Pumpkin Puree – The base ingredient that provides flavor and moisture. Ensure it’s 100% pure pumpkin; not pumpkin pie filling.
- Heavy Cream – Adds creaminess to the filling. Coconut cream can be an alternative for a dairy-free version.
- Cornstarch – Helps thicken the filling. Arrowroot starch can be substituted for a similar effect.
- Pumpkin Pie Spice – A blend of warm spices that enhances the pumpkin flavor. Use a homemade blend if preferred.
- Cinnamon – Provides extra warmth and flavor. Can increase based on taste preference.
- Vanilla Extract – Adds aromatic sweetness. Use pure vanilla for the best flavor.
Step‑by‑Step Instructions for Pumpkin Pie Bars
Step 1: Preheat Oven and Prepare Pan
Preheat your oven to 350°F (175°C) while you prepare a 9×9 inch baking pan. Line the bottom with parchment paper, allowing some overhang for easy removal later. This initial step sets the foundation for your delicious pumpkin pie bars, ensuring even baking and preventing sticking.
Step 2: Cream Butter and Sugars
In a stand mixer, combine ½ cup of softened butter, ¼ cup granulated sugar, and 1 cup brown sugar. Beat on medium speed for about 3 minutes until the mixture is light and fluffy. This creaming process incorporates air, which contributes to a tender crust, the perfect base for your pumpkin pie bars.
Step 3: Mix in Eggs and Vanilla
Add 3 large eggs and 1 teaspoon of vanilla extract to the creamed mixture. Beat until everything is well combined and smooth. This step incorporates moisture and flavor, ensuring a rich filling that will elevate your pumpkin pie bars.
Step 4: Combine Dry Ingredients
In a separate bowl, sift together your dry ingredients: 2 tablespoons cornstarch, 1 teaspoon pumpkin pie spice, 1 teaspoon cinnamon, and ½ teaspoon salt. Gradually add this mixture to your wet ingredients in the stand mixer, mixing just until the dough pulls away from the sides of the bowl. Be careful not to overmix, as it can affect the texture of your crust.
Step 5: Press Dough into Pan
Transfer the dough into your prepared baking pan, pressing it evenly into the bottom, making sure it covers all corners. Bake in the preheated oven for 15 minutes until the edges are golden and slightly firm to the touch. This initial bake solidifies the crust, setting the stage for the creamy filling of your pumpkin pie bars.
Step 6: Prepare the Pumpkin Filling
While the crust bakes, whisk together 15 oz of pumpkin puree, ⅓ cup of heavy cream, the remaining eggs, and the previously combined sugars. Also, stir in 2 tablespoons cornstarch, 1 teaspoon pumpkin pie spice, and additional salt. Continue whisking until the filling is completely smooth and well blended, ensuring every bite of your pumpkin pie bars is rich with flavor.
Step 7: Bake the Filling
Once the crust is done, pull it from the oven and pour the smooth pumpkin filling over the baked crust. Increase the temperature to 400°F (200°C) and bake for 15 minutes. After this time, reduce the temperature back to 350°F (175°C) and continue baking for another 40 minutes. The center should be slightly jiggly when done, indicating the perfect custard-like consistency of your pumpkin pie bars.
Step 8: Cool and Chill
After baking, allow the pumpkin pie bars to cool in the pan for 45-60 minutes at room temperature. Then, cover and refrigerate for at least 3 hours, or ideally overnight. Chilling enhances the flavors and helps the bars set properly, ensuring a clean cut when you’re ready to serve.
Step 9: Serve and Enjoy
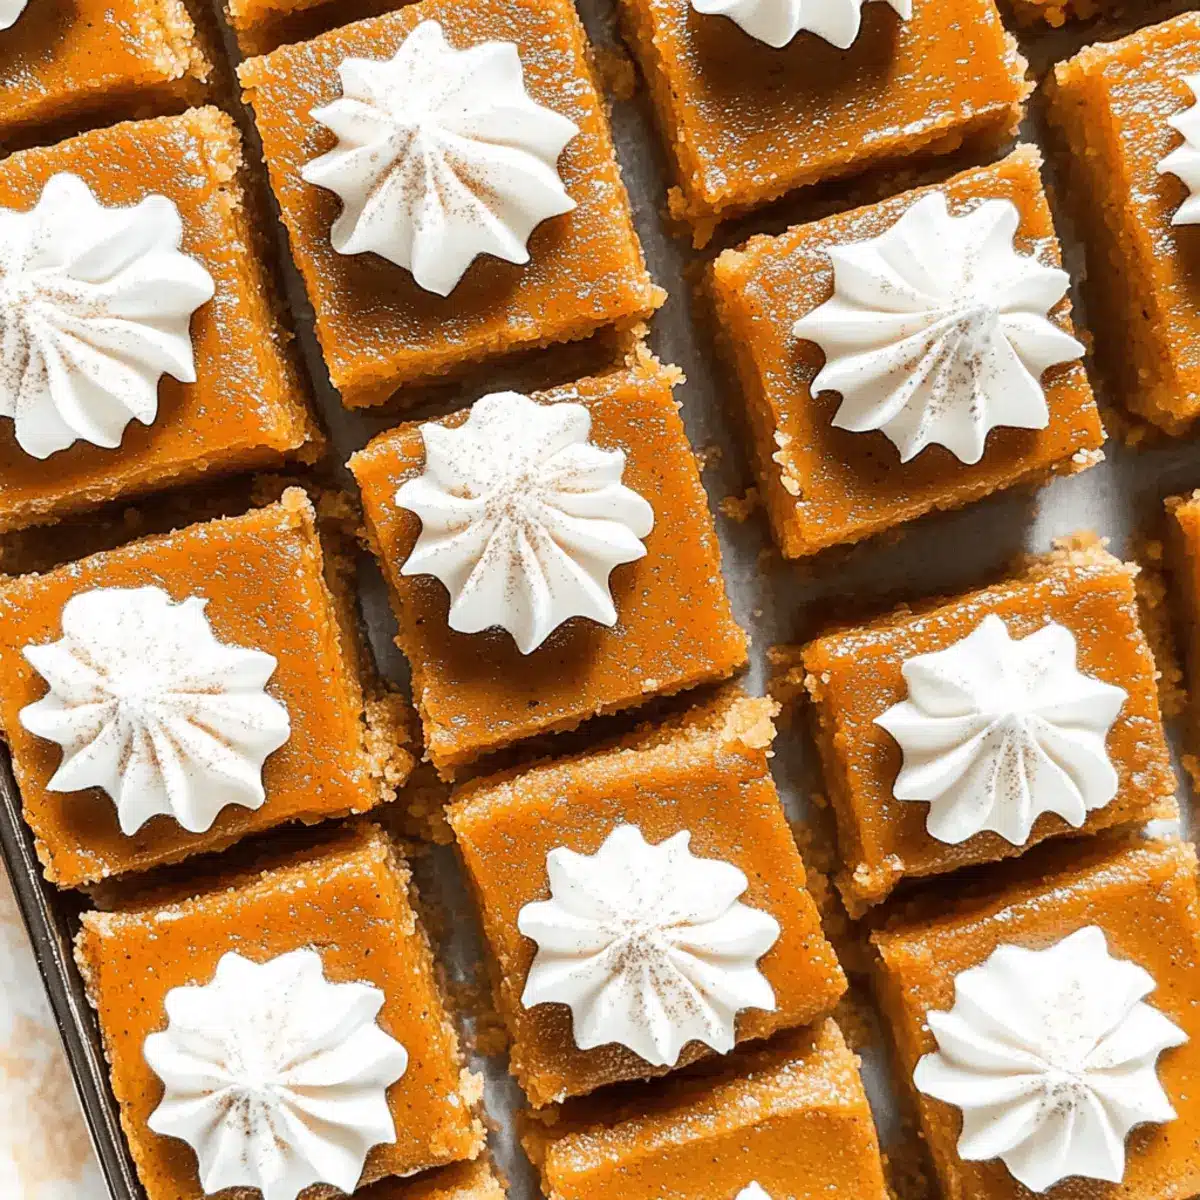
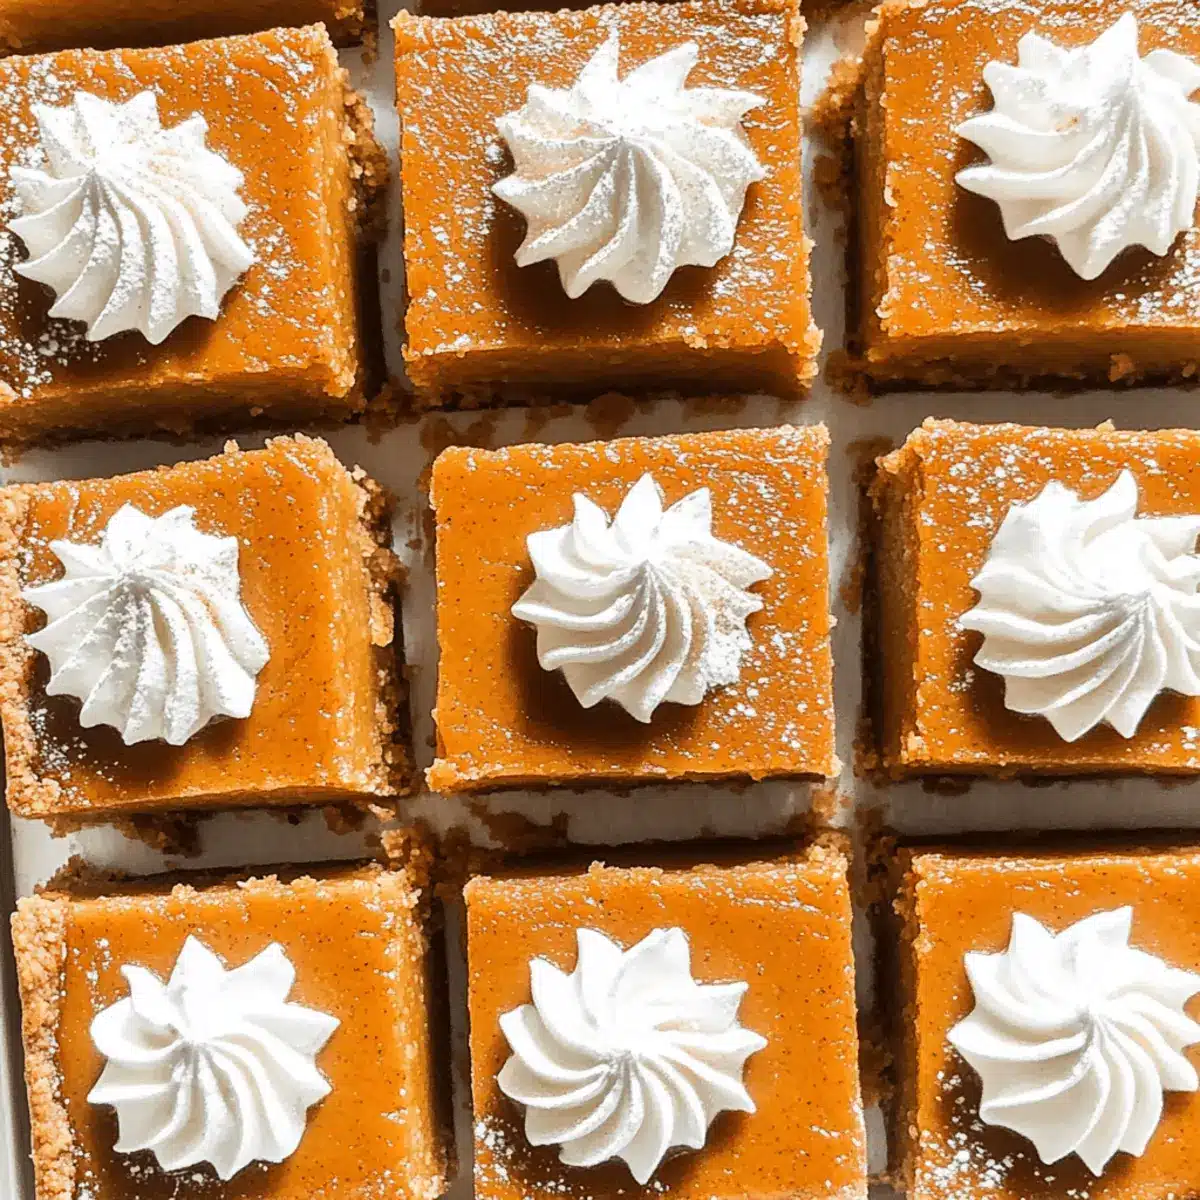
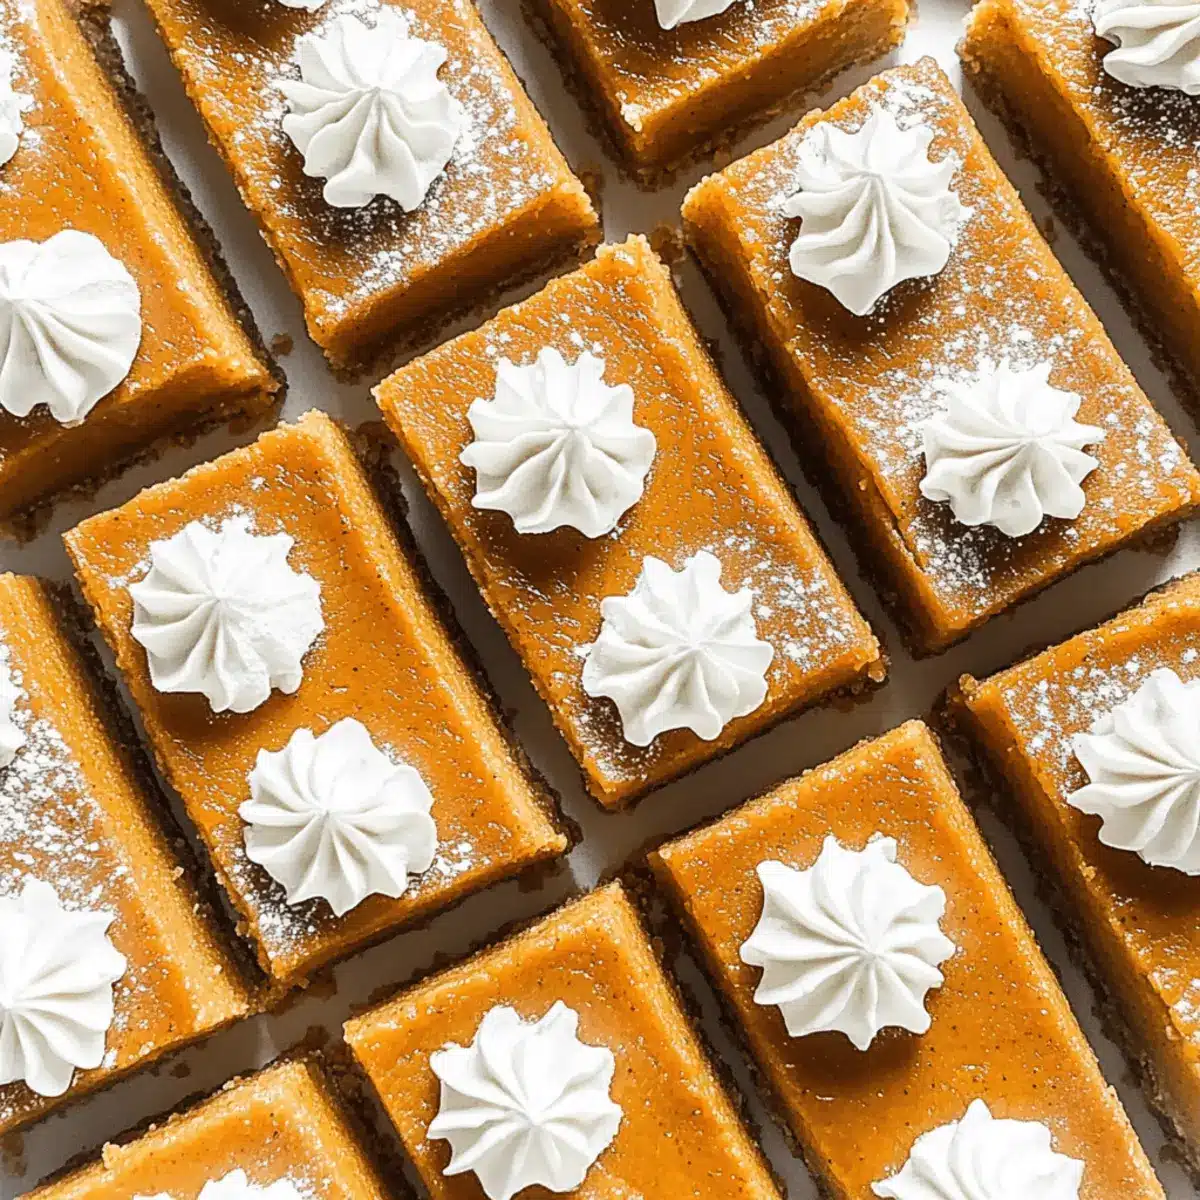
Once chilled, lift the pumpkin pie bars out of the pan using the parchment overhang. Cut into squares and serve topped with whipped cream and a light sprinkle of nutmeg. These pumpkin pie bars are not just visually appealing, but the combination of textures and flavors will surely delight your family and friends!
What to Serve with Easy Pumpkin Pie Bars
Indulge your senses and create the ultimate fall dessert spread that will leave your guests raving.
- Vanilla Ice Cream: A scoop of creamy vanilla ice cream perfectly balances the spiced richness of the bars, enhancing every bite.
- Cranberry Sauce: The tartness of cranberry sauce cuts through the sweetness, providing a refreshing contrast that elevates the dish.
- Whipped Cream: Luxurious and fluffy, whipped cream topped with a sprinkle of cinnamon adds an extra touch of indulgence to each slice.
- Toasted Nuts: Chopped pecans or walnuts introduce a satisfying crunch and nutty flavor that complements the creamy pumpkin filling beautifully.
- Spiced Hot Apple Cider: A warm mug of spiced apple cider brings cozy fall flavors to the table, perfect for sipping alongside these delightful bars.
- Coffee or Chai Latte: The warmth and richness of freshly brewed coffee or spiced chai latte enhance the comforting essence of your pumpkin pie bars.
- Gingerbread Cookies: Pairing with soft gingerbread cookies brings a nostalgic nod to the season, creating an inviting autumnal experience.
- Salted Caramel Drizzle: Drizzling salted caramel over the bars amplifies the delightful sweetness, transforming each bite into a decadent treat.
How to Store and Freeze Pumpkin Pie Bars
Fridge: Store your pumpkin pie bars in an airtight container for up to 4 days. Ensure they are completely cool and covered to maintain their creamy texture and flavor.
Freezer: To extend shelf life, freeze the bars before adding whipped cream. Wrap them tightly in plastic wrap and aluminum foil, and they will stay fresh for up to 3 months.
Defrosting: When ready to serve, simply thaw the bars at room temperature for a couple of hours.
Reheating: If you prefer warm bars, gently reheat them in the oven at 350°F for about 10 minutes. Enjoy the delightful combination of warm pumpkin flavor and buttery crust!
Expert Tips for Pumpkin Pie Bars
-
Keep an Eye on Baking Time: Avoid overbaking by checking the bars when the center is still slightly jiggly; they will firm up while cooling.
-
Chill for Best Texture: Allow the bars to cool completely in the fridge for at least 3 hours; this helps them set and enhances the flavors.
-
Storage Solutions: Store your pumpkin pie bars in the refrigerator for up to 4 days. For longer preservation, freeze before adding whipped cream.
-
Play with the Crust: Experiment with different crust options, like a Biscoff cookie crust, to add unique flavors to your pumpkin pie bars.
-
Don’t Skip the Whipped Cream: Top your bars with whipped cream and a sprinkle of nutmeg to elevate the dessert, making it even more irresistibly delicious!
Variations & Substitutions for Pumpkin Pie Bars
Feel free to get creative with these pumpkin pie bars, adding your unique twist to make them truly unforgettable!
-
Biscoff Cookie Crust: Substitute shortbread for crushed Biscoff cookies for a buttery, spiced flavor that pairs perfectly with pumpkin. The added hint of caramel and cinnamon will elevate your dessert!
-
Toasted Meringue: Top your bars with fluffy, toasted meringue instead of whipped cream for an elevated, gourmet touch. Just think of the beautiful presentation and delightfully airy texture!
-
Salted Caramel Drizzle: Enhance each serving with a warm drizzle of salted caramel sauce, providing a delicious contrast to the creamy filling. This addition will take your taste experience to a whole new level of indulgence.
-
Bourbon Whipped Cream: Add a splash of bourbon to your whipped cream for an adult-friendly twist. The warm undertones of bourbon complement the pumpkin flavors, adding a delightful sophistication.
-
Nutty Crunch Topping: Sprinkle some chopped pecans or walnuts on top before serving for an extra crunch and nutty flavor. The added texture beautifully contrasts the smooth filling while boosting the flavor profile.
-
Vegan Option: Use flax eggs and coconut cream instead of traditional eggs and heavy cream for a vegan version. You won’t sacrifice flavor or texture, making it a great choice for plant-based gatherings.
-
Spice It Up: Amp up the pumpkin pie spice or add a hint of cayenne for a surprising kick. Just a pinch can transform the flavor profile, making it a unique twist for adventurous eaters.
-
Fruit Add-Ins: Stir in some finely chopped apples or pears into the filling for a fruity surprise. These additions bring freshness and a different texture that perfectly complements the pumpkin filling.
By exploring these variations, you can create the perfect pumpkin pie bars that not only please your palate but also intrigue your guests. Whether you choose to add caramel or experiment with new toppings, these bars can be a delightful centerpiece for your holiday gatherings!
Make Ahead Options
These Easy Pumpkin Pie Bars are the perfect solution for busy cooks looking to save time during the holiday rush! You can prepare the crust and filling up to 24 hours in advance. Simply bake the crust as directed, then allow it to cool completely before whisking together the filling ingredients. Pour the filling over the cooled crust and bake as instructed. Once baked, allow the bars to cool and chill in the refrigerator for at least 3 hours or overnight for optimal flavor and texture. To maintain quality, ensure they’re covered tightly to prevent drying out. Just before serving, slice them up, top with whipped cream, and enjoy the deliciousness of your make-ahead pumpkin pie bars!
Pumpkin Pie Bars Recipe FAQs
How do I select the perfect pumpkin puree?
Absolutely! When choosing pumpkin puree, look for 100% pure pumpkin without any additives. You want that rich, deep orange color without any dark spots. Canned pumpkin is usually the most convenient, but if you prefer fresh, select a sugar pumpkin that’s sweet and firm.
What’s the best way to store leftover pumpkin pie bars?
Very! To store your pumpkin pie bars, place them in an airtight container in the refrigerator. They’ll stay fresh for up to 4 days. Make sure they are completely cool before covering to prevent condensation from affecting the texture.
Can I freeze pumpkin pie bars, and how?
Yes, you can! To freeze your pumpkin pie bars, wrap them tightly in plastic wrap and then again in aluminum foil. This double-layering prevents freezer burn. They can stay fresh for up to 3 months. When you’re ready to enjoy, simply thaw them at room temperature for a couple of hours before serving.
What should I do if my pumpkin pie filling is too runny?
If your filling turns out too runny, don’t worry! You can add a little extra cornstarch to help thicken it. Whisk in about 1 tablespoon of cornstarch mixed with a bit of water to the filling before pouring it onto the crust, ensuring it integrates well. Bake the bars as directed, and enjoy a perfectly set dessert!
Can I make these pumpkin pie bars gluten-free?
Absolutely! Substitute regular flour with a gluten-free all-purpose blend, ensuring it contains xanthan gum for stability. This swap makes the recipe suitable for gluten-sensitive friends while keeping all that scrumptious flavor intact.
Is there a pet-safe version of these pumpkin pie bars?
While these bars are delectable for humans, it’s best to keep them away from pets! The sugar and spices, especially nutmeg, can be harmful to dogs. If you’d like to share, consider plain pumpkin puree or baked, unsweetened pumpkin for your furry friends.
Browned Butter Blondies That Will Melt Your Heart
Ingredients
Equipment
Method
- Preheat your oven to 350°F (175°C) and line a 9x9 inch baking pan with parchment paper.
- In a stand mixer, combine softened butter, granulated sugar, and brown sugar. Beat on medium speed for about 3 minutes until light and fluffy.
- Add eggs and vanilla extract to the creamed mixture. Beat until well combined and smooth.
- In a separate bowl, sift together cornstarch, pumpkin pie spice, cinnamon, and salt. Gradually add to wet ingredients, mixing until the dough pulls away from the sides.
- Press the dough into the prepared baking pan, covering all corners. Bake for 15 minutes until edges are golden.
- While the crust bakes, whisk together pumpkin puree, heavy cream, remaining eggs, sugars, cornstarch, pumpkin pie spice, and salt until smooth.
- Pour the pumpkin filling over the baked crust. Increase oven temperature to 400°F and bake for 15 minutes. Then reduce to 350°F and bake for another 40 minutes.
- Allow to cool in the pan for 45-60 minutes, then refrigerate for at least 3 hours before serving.
- Lift out using the parchment overhang, cut into squares, and serve topped with whipped cream and a sprinkle of nutmeg.
Leave a Reply