
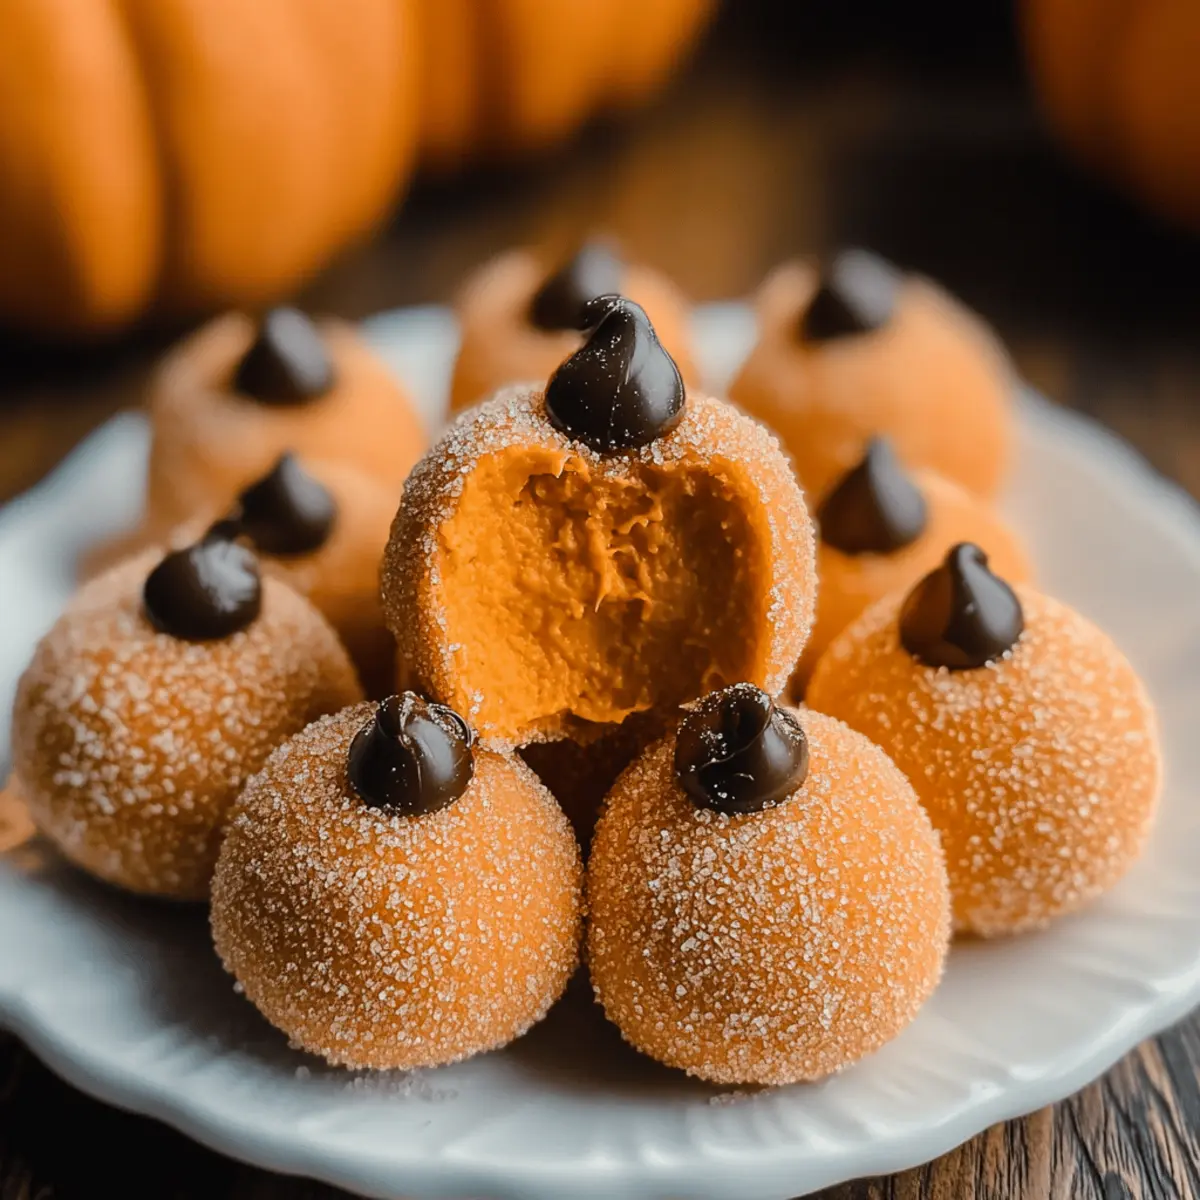
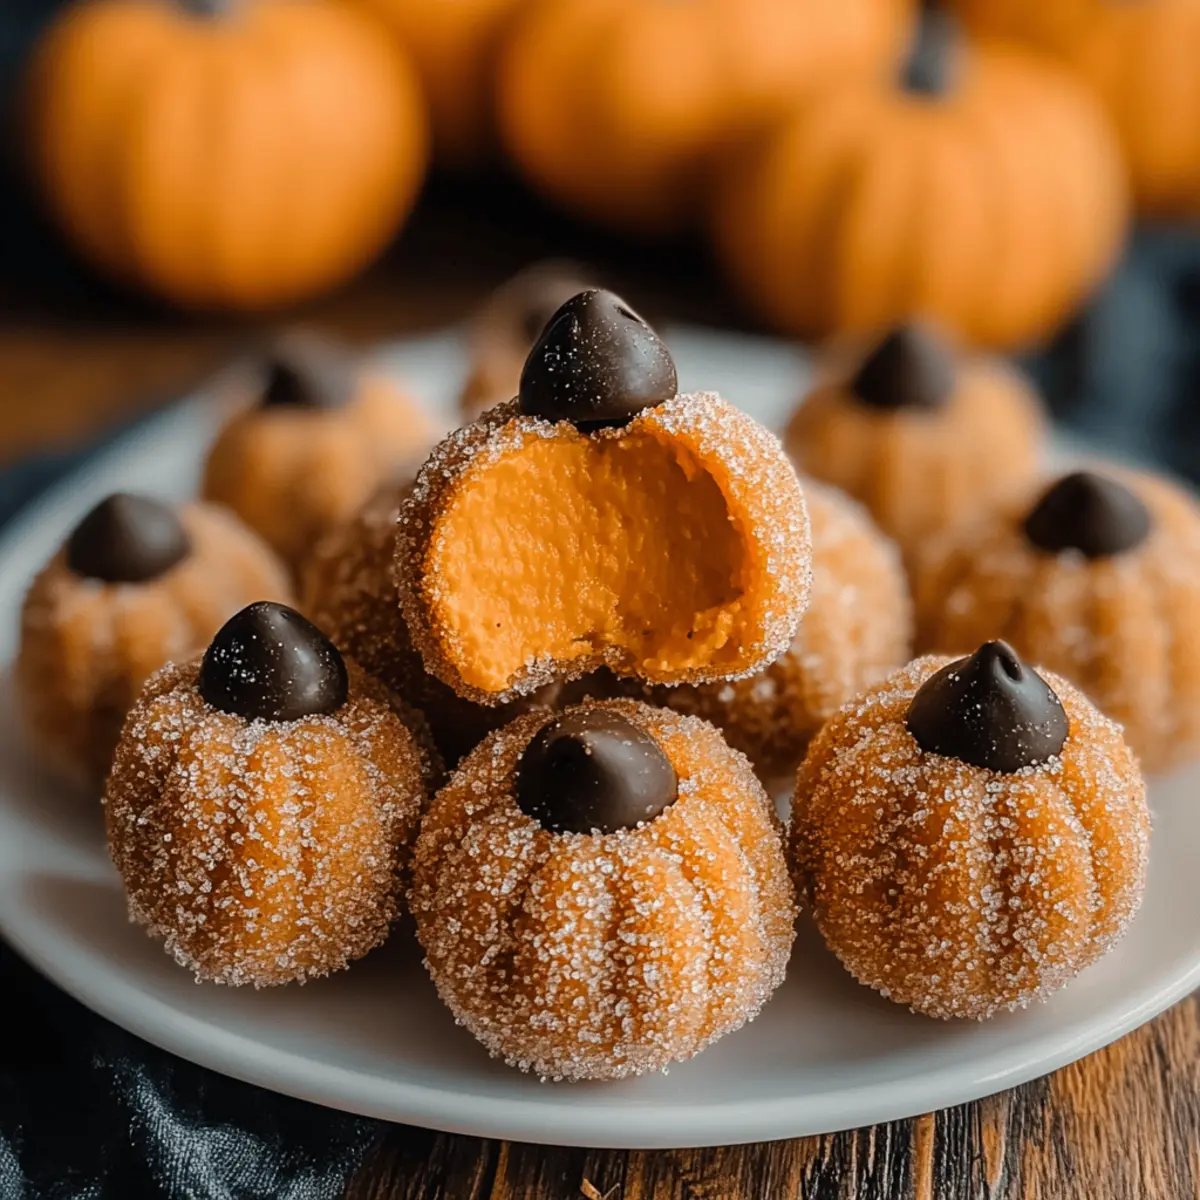
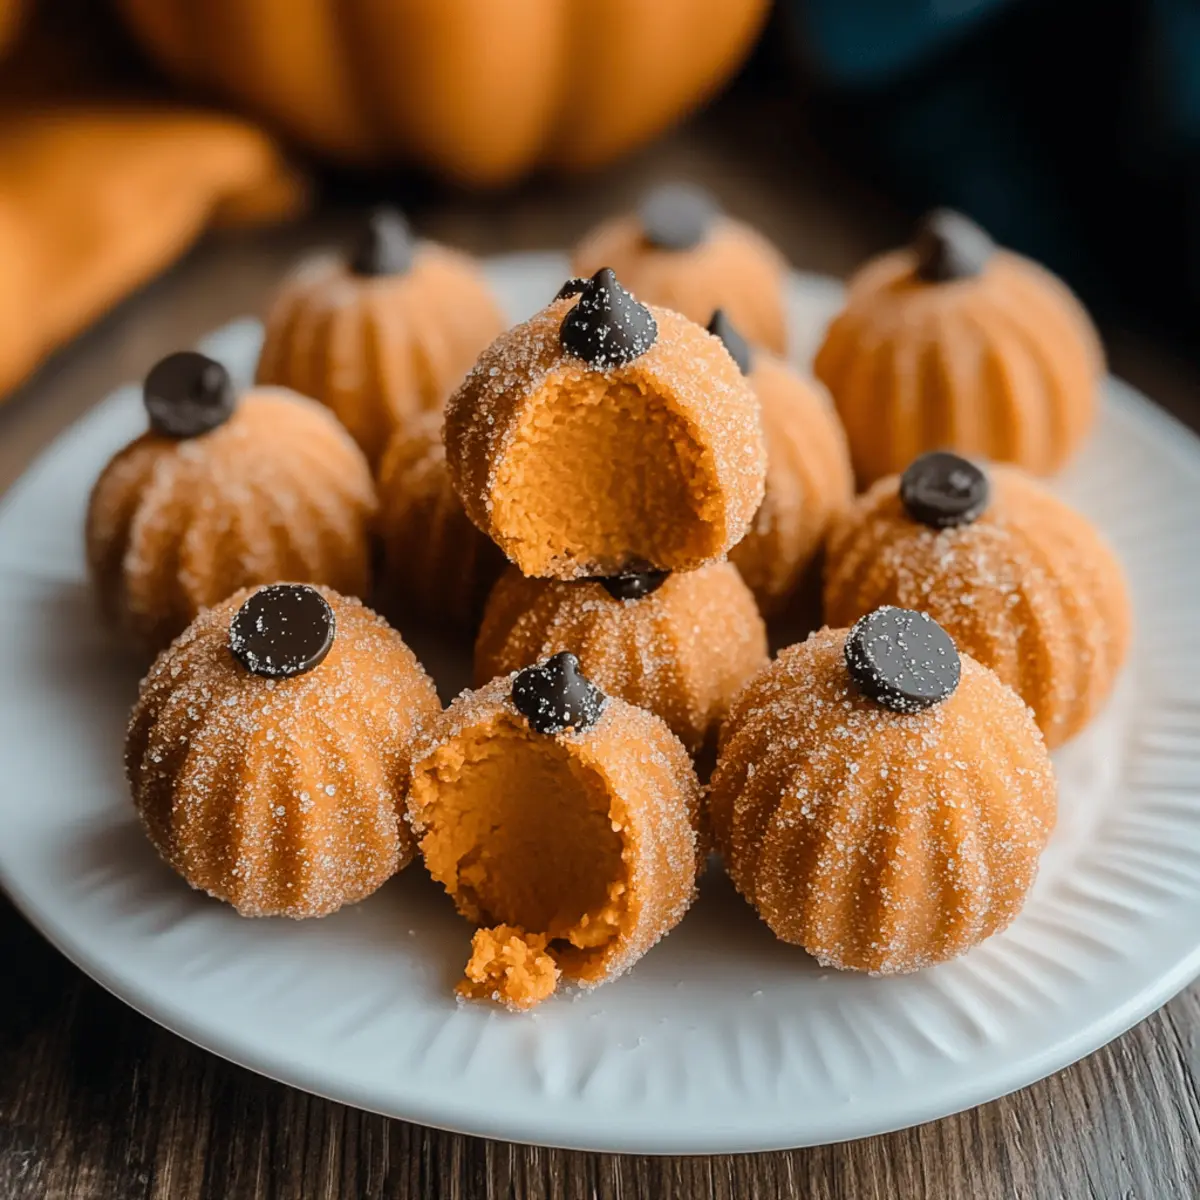
As the leaves begin to change and the air fills with that unmistakable crispness, I can’t help but crave all things pumpkin. Enter these no-bake Pumpkin Cheesecake Truffles—my go-to treat for capturing the essence of fall in bite-sized delights. Creamy and dreamy, each truffle offers a luscious pumpkin cheesecake filling that evokes the nostalgia of homemade pumpkin pie, while their playful presentation adds a festive flair to any gathering. The beauty of this recipe lies not only in its rich flavors but also in its quick prep time—perfect for busy hosts wanting to impress without the hassle of baking. Trust me, these truffles will be the hit of your Halloween parties or Thanksgiving dinners. Curious how to whip up these delightful morsels? Let’s dive into the recipe!
Why are Pumpkin Cheesecake Truffles irresistible?
Indulgent, creamy goodness: The rich filling captures all the cozy flavors of fall without any baking fuss, making them the perfect quick dessert for busy hosts.
Fun presentation: Their charming appearance allows you to serve a festive treat that feels special, even in a casual setting.
No-bake convenience: With no need to heat the oven, these truffles are effortlessly convenient for last-minute gatherings or cozy nights in.
Versatile variations: Feel free to experiment by adding nuts, drizzling with chocolate, or mixing in seasonal spices to suit your taste.
Crowd-pleaser: These truffles will impress guests of all ages, making them ideal for Halloween parties or Thanksgiving celebrations. Get ready to elevate your seasonal dessert game with the delightful charm of Pumpkin Cheesecake Truffles that everyone will love!
Pumpkin Cheesecake Truffles Ingredients
For the Filling
- Butter – Adds richness and helps prevent sticking during the rolling process.
- Cream Cheese – Provides a creamy base for the filling; Neufchâtel is a great lighter substitute.
- Canned Pumpkin Puree – Offers natural sweetness and the signature pumpkin flavor; ensure it’s pure pumpkin, not pie filling.
- Sweetened Condensed Milk – Contributes a velvety texture; consider using coconut milk for a dairy-free alternative.
- Pumpkin Pie Spice – Infuses warm fall flavors; if unavailable, a mix of cinnamon, nutmeg, and ginger works well.
For the Coating
- Graham Cracker Crumbs – Adds a slight crunch reminiscent of cheesecake crust; ground almonds make a good gluten-free substitute.
- White Chocolate Chips – Enhances sweetness and creaminess in the filling; swap for dark chocolate for a richer flavor.
- Orange Food Coloring (optional) – Provides a fun, festive hue if desired, but can be omitted for a more natural look.
For the Finishing Touches
- Granulated Sugar – Used for rolling the truffles, giving them a sparkling finish.
- Chocolate Chips – Serve as decorative pumpkin stems; consider using green sprinkles for a different look.
These Pumpkin Cheesecake Truffles combine the flavors of fall with a delightfully easy no-bake method that everyone will adore!
Step‑by‑Step Instructions for Pumpkin Cheesecake Truffles
Step 1: Prepare Filling
In a medium skillet, melt 4 tablespoons of butter over medium heat. Once melted, add 8 ounces of cream cheese, 1 cup of canned pumpkin puree, 1 cup of sweetened condensed milk, and 2 teaspoons of pumpkin pie spice. Stir gently until the mixture thickens and becomes smooth, about 5-7 minutes, ensuring not to let it bubble.
Step 2: Mix in Crumbs and Chocolate
Remove the skillet from heat and stir in 1 cup of graham cracker crumbs and ½ cup of white chocolate chips. Mix until fully combined, allowing the chocolate to melt into the warm filling. This mixture should be well-blended, showcasing the vibrant pumpkin color, and have a thick, creamy consistency.
Step 3: Chill Mixture
Spread the mixture evenly into a butter-greased baking sheet, smoothing the top with a spatula. Cover the sheet with plastic wrap and refrigerate for at least 2 hours, or ideally overnight, until the mixture is firm enough to handle. After chilling, it should hold its shape when gently pressed.
Step 4: Shape Truffles
Once the pumpkin cheesecake mixture is firm, rub a small amount of butter on your hands to prevent sticking. Roll the chilled mixture into golf-ball-sized balls using your palms, ensuring they are uniform in size. Set the truffles aside on a parchment-lined tray as you shape the rest.
Step 5: Coat Truffles
Pour ½ cup of granulated sugar onto a plate. Roll each formed truffle in the sugar until they’re completely coated, giving them a sparkling and sweet finish. The sugar will create a delightful crunch, contrasting with the creamy pumpkin inside.
Step 6: Decorate
Using a toothpick, gently create ridges on each truffle to mimic a pumpkin’s texture. Place a chocolate chip on top of each truffle to serve as the stem. For added flair, sprinkle some green edible glitter or use green sprinkles around the base for a festive touch.
Step 7: Serve or Store
Serve the Pumpkin Cheesecake Truffles immediately for a fresh, delightful treat, or refrigerate them in an airtight container until ready to enjoy. They can be made ahead of time, which allows for a hassle-free dessert option for any gathering, making these truffles a perfect choice for fall celebrations.
What to Serve with Pumpkin Cheesecake Truffles
These delightful treats are perfect for celebrating the cozy flavors of fall and will effortlessly round out your meal!
- Creamy Mashed Potatoes: Smooth and buttery, they provide a comforting contrast to the rich sweetness of truffles.
- Spiced Apple Cider: A warm, aromatic drink that enhances the fall vibes while balancing the sweetness of your dessert.
- Candied Pecans: Their crunchy texture adds a delightful twist and is a perfect fall-inspired snack alongside each bite of truffle.
- Pumpkin Soup: A savory option that complements the pumpkin flavor, creating a beautiful harmony of tastes on your table.
- Mixed Green Salad: Fresh greens with a zesty vinaigrette offer a refreshing palate cleanser between bites of creamy truffles.
- Vanilla Ice Cream: A scoop of this classic treat creates a delightful juxtaposition of temperature and texture with the truffles.
- Chocolate Coffee: The robust flavors enrich the tasting experience, making each truffle feel even more indulgent and special.
Don’t forget to create your perfect fall gathering by pairing these truffles with your favorite autumn-inspired treats!
Make Ahead Options
These no-bake Pumpkin Cheesecake Truffles are perfect for meal prep, allowing you to enjoy fall flavors with minimal fuss! You can prepare the filling up to 24 hours in advance by following the first three steps of the recipe, then store it in the refrigerator. Once cooled and firm, roll the mixture into truffles and coat them just before serving; this ensures they maintain their delightful texture and sparkle. For optimal freshness, keep them in an airtight container in the refrigerator for up to 3 days. By prepping ahead, you’ll have a delicious treat ready to impress at any autumn gathering without the last-minute rush!
Expert Tips for Pumpkin Cheesecake Truffles
- Thorough Mixing: Ensure your filling is well-mixed to avoid clumps of cream cheese, which can affect the smooth texture of your Pumpkin Cheesecake Truffles.
- Prevent Sticking: Use butter on your hands while rolling the truffles to prevent the mixture from sticking, making the rolling task much easier.
- Chill for Firmness: Allow ample chilling time for the mixture to firm up adequately. If it’s too soft, shaping the truffles will be challenging.
- Make-ahead Option: These truffles can be prepared a day in advance. Store them in an airtight container in the fridge for the best flavor and texture.
- Creative Coating: Experiment with different coatings beyond granulated sugar, such as crushed graham crackers or colored sugars, for an extra festive look.
Pumpkin Cheesecake Truffles Variations
Feel free to explore your creativity and tailor these truffles to your taste buds. Each twist adds a unique flair to this already delightful treat!
- Dairy-Free: Substitute cream cheese and sweetened condensed milk with coconut cream and coconut milk for a vegan-friendly option.
- Nutty Delight: Mix in chopped walnuts or pecans into the filling for a delightful crunch that pairs beautifully with pumpkin. The added texture can really elevate the experience of these truffles.
- Chocolate Lovers: Drizzle melted dark chocolate over the finished truffles for an indulgent layer of decadence that will satisfy any chocolate craving.
- Spiced Up: Add a dash of cayenne pepper or chili powder to the filling for a surprising kick that complements the sweetness. It’s a thrilling twist that will leave your guests wanting more!
- Graham Crackers: Swap out graham cracker crumbs for crushed ginger snaps for a spicy, zesty touch. The flavor change gives each truffle a delightful spin, transporting your taste buds to a cozy bakery.
- Maple Syrup: Replace the granulated sugar in the coating with a dusting of maple sugar for a hint of maple flavor that dances beautifully with the pumpkin.
- Pumpkin Pie Spice: Experiment with other spices such as cardamom or allspice in place of pumpkin pie spice for an unexpected flavor profile that still embodies fall.
- Elegant Presentation: For special occasions, roll the truffles in edible gold dust or cocoa powder for a touch of elegance. Each bite will feel like a festive celebration!
Feel inspired? Dive back into these Pumpkin Cheesecake Truffles and make them your own!
How to Store and Freeze Pumpkin Cheesecake Truffles
Fridge: Store truffles in an airtight container in the refrigerator for up to 5 days, keeping them fresh and ready to enjoy whenever you crave a sweet treat.
Freezer: For longer storage, freeze truffles in a single layer on a parchment-lined tray for about 1-2 hours, then transfer to a freezer-safe container for up to 3 months.
Thawing: When ready to enjoy, transfer the truffles from the freezer to the fridge to thaw for at least 1 hour before serving, ensuring they retain their creamy texture.
Reheating: These pumpkin cheesecake truffles are best enjoyed chilled, so avoid reheating them for the best flavor experience.
Pumpkin Cheesecake Truffles Recipe FAQs
What kind of pumpkin puree should I use?
Absolutely go for pure canned pumpkin puree! It gives you that rich, authentic pumpkin flavor without added sugar and spices. Avoid pumpkin pie filling, which is already sweetened and seasoned.
How should I store Pumpkin Cheesecake Truffles?
Store your truffles in an airtight container in the refrigerator for up to 5 days. This keeps them fresh and ready to indulge at a moment’s notice. Just make sure to keep them separated with parchment paper if stacking to avoid sticking!
Can I freeze Pumpkin Cheesecake Truffles?
Yes! For longer storage, freeze your truffles in a single layer on a parchment-lined tray for about 1-2 hours. Once firm, transfer them to a freezer-safe container. They can be frozen for up to 3 months. When you’re ready to enjoy, simply move them to the fridge to thaw for about 1 hour.
What if my filling is too soft to roll into truffles?
If your filling feels too soft, don’t worry! Just pop it back in the fridge and let it chill for an additional 30 minutes or until it firms up. Chilling is key for achieving the perfect texture. Using a little extra butter on your hands can also help when rolling, as a light touch makes the process smoother!
Are these truffles suitable for dietary restrictions?
These Pumpkin Cheesecake Truffles can be modified for various dietary needs. For a gluten-free option, replace graham cracker crumbs with ground almonds. If you’re looking for a dairy-free version, use coconut milk instead of sweetened condensed milk and swap the cream cheese for a vegan alternative. Always check your ingredients for allergies!

Pumpkin Cheesecake Truffles: Fall's Creamy, No-Bake Delight
Ingredients
Equipment
Method
- In a medium skillet, melt 4 tablespoons of butter over medium heat. Once melted, add 8 ounces of cream cheese, 1 cup of canned pumpkin puree, 1 cup of sweetened condensed milk, and 2 teaspoons of pumpkin pie spice. Stir gently until the mixture thickens and becomes smooth, about 5-7 minutes.
- Remove the skillet from heat and stir in 1 cup of graham cracker crumbs and ½ cup of white chocolate chips. Mix until fully combined.
- Spread the mixture into a butter-greased baking sheet. Cover with plastic wrap and refrigerate for at least 2 hours.
- Once firm, rub a small amount of butter on your hands and roll the mixture into golf-ball-sized balls.
- Pour ½ cup of granulated sugar onto a plate and roll each truffle in the sugar.
- Using a toothpick, create ridges on each truffle and place a chocolate chip on top for the stem.
- Serve immediately or refrigerate until ready to enjoy.
Leave a Reply