
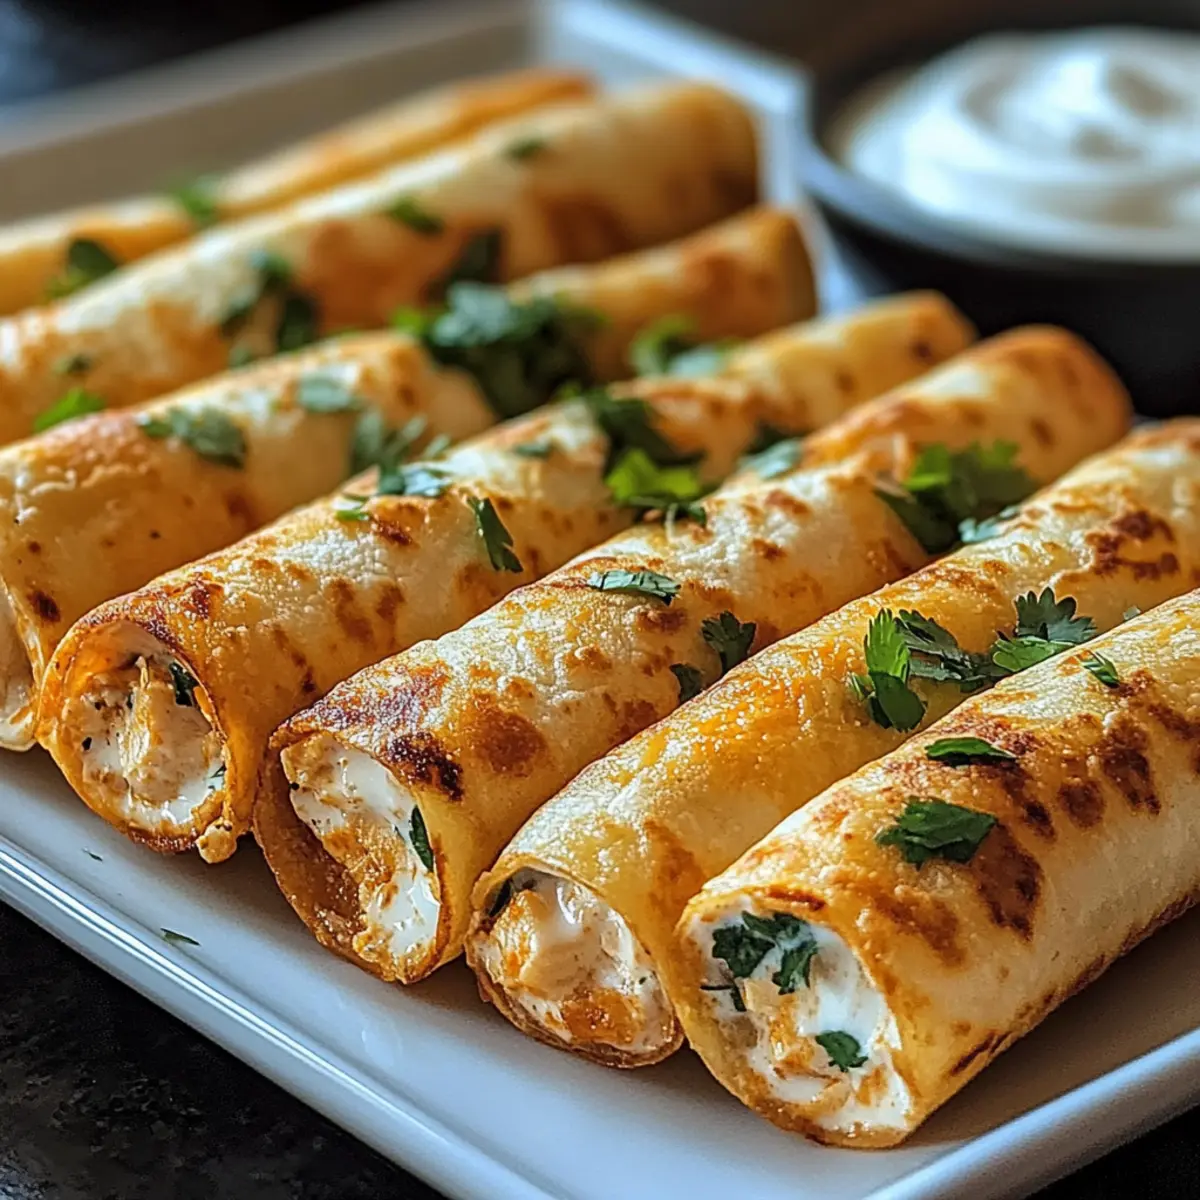
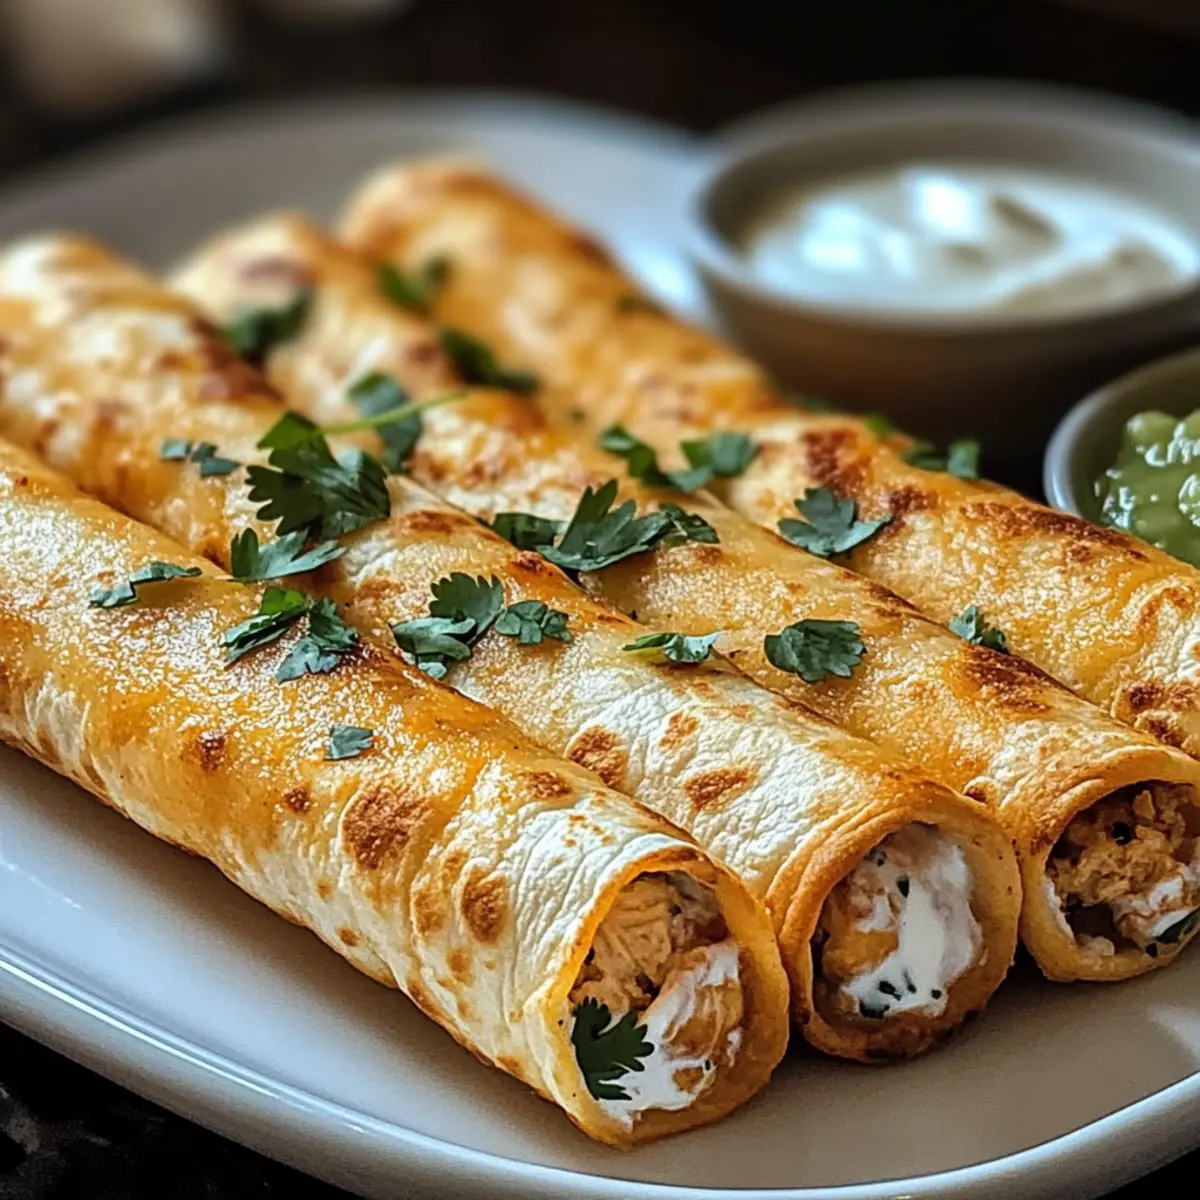
In the hustle and bustle of life, snacking often turns into a quick grab of something less than satisfying. Enter Crispy Chicken Taquitos, a scrumptious solution that transforms your snack game! These delightfully crunchy tortillas are filled with a creamy blend of chicken, cheese, and spices, making them an absolute joy to prepare from the comfort of your home. The beauty of this easy taquitos recipe lies in its versatility—you can customize the fillings to suit your cravings or dietary needs, whether it’s adding roasted veggies or switching to a plant-based protein. Plus, they bake up crispy in just 20 minutes, making them the perfect appetizer for game nights or a speedy weeknight dinner. Curious about how these little wonders can elevate your next gathering? Let’s dive in!

Why are Crispy Chicken Taquitos a Must-Try?
Crispy Crunch: These taquitos are the ultimate snack! With a perfectly golden exterior, each bite delivers that satisfying crunch you crave.
Creamy Filling: The rich chicken and cream cheese filling creates a delicious contrast to the crispy tortilla, making for a delightful mouthful every time.
Customizable Flavor: Whether you’re a spice lover or prefer mild, you can easily adjust the salsa and spices to match your taste preferences.
Quick & Easy: In just 20 minutes, you can bake up a fresh batch, leaving you more time to enjoy with friends and family.
Crowd-Pleasing Shape: Perfect for parties or game nights, these handheld delights are easy for guests to grab and savor. Consider serving them with a side of guacamole or your favorite salsa for the perfect finishing touch!
Crispy Chicken Taquitos Ingredients
For the Filling
• Cooked Shredded Chicken – Adds protein and texture; use rotisserie chicken for convenience.
• Cream Cheese – Provides a creamy texture; let it soften before mixing for easier blending.
• Shredded Cheddar or Mexican Blend Cheese – Adds richness; substitute with dairy-free cheese if desired.
• Salsa (mild or spicy) – Infuses flavor and moisture; adjust the spiciness according to your taste.
• Garlic Powder – Enhances aroma; fresh garlic can also be used for a more robust flavor.
• Chili Powder – Adds warmth and a slight kick; consider smoked chili powder for a unique twist.
• Cumin – Offers earthy notes; feel free to omit if a lighter flavor is preferred.
• Salt and Black Pepper – Essential for seasoning; adjust to taste.
For the Wrap
• Small Flour or Corn Tortillas – The base for your taquitos; corn tortillas offer a gluten-free option.
• Cooking Spray or Oil – Promotes crispiness during baking; any neutral oil works great.
Optional Toppings
• Chopped Cilantro – Adds freshness; sprinkle on top for a vibrant touch.
• Sour Cream and Guacamole – Perfect for dipping; they add a creamy contrast to the crispy taquitos.
• Extra Cheese – For those who can’t get enough cheese; sprinkle before baking for a melty topping.
With these Crispy Chicken Taquitos ingredients, you’ll be well on your way to creating a delicious and satisfying snack!
Step‑by‑Step Instructions for Crispy Chicken Taquitos
Step 1: Preheat the Oven
Begin by preheating your oven to 425°F (220°C). While the oven heats up, prepare a baking sheet by lining it with parchment paper or lightly greasing it to prevent the taquitos from sticking. Having everything ready will make the process smoother as you dive into making your delicious Crispy Chicken Taquitos.
Step 2: Mix the Filling
In a large mixing bowl, combine the cooked shredded chicken, softened cream cheese, shredded cheese, salsa, garlic powder, chili powder, cumin, salt, and black pepper. Use a spatula to mix everything together until it’s creamy and well-blended, ensuring the flavors meld beautifully. This filling is the heart of your Crispy Chicken Taquitos, so be thorough!
Step 3: Prepare the Tortillas
To make the tortillas pliable, warm them in the microwave for about 20 seconds. This will help avoid cracking when you roll them. Once warmed, stack and cover the tortillas with a clean kitchen towel to keep them warm as you prepare to fill them with your flavorful mixture.
Step 4: Fill the Tortillas
Take one warmed tortilla and spoon 2-3 tablespoons of the chicken filling onto one edge. Carefully roll the tortilla tightly around the filling, securing it well so that it holds its shape. Repeat this process for each tortilla until all your filling is used up, ensuring your Crispy Chicken Taquitos are ready for baking.
Step 5: Arrange on the Baking Sheet
Place the rolled taquitos seam-side down onto the prepared baking sheet. Spread them out in a single layer to allow even cooking, ensuring they’re not overcrowded. This step is crucial for achieving that perfect crispy texture you desire from your Crispy Chicken Taquitos!
Step 6: Oil for Crispiness
Lightly brush or spray the tops of the taquitos with cooking oil. This is what will give your taquitos their golden brown color and delightful crunch. The oil helps achieve crispy perfection during the baking process, setting your Crispy Chicken Taquitos apart.
Step 7: Bake to Golden Perfection
Bake your taquitos in the preheated oven for 15-20 minutes, or until they turn golden brown and crisp. Keep an eye on them during the last few minutes, as every oven can vary. If you want an extra crispy finish, for the last 1-2 minutes, switch to broil, watching closely to avoid burning.
Step 8: Serve and Enjoy
Once baked, remove the Crispy Chicken Taquitos from the oven and let them cool slightly. Serve them warm with optional toppings like chopped cilantro, sour cream, and guacamole on the side for dipping. They’ll be a hit at any event, making your snack time or gathering truly special!
Make Ahead Options
These Crispy Chicken Taquitos are perfect for busy weeknights, allowing you to prep ahead and save valuable time! You can assemble the taquitos and refrigerate them for up to 24 hours. Simply prepare your filling and roll the taquitos as instructed, placing them on a baking sheet lined with parchment paper. Cover tightly with plastic wrap to prevent drying out. When you’re ready to bake, preheat your oven and bake directly from the fridge, adding an extra couple of minutes to the cooking time if needed. This method maintains their delicious crispiness, ensuring that your homemade taquitos are just as delightful as if they were prepared fresh on the spot!
Tips for the Best Crispy Chicken Taquitos
Warm Tortillas: Make sure to warm your tortillas before rolling. This prevents cracking and ensures easy maneuvering as you fill your crispy chicken taquitos.
Avoid Overfilling: It can be tempting to add more filling, but overstuffing can cause the taquitos to burst while baking. Stick to 2-3 tablespoons for best results!
Oil Application: A light coating of oil is key for achieving that golden, crispy texture. Don’t skip this step—it makes all the difference in your taquitos!
Bake and Broil: For an extra crunchy finish, bake the taquitos first, then switch to broil for the last few minutes. Watch them closely to prevent burning!
Prep Ahead: Feel free to assemble the taquitos ahead of time. You can refrigerate or freeze them. Just remember that baking time may increase for frozen taquitos.
Flavor Adjustments: Experiment with different salsas or spices to customize the flavor profile to your liking. Your crispy chicken taquitos should reflect your personal taste!
What to Serve with Crispy Chicken Taquitos
Transform your delightful Crispy Chicken Taquitos into a complete feast with these tasty accompaniments that enhance every bite!
-
Fresh Guacamole: This creamy avocado dip complements the crunchy taquitos beautifully and adds a burst of freshness.
-
Zesty Salsa: Bright and tangy salsa, whether mild or spicy, provides a refreshing kick, enhancing the flavors of the taquitos.
-
Mexican Street Corn: Sweet, smoky, and buttery corn on the cob topped with cheese and spices creates a delicious contrast to the crispy taquitos.
With such vibrant sides, your meal will be a celebration of flavors!
-
Chilled Black Bean Salad: A protein-packed, refreshing salad that balances the savory taquitos with its crisp veggies and zesty dressing.
-
Cilantro Lime Rice: Fluffy rice seasoned with zesty lime and fresh cilantro brings a light and fragrant touch to your meal.
-
Margaritas or Horchata: Cool down with a classic margarita for a festive vibe, or sip on a creamy horchata for something sweet and refreshing.
How to Store and Freeze Crispy Chicken Taquitos
Fridge: Store baked taquitos in an airtight container for up to 3 days. Reheat in the oven at 375°F (190°C) for 10-15 minutes to restore crispness.
Freezer: For longer storage, freeze uncooked taquitos on a baking sheet until solid, then transfer to a freezer bag for up to 2 months. Bake directly from frozen, adding a few extra minutes to the cooking time.
Reheating from Fridge: From the fridge, enjoy leftover crispy chicken taquitos by reheating them in the oven to maintain their crunch—about 10-15 minutes at 375°F (190°C) works best.
Make-Ahead Tips: Prepare and assemble taquitos in advance, storing them in the fridge for a quick meal or freeze them for an easy future snack with minimal effort.
Crispy Chicken Taquitos: Customization Ideas
Make your Crispy Chicken Taquitos even more delightful with these simple twists and turns, allowing your creativity to shine!
-
Protein Swap: Switch out shredded chicken with cooked shredded beef, turkey, or even canned tuna for a different flavor profile. The magic lies in the blend—each alternative brings its own unique taste.
-
Vegetarian Option: Replace chicken with beans, sautéed mushrooms, or cheese. This way, you can enjoy a rich and satisfying bite without any meat. Think about adding bell peppers for an extra crunch!
-
Add Extra Veggies: Incorporate diced bell peppers, corn, or fresh spinach into the filling. This not only boosts nutrition but also adds vibrant colors and flavors, making your taquitos even more appealing.
-
Spice it Up: If you enjoy heat, mix in diced jalapeños or switch your salsa for a spicier variety. Just remember, the joy of cooking is making it your own, and a little kick can turn these taquitos into a real fiesta!
-
Cheesy Bliss: For cheese lovers, sprinkle extra shredded cheese on the insides before rolling or on top before baking for a gooey, melt-in-your-mouth experience. The more, the merrier, right?
-
Gluten-Free Delight: Use corn tortillas instead of flour for a gluten-free version that’s just as tasty. With a little creativity, you can create a dish that’s just as satisfying for everyone!
-
Herb Infusion: Add fresh herbs like cilantro or parsley to the filling to brighten up the flavor profile. A touch of fresh greenery can make every bite feel fresh and exciting.
You can always enhance your taquitos with side options like guacamole, sour cream, or a zesty avocado sauce. Your culinary adventure starts here!
Crispy Chicken Taquitos Recipe FAQs
How do I choose ripe ingredients for my Crispy Chicken Taquitos?
Absolutely! Selecting ripe ingredients can enhance the flavor of your taquitos. When choosing chicken, opt for cooked, shredded chicken—using rotisserie chicken is a quick, convenient option. For salsa, look for brands that list fresh ingredients first, avoiding preservatives. If you’re adding any vegetables, select ones that are vibrant and firm, avoiding any that have dark spots or are overly soft.
How should I store leftover Crispy Chicken Taquitos?
Very! To keep your baked taquitos fresh, store them in an airtight container in the fridge for up to 3 days. When you’re ready to enjoy them again, preheat your oven to 375°F (190°C) and reheat for about 10-15 minutes. This method will help maintain their crispness, ensuring you get a delightful crunch each time!
Can I freeze my Crispy Chicken Taquitos?
Of course! To freeze uncooked taquitos, lay them out on a baking sheet, ensuring they don’t touch, and place them in the freezer until solid (about 1 hour). Then, transfer them to a freezer bag for up to 2 months. When you’re ready to enjoy them, bake straight from frozen for 20-25 minutes, adding a few minutes if needed until golden brown.
What should I do if my taquitos are bursting open while baking?
No worries! If you find your taquitos are bursting, it might be that they are overfilled. Be sure to stick to 2-3 tablespoons of filling per tortilla. Also, rolling them tightly is essential—make sure you secure the filling well at the seam. If problems persist, try lightly brushing the outside of the rolled taquitos with oil to create a seal.
Are Crispy Chicken Taquitos suitable for people with dietary restrictions?
Very much so! You can make these taquitos gluten-free by using corn tortillas instead of flour. For a dairy-free version, substitute cream cheese and cheese with vegan alternatives. Additionally, if you want to accommodate a vegetarian diet, simply replace the chicken with black beans, sautéed mushrooms, or a mix of roasted vegetables. This flexibility makes them perfect for gatherings with diverse dietary needs!
How can I customize the filling for my Crispy Chicken Taquitos?
The more, the merrier! You can get creative with your filling. Start with your base of cooked shredded chicken and cream cheese, then mix in ingredients like diced jalapeños for heat, chopped bell peppers for crunch, or corn for sweetness. You can also experiment with different spices—try smoked chili powder or taco seasoning for added zing. Just remember to keep a balance between flavors so that each bite remains delicious!

Crispy Chicken Taquitos: Crunchy Bliss for Any Occasion
Ingredients
Equipment
Method
- Preheat your oven to 425°F (220°C) and prepare a baking sheet by lining it with parchment paper or greasing it.
- Combine the cooked shredded chicken, cream cheese, shredded cheese, salsa, garlic powder, chili powder, cumin, salt, and pepper in a mixing bowl.
- Warm the tortillas in the microwave for about 20 seconds to make them pliable.
- Take a warmed tortilla, spoon 2-3 tablespoons of the filling onto one edge, and roll it tightly.
- Place the rolled taquitos seam-side down on the baking sheet in a single layer.
- Lightly brush or spray the tops of the taquitos with cooking oil.
- Bake in the preheated oven for 15-20 minutes until golden brown and crisp.
- Let them cool slightly, then serve warm with optional toppings.
Leave a Reply