
As the leaves begin to turn and a crisp chill fills the air, I often find myself craving the cozy comforts of fall. This season calls for something special, and there’s nothing quite like the allure of Bloomin’ Apples. Imagine warm, tender apples that look like they’ve just blossomed from the oven, their gooey caramel centers oozing with every bite. This quick and interactive dessert not only satisfies those autumn cravings but is also a delightful crowd-pleaser, perfect for gatherings with friends and family. It’s easy enough for a weeknight treat, yet impressive enough to share on special occasions. Who can resist the charm of a beautiful apple dessert paired with a scoop of cold vanilla ice cream? Ready to create a stunning centerpiece for your fall table? Let’s dive into this delicious adventure!
Why are Bloomin’ Apples a must-try?
Interactive Experience: Prepare for fun as you slice and stuff these apples together, making it a memorable activity for family or friends.
Comforting Aromas: The delightful scents of cinnamon and caramel wafting from the oven create an inviting atmosphere that enhances any gathering.
Remarkably Simple: Just follow a few easy steps, and you’ll have a stunning dessert ready in no time—perfect for busy weeknights!
Versatile Delight: Feel free to experiment with different fillings or toppings, tailoring each batch to suit your taste and impress your guests.
Amazing Presentation: These Bloomin’ Apples not only taste fantastic but also look gorgeous, making them a stunning centerpiece for any fall feast.
Make this cozy fall dessert your new go-to!
Bloomin’ Apples Ingredients
• Discover the essential ingredients for Bloomin’ Apples that will warm your heart!
For the Apples
- Firm Apples – Select varieties like Honeycrisp, Gala, or Granny Smith to ensure they hold their shape while baking.
- Melted Butter – Adds richness and helps the cinnamon-sugar mixture stick; you can swap with coconut oil for a dairy-free version.
For the Sweet Filling
- Packed Brown Sugar – This ingredient gives your apples a deep sweetness with caramel notes; light brown sugar can also work.
- Granulated Sugar – Adds extra sweetness and a slight crunch to the caramelized exterior; feel free to omit if you prefer less sweetness.
- Ground Cinnamon – Enhances the warm flavors of the dessert; there’s no direct substitute, but pumpkin pie spice works well for a twist.
- Chewy Caramel Squares – This gooey filling is a must-have; use any soft caramel candy but avoid hard varieties that won’t melt well.
For Serving
- Vanilla Ice Cream – Provides a creamy contrast to the warm apples; alternative plant-based versions can be used for a dairy-free option.
- Caramel Sauce – Perfect for drizzling on top to enhance both aesthetics and flavor; it’s optional if you’re watching sugar intake.
Now, you’re all set to create delicious Bloomin’ Apples that wow everyone at your next gathering!
Step‑by‑Step Instructions for Bloomin’ Apples
Step 1: Preheat the Oven
Begin by preheating your oven to 375°F. If you prefer using an air fryer for a quicker option, set it to 350°F. This initial step is crucial as it ensures your Bloomin’ Apples will bake evenly and develop that delightful tender texture as they cook.
Step 2: Prepare the Apples
Take your chosen firm apples and slice off the top, creating a cap. Use a corer to remove the core while ensuring the bottom remains intact. Carefully make thin, crosswise cuts, stopping just before you reach the base to create the ‘blooming’ effect. This allows steam to escape, resulting in perfectly cooked apples.
Step 3: Stuff the Apples
Gently fill each prepared apple with two chewy caramel squares, allowing them to settle inside. In a separate bowl, mix melted butter, brown sugar, granulated sugar, and ground cinnamon. Brush this delicious mixture over the stuffed apples generously, ensuring they are coated well for maximum flavor and caramelization.
Step 4: Bake the Apples
Place the stuffed apples upright in a greased baking dish. Bake them in your preheated oven for about 30 minutes, or if using an air fryer, cook for roughly 20 minutes. Keep an eye on them; they’re ready when the apples are tender and fragrant, and their skin starts to wrinkle beautifully.
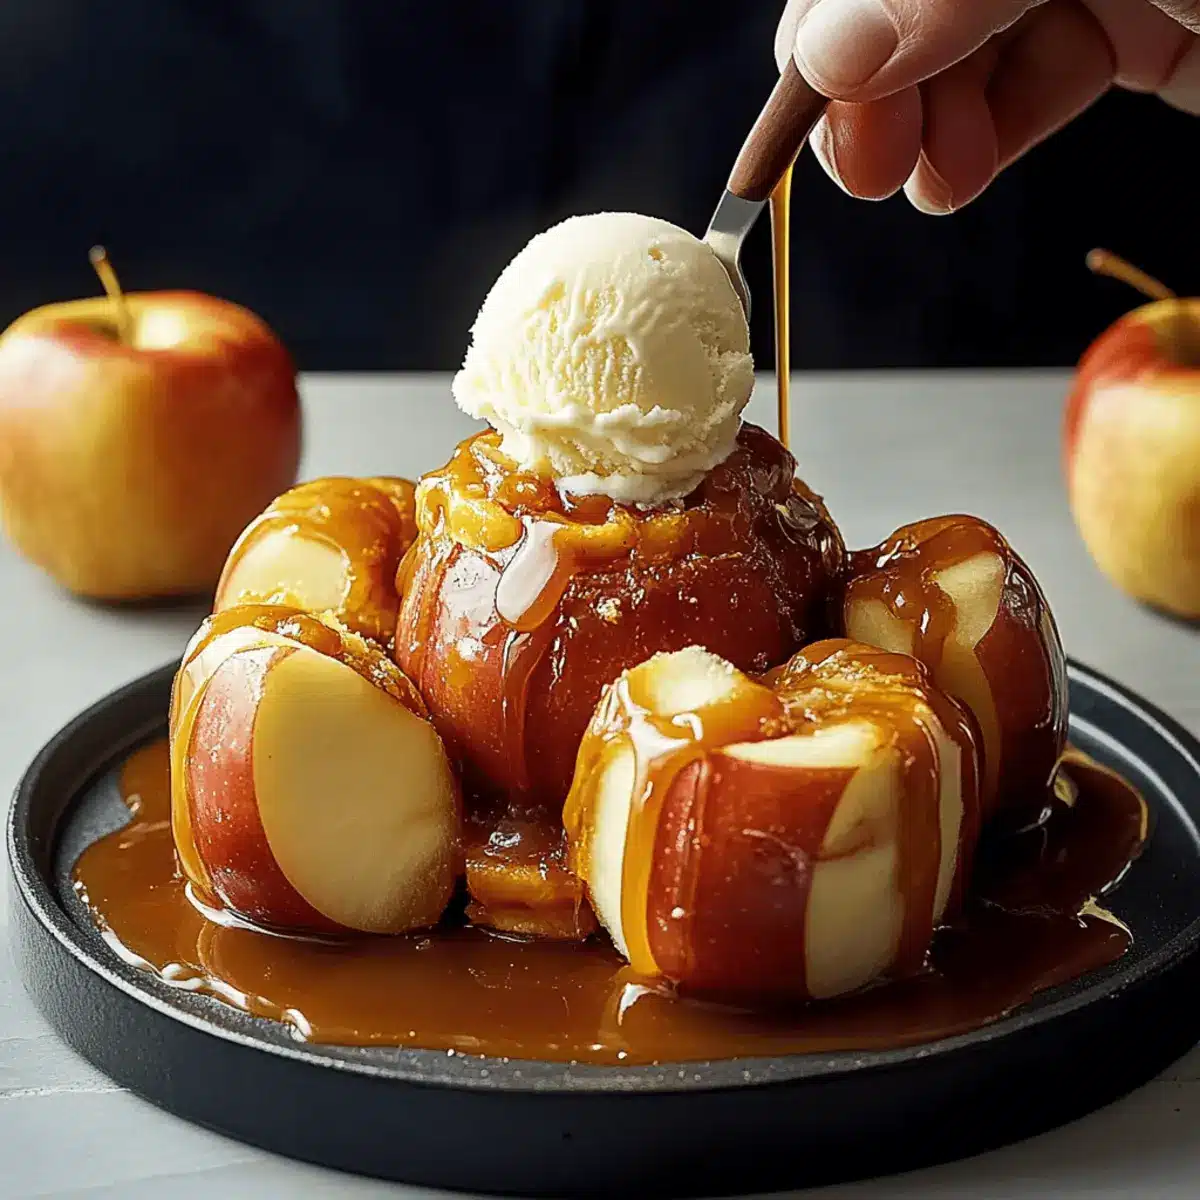
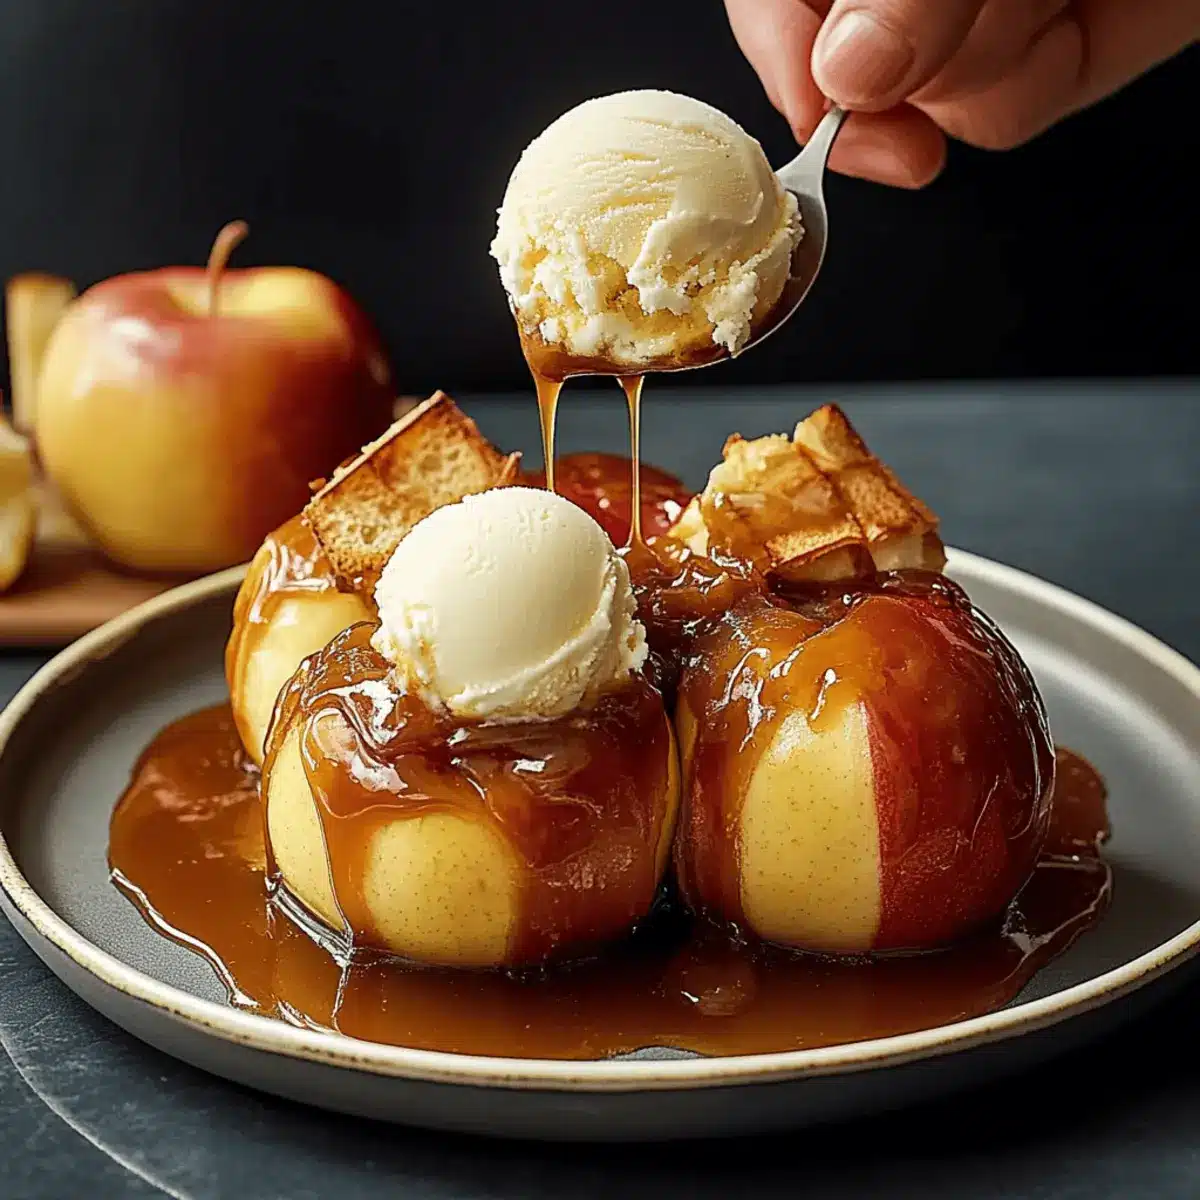
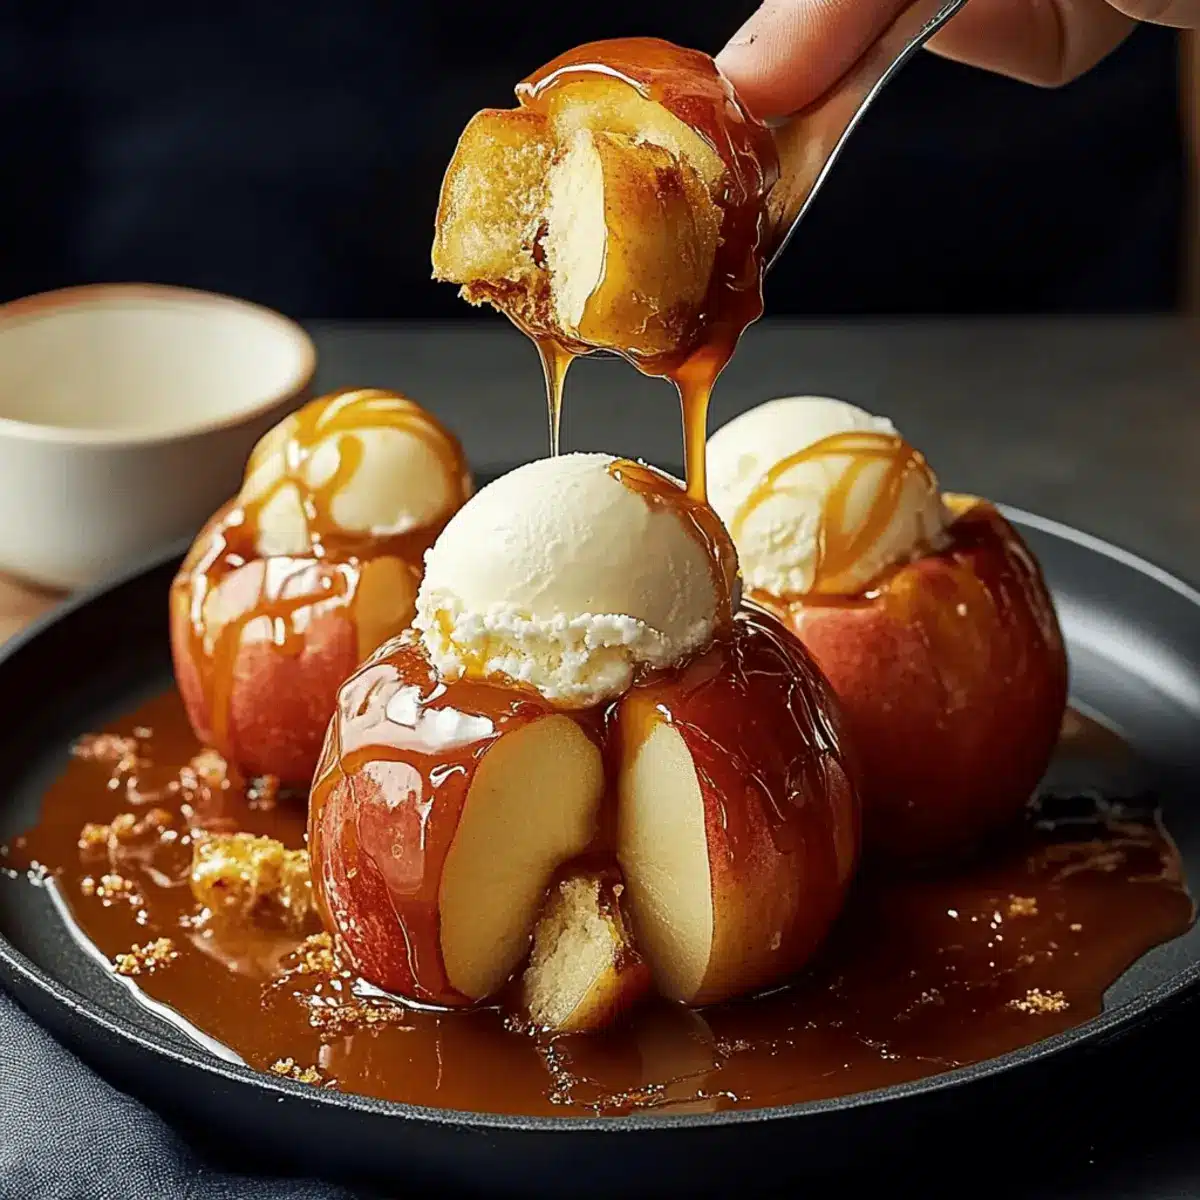
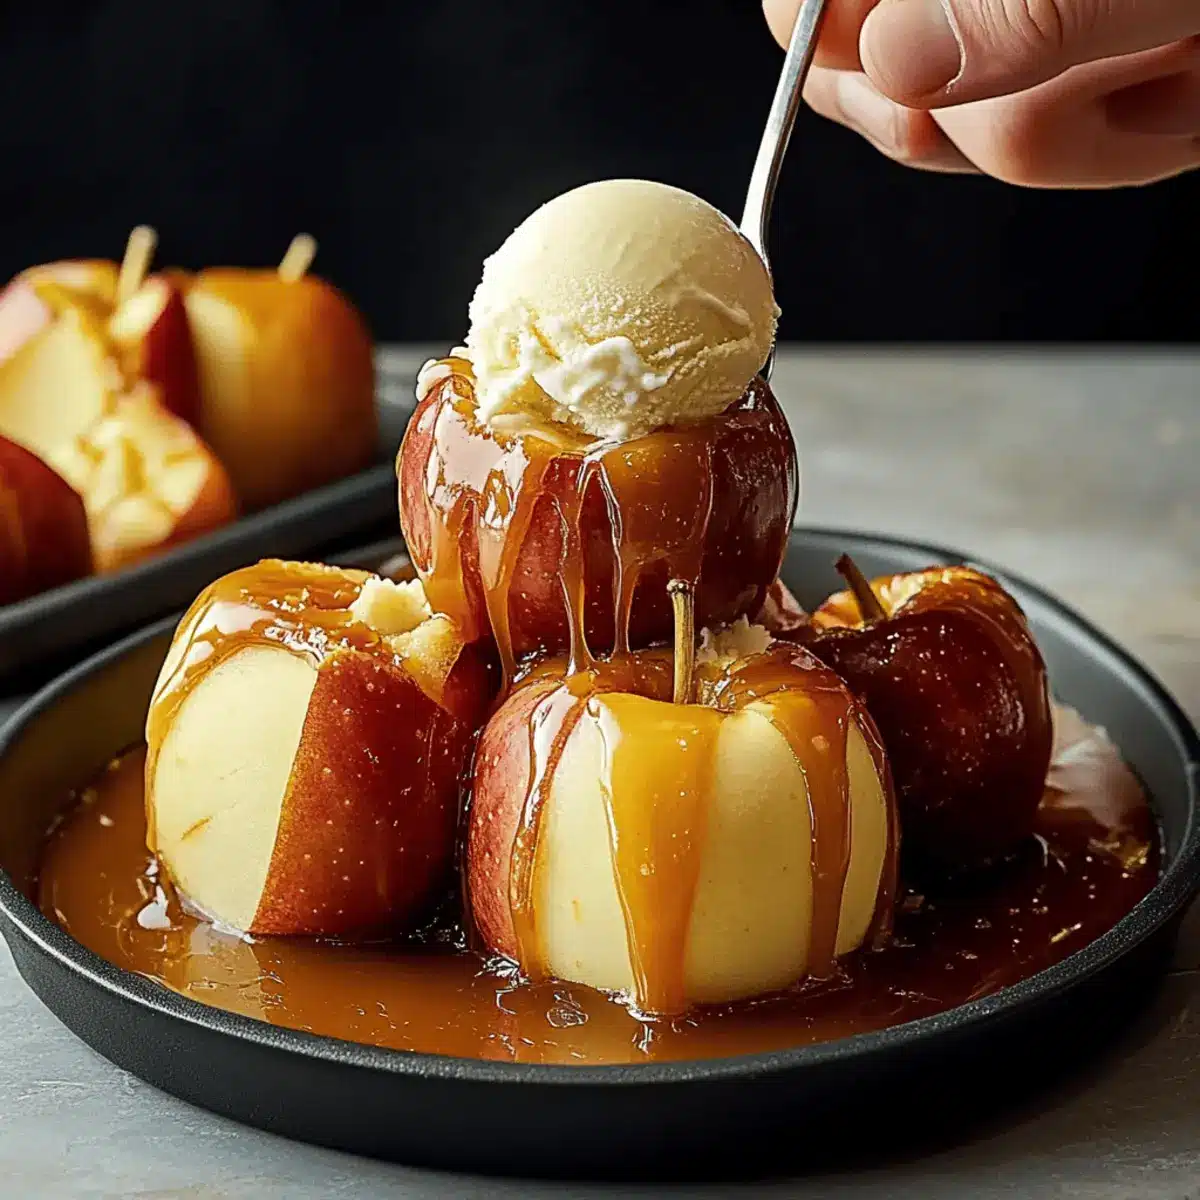
Step 5: Serve Your Bloomin’ Apples
Once your Bloomin’ Apples are done, remove them from the oven and let them cool slightly for a few minutes. Serve them warm with a generous scoop of vanilla ice cream on top and drizzle with caramel sauce, if desired. The contrast of warm apples and cold ice cream is simply irresistible!
Expert Tips for Bloomin’ Apples
- Choose the Right Apple: Opt for firm varieties like Honeycrisp or Granny Smith to prevent mushy results during baking.
- Chopstick Trick: Use chopsticks on either side of the apple to stop your knife from cutting all the way through; this helps create the perfect bloom effect.
- Butter Mixture Application: Be generous with the melted butter mixture; it maximizes flavor and ensures a beautifully caramelized exterior.
- Watch the Time: Start checking for doneness a few minutes earlier than the suggested baking time to avoid overcooking your Bloomin’ Apples.
- Creative Fillings: Don’t hesitate to experiment with different fillings like nuts or chocolate chips for a delightful twist.
Bloomin’ Apples Variations & Substitutions
Feel free to get creative and customize your Bloomin’ Apples to suit your taste and dietary needs!
- Nutty Crunch: Add chopped pecans or walnuts inside the apples for a delightful texture contrast and extra flavor. The nuts bring a wonderful crunch that complements the soft fruit beautifully.
- Fruit Fusion: Mix in dried cranberries or raisins for a sweet and tart twist, giving a layered flavor experience with each bite. This twist not only adds flavor but also a pop of color!
- Spiced Up: Incorporate a dash of nutmeg or ginger to the cinnamon-sugar mix for an added warmth that sings of autumn spice. Just a sprinkle can elevate your dish and delight your senses!
- Chocolate Lovers: Swap out the caramel for chocolate chips for a rich, gooey filling that will please any chocolate enthusiast. Pair with a scoop of chocolate ice cream for an indulgent treat!
- Dairy-Free Delight: Use coconut oil instead of butter and serve with your favorite plant-based ice cream to create a delicious vegan version. You’ll still enjoy all the wonderful flavors without the dairy.
- Maple Sweetness: Drizzle a bit of maple syrup over the stuffed apples before baking to infuse them with a lovely sweetness and distinct flavor profile. The maple enhances the fall vibes with every bite!
- Spicy Kick: Add a pinch of cayenne or crushed red pepper flakes for a surprising kick to balance the sweetness of the apples and caramel. This will definitely intrigue your guests!
- Creamy Alternative: Instead of vanilla ice cream, try a scoop of cinnamon ice cream for a delicious twist that complements the apple flavors! The creamy texture pairs perfectly with warm, baked apples.
Feel inspired? Each variation offers a unique twist to your creation! For more delightful ideas, you might enjoy exploring how to use different fillings to enhance your dessert experience.
How to Store and Freeze Bloomin’ Apples
Fridge: Keep any leftover Bloomin’ Apples in an airtight container in the fridge for up to 3 days. Reheat them in the oven or microwave until warm.
Freezer: For longer storage, freeze the baked apples on a baking sheet before transferring them to a freezer bag. They can be frozen for up to 2 months; reheat from frozen, extending the baking time as needed.
Make-Ahead Tip: Core and prepare the apples a few hours in advance, treating them with lemon juice to prevent browning before baking. This keeps them fresh and ready to cook when you are!
Reheating: To reheat, place the apples in a baking dish, cover with foil, and warm in a 350°F oven for about 10-15 minutes, ensuring they stay moist and delightful.
What to Serve with Caramel-Stuffed Bloomin’ Apples?
Indulging in these blooming apples is only the beginning of a delightful autumn feast, complete with flavors that comfort and warm the soul.
-
Creamy Vanilla Ice Cream: A classic pairing that adds a luscious, cold contrast to the warm apples, enhancing the entire dessert experience.
-
Cinnamon Sugar Donuts: Soft, sugary donuts bring a delightful crunch and complement the warm, spiced flavors of the Bloomin’ Apples.
-
Maple Glazed Pecans: Their crunchy texture and sweet, nutty taste create a perfect balance that harmonizes beautifully with the apples’ caramel filling.
-
Warm Spiced Cider: Sipping on spiced apple cider adds a seasonal beverage option that echoes the fall flavors found in Bloomin’ Apples while keeping everyone cozy.
-
Fresh Fruit Salad: A light, refreshing mix of seasonal fruits can cleanse the palate and provide a gorgeous color contrast on the table.
-
Cheddar Cheese Platter: A selection of sharp cheddar cheese pairs unexpectedly well, enhancing the sweet caramel in the apples with its savory notes.
-
Pumpkin Pie: This classic autumn dessert brings comforting spices to the table and is a nostalgic choice that everyone loves.
-
Chocolate Stout Cake: For the chocolate lovers, this rich dessert pairs wonderfully with the fruity notes, creating a delightful twist to the meal.
-
Caramel Drizzle: Simply adding extra caramel sauce on the side is a must for those who can’t get enough of that gooey sweetness!
Enjoy crafting a beautiful, shareable fall celebration around these Caramel-Stuffed Bloomin’ Apples!
Make Ahead Options
These Bloomin’ Apples are perfect for busy weeknights! You can core and slice the apples up to 3 hours in advance, treating them with a mixture of lemon juice and water to prevent browning. Additionally, you can prepare the caramel filling and the butter-sugar-cinnamon mixture ahead of time and store them in the refrigerator for up to 24 hours. When you’re ready to serve, simply stuff the apples with the caramel, brush them with the prepped mixture, and bake as directed. This way, you’ll have a stunning dessert ready with minimal effort, allowing you to focus on enjoying the moment with family and friends!
Bloomin’ Apples Recipe FAQs
What type of apples should I use for Bloomin’ Apples?
Absolutely! Opt for firm varietals like Honeycrisp, Gala, or Granny Smith. These apples maintain their shape while baking, giving your Bloomin’ Apples that perfect flower-like appearance. Avoid soft apples, as they may become mushy.
How should I store leftover Bloomin’ Apples?
Very simply! Store leftover Bloomin’ Apples in an airtight container in the fridge for up to 3 days. To reheat, pop them in the oven or microwave until warm; this will help restore their delightful texture and flavor.
Can I freeze Bloomin’ Apples?
Yes, you can! To freeze, first allow the baked apples to cool completely. Arrange them on a baking sheet in a single layer and freeze until solid. Then transfer them to a freezer bag and they can be stored for up to 2 months. When you’re ready to enjoy, bake them from frozen, allowing for a bit of extra time to ensure they’re heated through.
What if my apples are cut too deeply while preparing?
No worries! If you cut too deep and the apples don’t hold their shape perfectly, you can still proceed. Just ensure you don’t overfill them with the caramel, as it may ooze out during baking. The flavor will still be delicious, and your guests will love them!
Can I use different fillings besides caramel?
Absolutely! Feel free to get creative. You can substitute the caramel with chocolate chips, or mix in oats, nuts, or dried fruits for a unique twist. Each variation can change the experience entirely, allowing you to tailor your Bloomin’ Apples to your taste.preferences.
Are Bloomin’ Apples pet-friendly?
It’s important to note that while apples are safe for dogs, the added sugar and caramel in this recipe are not suitable for pets. Always refrain from sharing dessert with your furry friends to keep them healthy!
Delicious Bloomin' Apples: A Cozy Fall Dessert Adventure
Ingredients
Equipment
Method
- Preheat your oven to 375°F (350°F for air fryer).
- Slice off the top of each apple and core them while keeping the bottom intact.
- Make thin crosswise cuts into the apples without cutting through the base.
- Stuff each apple with 2 chewy caramel squares and brush with the melted butter mixture.
- Place apples in a greased baking dish and bake for about 30 minutes, checking for tenderness.
- Serve warm with vanilla ice cream and drizzle with caramel sauce.
Leave a Reply