
As I crafted the first batch of my Chopped Italian Sliders, the warm aroma of melted provolone and zesty deli meats brought back memories of summer picnics and backyard barbecues. Nestled between soft, buttery Kings Hawaiian rolls, these sliders are not just a meal; they’re a heartfelt gathering perfect for game day or casual family dinners. Quick and easy to whip up, they promise to bring smiles to everyone at the table while combining comforting flavors with a delightful crunch. What’s not to love about a dish that feels like a warm hug while satisfying your cravings for something savory and satisfying? Are you ready to taste the magic of these sliders that are sure to impress? Let’s get started!
Why Are Chopped Italian Sliders Worth It?
Simplicity reigns supreme with this recipe, making it a breeze for anyone to whip up. Flavor-packed with a delightful blend of meats and zesty toppings, each bite is a taste sensation. Crowd favorite—perfect for family gatherings, game days, or potlucks, guaranteeing smiles all around. Versatile in flavor, you can easily swap ingredients to fit your mood. Plus, these sliders come together in record time, leaving you more moments to enjoy your company. Don’t miss out—check out my versatile dip selections to serve alongside these delicious Chopped Italian Sliders!
Chopped Italian Sliders Ingredients
Discover everything you need to create these crowd-pleasing sliders!
For the Sliders
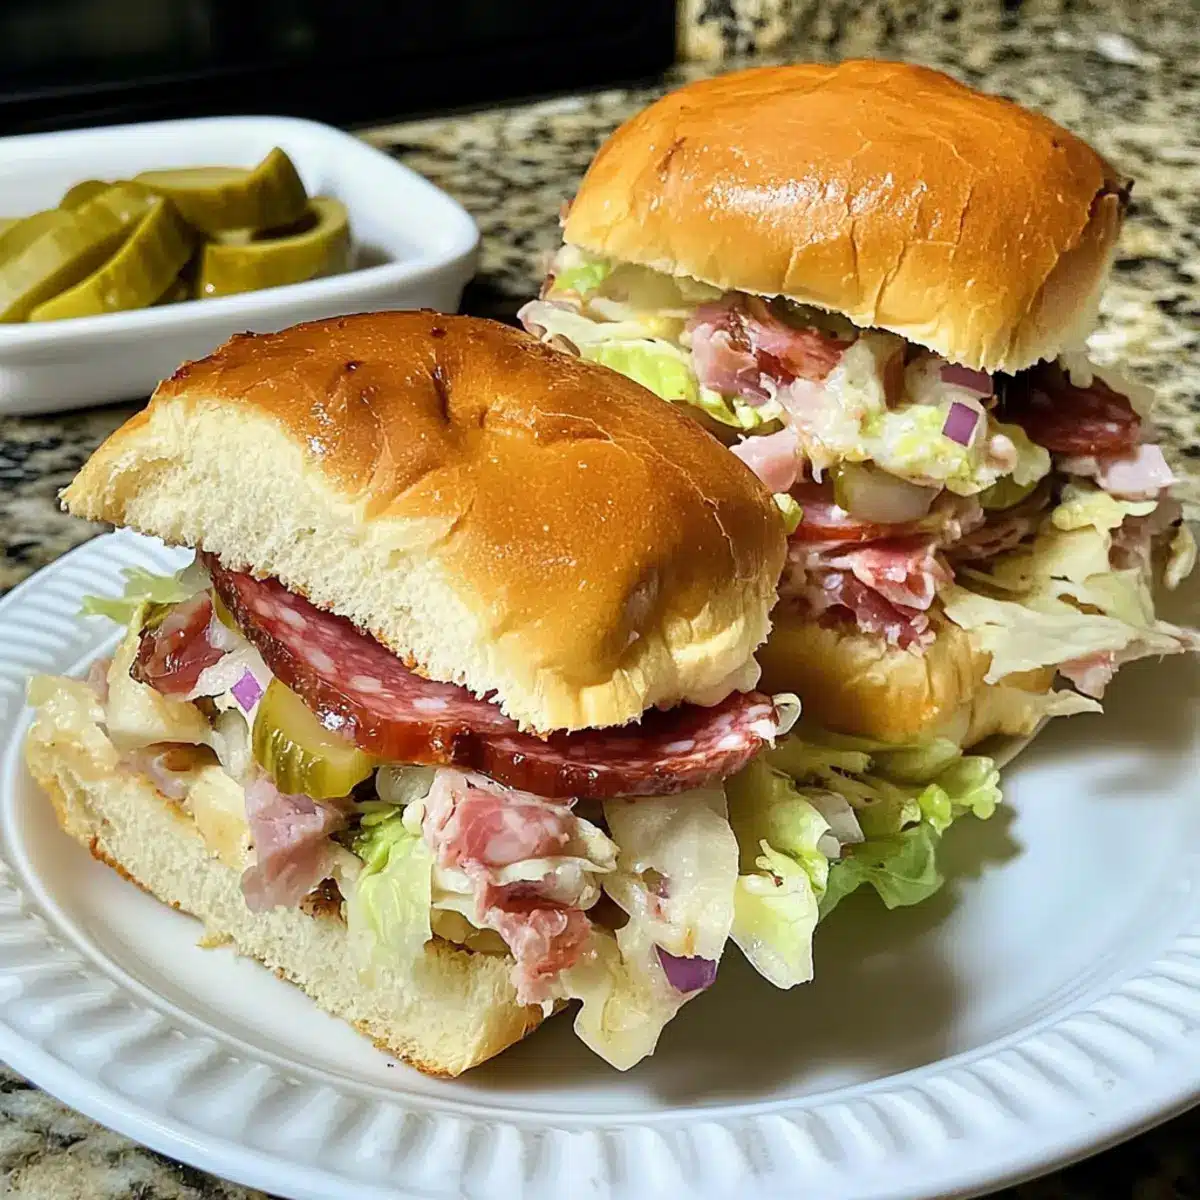
- Kings Hawaiian Savory Butter Rolls – These soft rolls provide a slightly sweet and buttery flavor. Note: Feel free to experiment with any flavor of rolls!
- Deli Sliced Ham – Adds a rich, savory depth to your sliders. Note: Substitute with turkey or roast beef for a twist.
- Deli Sliced Salami – Contributes a peppery flavor that complements the other meats perfectly. Note: Thin slices ensure even distribution.
- Deli Sliced Pepperoni – Infuses classic Italian deliciousness into every bite. Note: For a leaner option, try turkey pepperoni.
- Smoked Provolone Cheese (sliced) – Melts beautifully for that creamy, gooey goodness. Note: Mozzarella or cheddar can work as well.
For the Salad Topping
- Shredded Lettuce – Brings freshness and a satisfying crunch. Note: Freshly shredded lettuce elevates the texture.
- Mayonnaise – Enhances flavor and moisture while helping to toast the rolls. Note: Replace with butter if you prefer a different taste.
- Red Onion (diced) – Adds a sharp bite that balances the richness of the meats. Note: Omit if you prefer a milder flavor.
- Dill Pickles (chopped) – Offers a tangy crunch that elevates the overall flavor. Note: Gherkins work well for a hint of sweetness.
- Pickled Banana Peppers (chopped) – Adds a delightful heat and sweetness. Note: Substitute with jalapeños for extra spice.
- Submarine Dressing – Provides a zesty kick to the salad. Note: Mix olive oil, red wine vinegar, and Italian seasoning as a substitute.
For the Topping
- Butter (melted) – Used for brushing on top rolls, adding flavor and a beautiful golden finish. Note: Mixing in garlic lends an aromatic twist.
- Dried Italian Seasoning – Enhances the savory notes in the sliders. Note: Fresh herbs could be substituted for even more flavor vibrancy.
Experiment with different combinations and make these Chopped Italian Sliders your own! Enjoy the process of creating a dish you can proudly share with family and friends!
Step‑by‑Step Instructions for Chopped Italian Sliders
Step 1: Preheat the Oven
Begin by preheating your oven to 400°F (200°C). This step is crucial as it ensures the perfect golden-brown finish on your sliders. While the oven heats up, gather your baking tray and prepare the Kings Hawaiian rolls for assembly.
Step 2: Prepare the Rolls
Carefully cut the Kings Hawaiian rolls in half, keeping the tops and bottoms together. Place the bottom halves in an oven-safe tray and spread a generous layer of mayonnaise over them. This not only adds flavor but also helps create a nice toasted texture.
Step 3: Toast the Bottom Rolls
With your preheated oven ready, slide the tray with the prepared roll bottoms inside. Bake them for about 7-10 minutes, or until they turn a lovely golden color. Keep an eye on them, as you want them to be warm and slightly crispy, ready to hold all the delicious fillings.
Step 4: Heat the Deli Meats
While the bottoms are toasting, chop your deli meats into bite-sized pieces. Heat a skillet over medium heat and add the chopped meats. Stir occasionally for about 5 minutes or until they’re heated through. This will enhance the flavors and ensure a delightful bite in your Chopped Italian Sliders.
Step 5: Mix the Salad Topping
In a mixing bowl, combine your shredded lettuce, mayonnaise, diced red onion, chopped dill pickles, and pickled banana peppers. Drizzle your submarine dressing over the mixture and toss everything together. The resulting salad should be fresh and vibrant, adding a crisp contrast to your savory sliders.
Step 6: Assemble the Sliders
Once your bottom rolls are nicely toasted, layer the slices of provolone cheese on top. Next, evenly distribute the warm deli meats over the cheese, allowing it to melt slightly. This will create a delicious melt-in-your-mouth experience in every bite.
Step 7: Add the Top Buns
Gently place the top halves of the Kings Hawaiian rolls over the layered meats. Next, melt some butter and combine it with Italian seasoning in a small bowl. Brush this flavorful mixture generously over the tops of your sliders for an extra burst of flavor and a beautiful finish.
Step 8: Bake the Assembled Sliders
Return the assembled Chopped Italian Sliders to the oven and bake for an additional 5-7 minutes. You want them to be heated through and the cheese to be delightfully melted. The tops should be golden and slightly crispy, hinting at the tasty goodness within.
Step 9: Finish with the Salad Mixture
After your sliders have finished baking, carefully remove the tray from the oven. Spread your flavorful salad mixture over the top of the meats, allowing the freshness to meld with the warm ingredients. Place the top buns back on and gently press down before slicing the sliders into individual portions.

What to Serve with Chopped Italian Sliders
The magic of Chopped Italian Sliders doesn’t stop at the slider itself; they can shine even brighter when paired with delicious sides and drinks.
-
Creamy Potato Salad: This classic side adds a cool and creamy contrast to the savory sliders, creating a satisfying meal experience. Its tangy flavors are the perfect companion to the rich taste of the sliders.
-
Zesty Coleslaw: A crunchy and slightly sweet coleslaw complements the flavors in the sliders. Its fresh bite enhances the overall texture, bringing a wonderful balance to every mouthful.
-
Garlic Breadsticks: Soft, buttery breadsticks brushed with garlic are a delightful addition. They allow you to savor every last bit of the savory goodness from the sliders. Pull them apart for that satisfying stretch!
-
Caprese Salad: Featuring fresh basil, tomatoes, and mozzarella, this salad brightens the meal. Its refreshing flavors provide a lovely contrast, perfect for warm gatherings. Drizzled with balsamic glaze, it’s a winning combo.
-
Italian Antipasto Platter: Elevate your game day spread with a platter filled with olives, cured meats, cheeses, and roasted vegetables. This vibrant selection invites guests to mix and match flavors, making it a lively addition to your meal.
-
Fizzy Lemonade: A refreshing, tangy beverage that cleanses the palate between bites. The bubbles and zest of lemonade will revive your taste buds, making every bite of the sliders even more enjoyable.
-
Chilled White Wine: Consider pairing these sliders with a crisp, chilled white wine. Opt for a Sauvignon Blanc to enjoy its citrus notes which beautifully complement the Italian flavors.
-
Dessert Bars: For a sweet finish, serve bite-sized dessert bars like lemon squares or brownies. Their sweet richness brings a lovely conclusion to a savory meal, keeping everyone happily satisfied.
Make Ahead Options
These Chopped Italian Sliders are a fantastic option for meal prep, allowing you to save time during busy weeknights or gatherings. You can prepare the deli meats and salad topping up to 3 days in advance; simply chop your ingredients and store them separately in airtight containers in the refrigerator to maintain their freshness. Additionally, the bottom rolls can be toasted up to 24 hours prior; just keep them wrapped to avoid drying out. When it’s time to serve, layer the prepped meats and salad on the toasted rolls, brush with the seasoned butter, and bake until heated through, ensuring they’ll be just as delicious as freshly made!
Chopped Italian Sliders Variations & Substitutions
Feel free to get creative with your sliders! Let your culinary spirit soar by exploring these delightful twists and alternatives.
- Vegetarian Version: Substitute deli meats with grilled veggies like zucchini and bell peppers. This adds a smoky flavor that everyone will enjoy!
- Cheese Swap: Use mozzarella or sharp cheddar instead of provolone for a different flavor profile. Each cheese brings its own unique twist!
- Dairy-Free Delight: Switch out cheese for your favorite vegan alternative and use vegan mayo. You’ll still enjoy all the delicious flavors!
- Spicy Kick: Add sliced jalapeños or sprinkle in some crushed red pepper flakes for an extra layer of heat. Perfect for spice lovers!
- Herbaceous Boost: Replace dried Italian seasoning with fresh herbs like basil and oregano for a vibrant boost of flavor. Fresh herbs brighten the dish beautifully!
- Crunchy Topping: Mix in some crushed potato chips or crispy fried onions with your salad topping for added texture and flavor. It’s sure to surprise your taste buds!
- Bread Variation: Experiment with different types of rolls like ciabatta or focaccia for a unique take on these sliders. Each bread adds its own character!
Don’t forget to check out my versatile dip selections for tasty pairings that will elevate your Chopped Italian Sliders experience! Have fun mixing and matching to create your perfect slider!
Expert Tips for Chopped Italian Sliders
- Perfectly Toasted Rolls: Ensure the bottom rolls are fully toasted to prevent sogginess. This step is vital for keeping the sliders crisp and delightful!
- Fresh Ingredients: Always use freshly shredded lettuce and vegetables for an optimal crunch in your Chopped Italian Sliders. Freshness elevates the taste!
- Layer Generously: Don’t skimp on the layers of deli meats and cheese; generous portions create that mouthwatering, satisfying bite everyone loves!
- Mix It Up: Feel free to experiment with different deli meats or toppings to personalize your sliders. Customize them according to your family’s taste preferences!
- Serve Immediately: For the best experience, serve these sliders right after assembly. Waiting too long may affect the texture of the salad topping.
How to Store and Freeze Chopped Italian Sliders
Fridge: Store leftover Chopped Italian Sliders in an airtight container for up to 3 days. Reheat in the oven at 350°F (175°C) until warmed through.
Freezer: For longer storage, freeze the assembled sliders wrapped tightly in plastic wrap, then foil. They can last up to 2 months. Thaw in the fridge overnight before reheating.
Room Temperature: To enjoy within a few hours, keep sliders covered at room temperature. Avoid leaving them out for more than 2 hours to ensure food safety.
Reheating: If reheating frozen sliders, bake at 350°F (175°C) for 15-20 minutes or until heated through, ensuring that cheese is gooey and the buns are slightly crispy.

Chopped Italian Sliders Recipe FAQs
What type of rolls should I use for Chopped Italian Sliders?
Absolutely! The recipe calls for Kings Hawaiian Savory Butter Rolls, which add a slightly sweet and buttery flavor. However, you can use any flavor of roll that you enjoy, such as sesame or whole wheat. Just remember, the roll texture should be soft enough to hold the fillings without falling apart.
How do I store leftover Chopped Italian Sliders?
Store any leftovers in an airtight container in the fridge for up to 3 days. To keep them tasting fresh, you can reheat them by placing them in the oven at 350°F (175°C) until they’re warmed through, typically around 10-15 minutes.
Can I freeze Chopped Italian Sliders?
Yes, you can! Wrap the assembled sliders tightly in plastic wrap and then in foil. They’ll maintain quality for up to 2 months in the freezer. When you’re ready to enjoy them, thaw in the fridge overnight, and then reheat in the oven at 350°F (175°C) for about 15-20 minutes. This ensures the cheese melts perfectly and the buns crisp up nicely.
What should I do if my sliders are soggy?
To prevent sogginess, it’s crucial to toast the bottom rolls well before assembling. If your sliders already turned out soggy, you can try putting them back in the oven at a low temperature (around 250°F or 120°C) for about 10-15 minutes. This helps crisp up the buns while keeping the filling warm.
Are Chopped Italian Sliders suitable for people with dietary restrictions?
Definitely! These sliders can easily accommodate various dietary preferences. For gluten-free options, simply use gluten-free rolls. You can also make them vegetarian by replacing deli meats with grilled vegetables or extra cheese. Just be mindful of any specific allergies and adjust ingredients accordingly.
Can pets eat any of the ingredients?
While some ingredients are pet-friendly in moderation, be cautious. Foods like onion, garlic, and certain dressings can be harmful to pets. It’s best to keep this dish for human enjoyment only and offer them safe treats instead!

Delicious Chopped Italian Sliders for Game Day Joy
Ingredients
Equipment
Method
- Preheat your oven to 400°F (200°C).
- Carefully cut the Kings Hawaiian rolls in half and spread mayonnaise over the bottom halves.
- Toast the bottom rolls in the oven for about 7-10 minutes until golden.
- Chop deli meats, heat them in a skillet for about 5 minutes.
- Mix shredded lettuce, mayonnaise, diced red onion, dill pickles, and banana peppers in a bowl.
- Layer provolone cheese on toasted roll bottoms, then add warm deli meats.
- Place the top halves of the rolls on, brush with melted butter and Italian seasoning.
- Bake the assembled sliders for an additional 5-7 minutes.
- Spread the salad mixture over the meats, place top buns back and press down before slicing.
Leave a Reply