
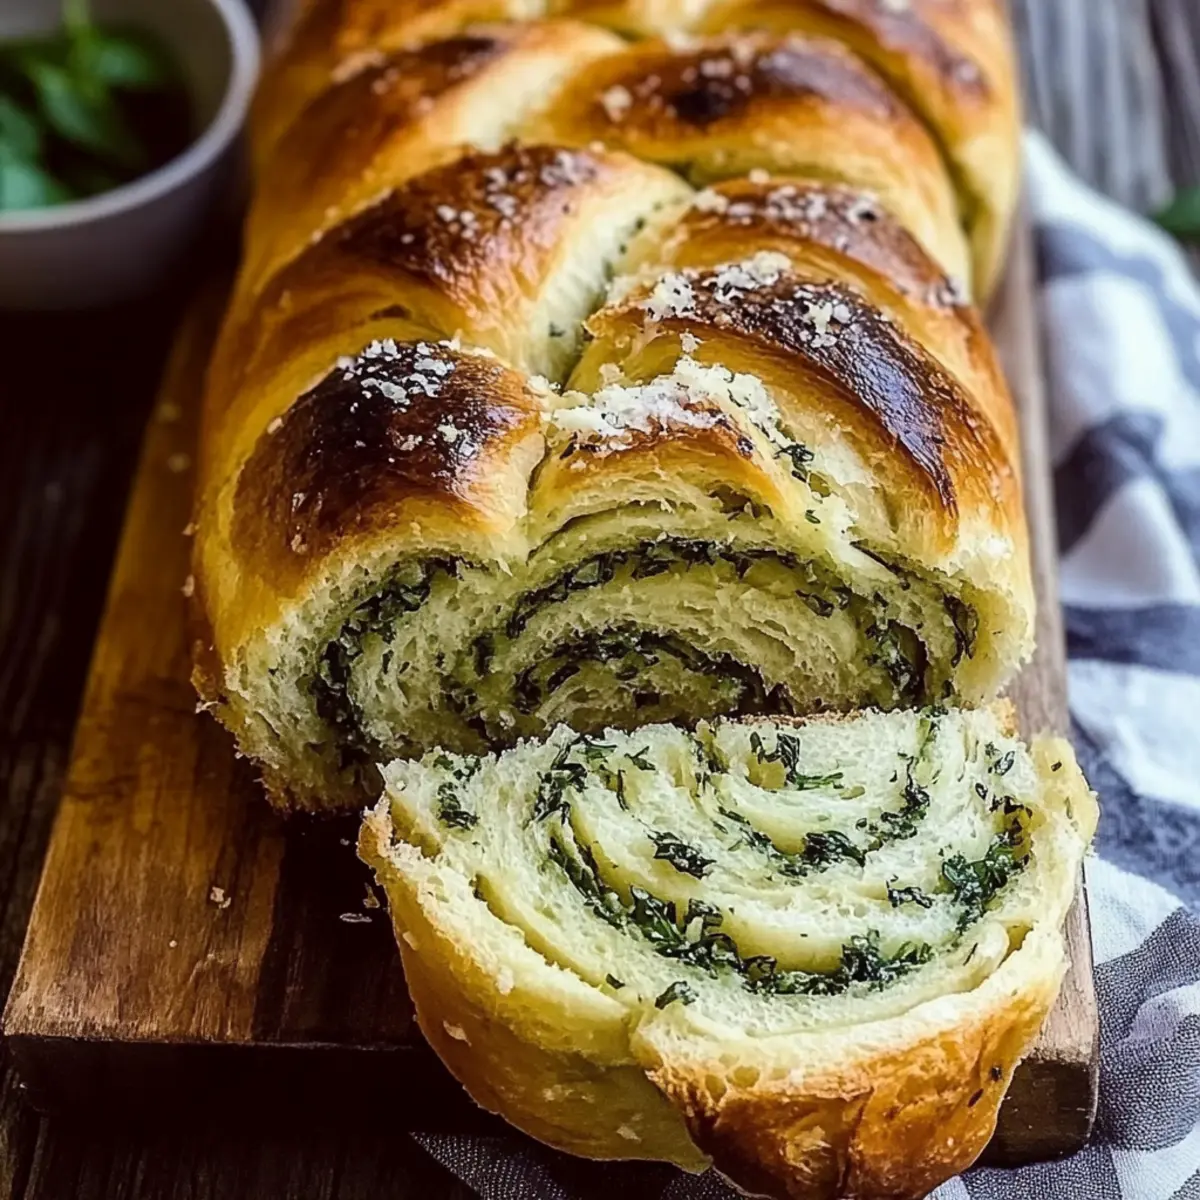
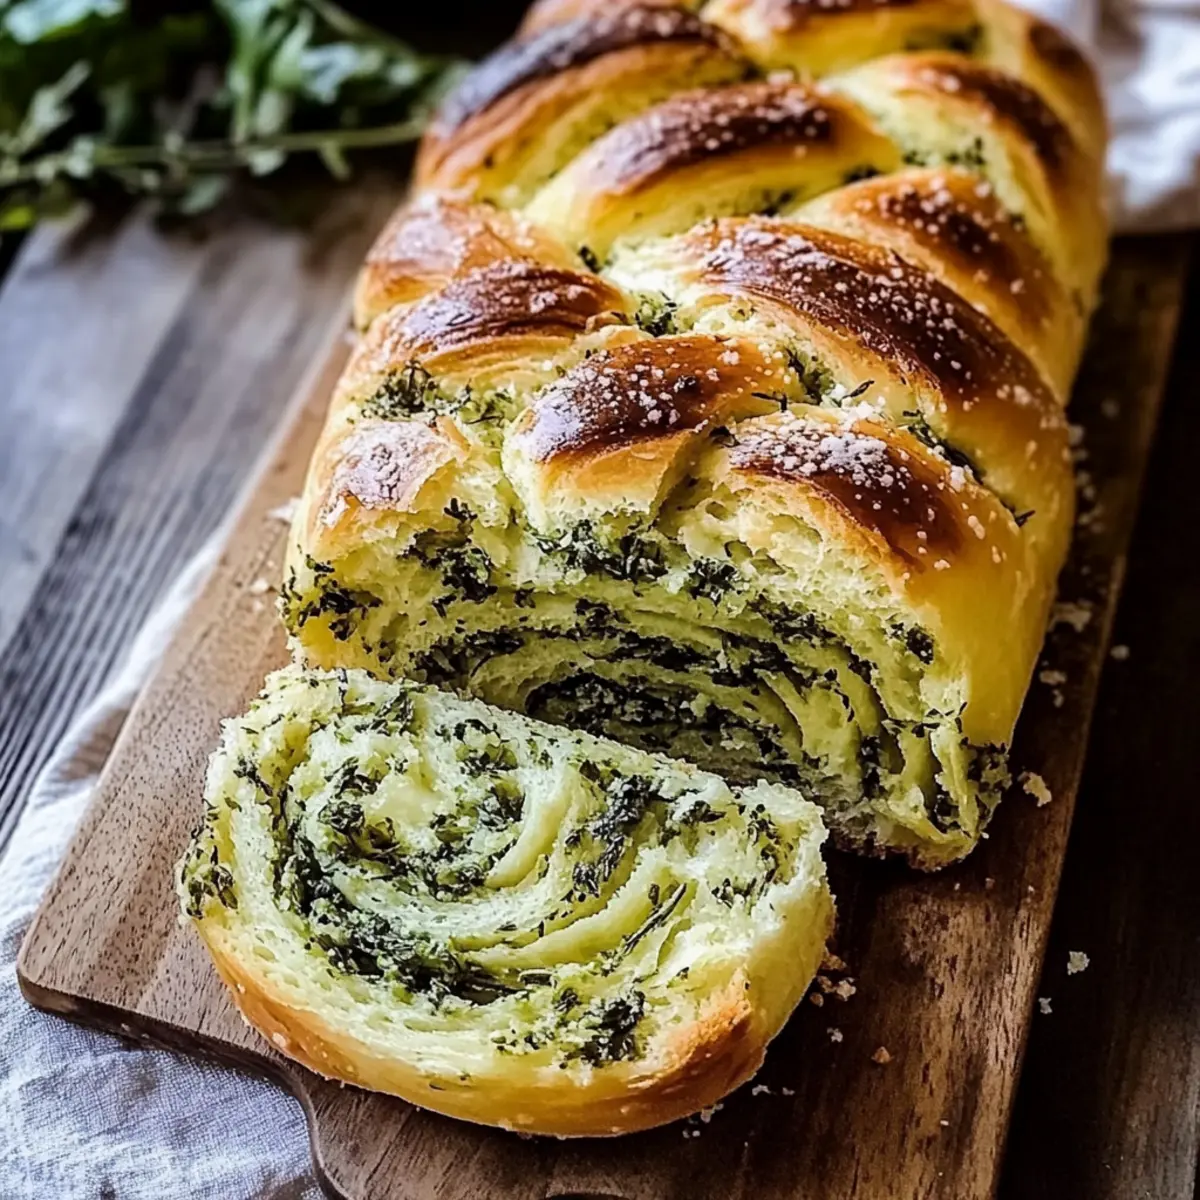
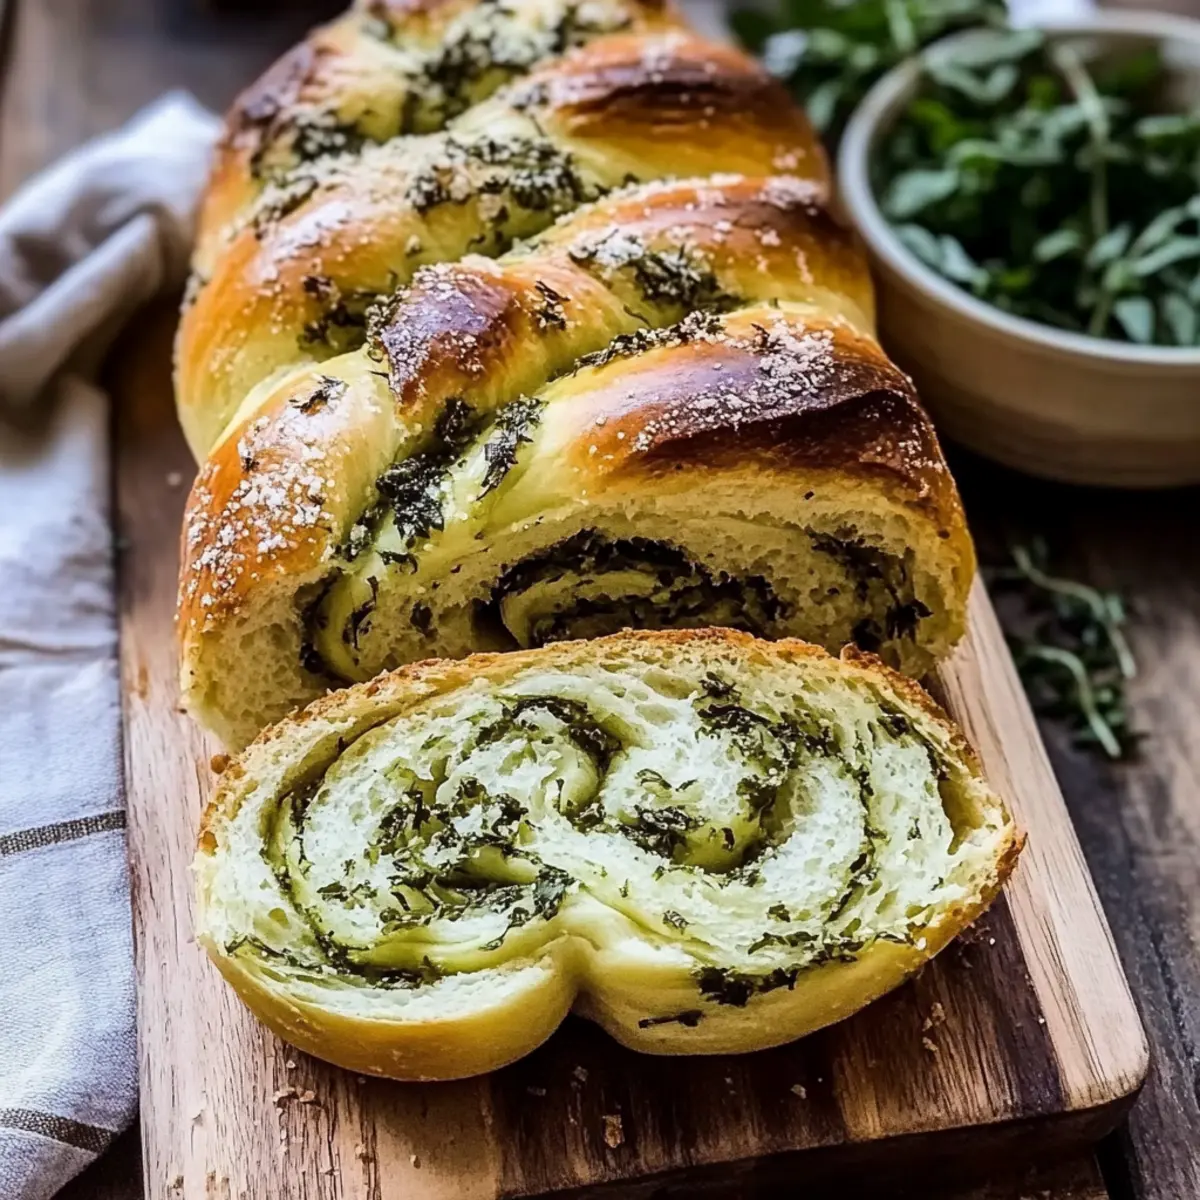
The scent of warm bread baking fills my kitchen, instantly transporting me to a cozy café where every bite feels like a hug. Today, I’m thrilled to share my recipe for Swirled Garlic Herb Bread—a delightful and aromatic treat that’s a joy to make, especially for beginner bakers. Not only is this recipe a comforting addition to your meal, but its mesmerizing layers of garlic, fresh herbs, and melted parmesan make it a stunning centerpiece on any table. Perfect for pairing with soups or just slathered in butter, this vegetarian-friendly bread is bound to impress family and friends alike. Are you ready to transform your kitchen into a haven of deliciousness? Let’s dive into the wonderful world of baking!
Why is Swirled Garlic Herb Bread Incredible?
Aromatic Bliss: The moment you bake this bread, your kitchen will be filled with the inviting scent of garlic and herbs, making it impossible to resist.
Beginner-Friendly: No intimidating techniques here! This recipe is straightforward, making it perfect for novice bakers eager to impress.
Visual Delight: The unique swirled design not only looks stunning but also creates layers of flavor that your taste buds will adore.
Versatile Pairing: Enjoy it with creamy soups, alongside a robust salad, or simply spread with butter for a delightful snack! For an exquisite side, try pairing it with Country French Garlic or a classic Alfredo Garlic Bread.
Meal Prep Friendly: Make it ahead of time and warm it up, ensuring your meals stay hassle-free and delicious.
Swirled Garlic Herb Bread Ingredients
For the Dough
• Milk – Provides moisture and a soft texture. Substitution: Use non-dairy milk for a dairy-free option.
• Instant Yeast – Helps the bread rise and develops a light, airy crumb. Ensure yeast is fresh for proper activation.
• Honey – Adds subtle sweetness and activates the yeast. Substitution: Substitute sugar or maple syrup if preferred.
• Eggs – Contribute to the rich texture and structure of the dough. No substitution recommended; avoid for vegan versions.
• All-Purpose Flour – Forms the base of the dough, producing a sturdy yet fluffy bread. Substitution: Whole wheat flour can be used, but it may affect texture.
• Salted Butter – Enhances flavor and ensures a tender crumb. Substitution: Olive oil works for a dairy-free version.
For the Filling
• Garlic – Delivers a subtle, aromatic savory taste. Use roasted garlic for a mellower flavor or omit if necessary.
• Parmesan Cheese – Adds a slightly salty, umami depth to the bread. Substitution: Cheddar or pecorino can be used for variation.
• Fresh Basil, Thyme, and Sage – Infuse the bread with fresh, earthy flavors. Substitution: Use dried herbs, but reduce quantity to one-third.
Embrace the joy of baking with this Swirled Garlic Herb Bread that will fill your home with warmth and deliciousness!
Step‑by‑Step Instructions for Swirled Garlic Herb Bread
Step 1: Prepare the Dough
In a mixing bowl, combine 1 cup of warm milk, 2 ¼ teaspoons of instant yeast, and 2 tablespoons of honey. Let this mixture sit for about 5 to 10 minutes until it becomes foamy. Next, add 2 eggs, 3 ½ cups of all-purpose flour, and 1 teaspoon of salt to the bowl, mixing with a stand mixer or wooden spoon until combined. Gradually knead in 4 tablespoons of softened butter until the dough is smooth and elastic, about 5 minutes.
Step 2: Let the Dough Rise
Once your dough for the Swirled Garlic Herb Bread is kneaded, shape it into a ball and place it in a greased bowl. Cover it with a clean kitchen towel or plastic wrap and let it rise at room temperature for 1 hour, or until it has doubled in size. This rise will give the bread its light and airy texture.
Step 3: Prepare Garlic Herb Butter
While the dough rises, prepare the savory filling by mixing together 4 tablespoons of softened butter, 3 cloves of minced garlic, ½ cup of grated parmesan cheese, and a combination of 2 tablespoons of chopped fresh basil, thyme, and sage in a small bowl. The delightful aroma of this garlic herb butter will add layers of flavor to your Swirled Garlic Herb Bread.
Step 4: Roll and Fill the Dough
After the dough has risen, punch it down to release air and turn it out onto a lightly floured surface. Roll it into a rectangle measuring approximately 12×18 inches. Spread the garlic herb butter evenly across the surface of the dough, leaving about a half-inch border around the edges. This will create those delicious garlicky swirls once rolled.
Step 5: Shape the Bread
Starting from the long edge, carefully roll the dough tightly into a log shape. Once rolled, use a sharp knife to cut the log lengthwise down the middle, exposing the beautiful filling. Twist the two halves together, pinching the ends to seal, and shape it into an S-form, placing it onto a parchment-lined baking sheet.
Step 6: Second Rise
Cover your twisted bread with a kitchen towel and let it rise again for about 45 minutes at room temperature. During this time, the bread will expand and develop a delightful texture, ensuring it’s fluffy in every bite once baked.
Step 7: Bake the Bread
Preheat your oven to 350°F (175°C). Once the dough has risen, place the baking sheet in the oven and bake for 30 to 35 minutes, or until the Swirled Garlic Herb Bread is golden brown and sounds hollow when tapped. For an extra touch, brush the hot bread with melted butter right after removing it from the oven.

Make Ahead Options
For those busy home cooks looking to simplify mealtime, this Swirled Garlic Herb Bread is a fantastic option for meal prep! You can prepare the dough up to 24 hours in advance by following steps 1 and 2, then refrigerate it for the perfect overnight rise. This method not only saves time but also enhances the flavor as the dough develops overnight. When you’re ready to finish baking, simply remove the dough from the fridge, let it come to room temperature for about 30 minutes, and then proceed with steps 3 through 7. To maintain the bread’s scrumptious quality, wrap it tightly in plastic wrap if storing for a few days before baking. You’ll still achieve that warm, comforting aroma and irresistible flavor with minimal effort!
What to Serve with Swirled Garlic Herb Bread?
A warm loaf of bread deserves hearty companions that enhance its comforting flavors.
- Creamy Tomato Soup: The rich, velvety texture and savory flavors of tomato soup are a classic pairing that complements the bread’s garlic and herb layers beautifully.
- Caesar Salad: Crisp romaine lettuce in a garlicky dressing balanced with Parmesan will elevate your meal while adding freshness to each bite of bread.
- Roasted Vegetables: Seasoned veggies like zucchini, bell peppers, and carrots offer a delightful textural contrast to the soft bread, creating a colorful and nutritious plate.
- Herbed Olive Oil Dip: For a simple yet gourmet experience, serve your bread with a fragrant blend of olive oil, vinegar, and herbs for dipping—a true treat for the senses!
- Classic French Onion Soup: The blend of sweet caramelized onions and gooey cheese provides a rich backdrop that pairs perfectly with the bread’s flavors and textures.
- Antipasto Platter: Enjoy slices of the Swirled Garlic Herb Bread alongside an assortment of cured meats, cheeses, and marinated olives for a delightful range of flavors and textures.
- Chardonnay or Sauvignon Blanc: A chilled glass of white wine complements the garlic and herb notes in the bread while offering a refreshing contrast to its richness.
- Chocolate Fondue: For an unexpected dessert, enjoy the warm bread dipped in chocolate fondue—its savory notes make an incredible canvas for sweet indulgence.
Expert Tips for Swirled Garlic Herb Bread
-
Dough Consistency: A slightly tacky dough is ideal. If it feels too sticky, gradually add more flour, ensuring the perfect texture for your Swirled Garlic Herb Bread.
-
Yeast Activation: Use warm milk (about 110°F) to activate the yeast effectively. If your mixture doesn’t foam, the yeast might be expired or the milk too hot.
-
Layering Flavor: For a richer taste, consider using roasted garlic instead of raw. This adds a sweeter, more complex flavor to your bread without overwhelming it.
-
Avoiding Overbake: If the top browns too quickly, gently cover it with aluminum foil during the last few minutes of baking to ensure even cooking without burning.
-
Storage Tips: To keep your Swirled Garlic Herb Bread fresh, store it in an airtight container at room temperature for up to 3 days. For longer storage, freeze and reheat in the oven!
Swirled Garlic Herb Bread Variations
Feel free to get creative with this delicious recipe! You can personalize the flavors and ingredients to make it your own.
-
Herb Swap: Replace basil with oregano or rosemary for a fresh twist on flavor. These herbs can lend a new aromatic profile that complements the garlic beautifully.
-
Cheese Alternatives: Substitute parmesan with cheddar or pecorino for varied richness. Cheddar adds a sharper flavor while pecorino provides a saltier punch.
-
Dairy-Free Delight: Use olive oil in place of butter and choose non-dairy milk to make this bread friendly for those avoiding dairy. The olive oil contributes a lovely moistness without compromising taste.
-
Add Heat: Incorporate red pepper flakes into your garlic herb butter for a spicy kick. This tiny addition can transform your bread into a delightful treat that warms the palate!
-
Whole Grain Option: Use whole wheat flour instead of all-purpose for a heartier texture. This swap not only changes the flavor but can boost the bread’s nutritional value, adding fiber and a nutty flavor.
-
Sweet & Savory: Mix in a teaspoon of honey or maple syrup in the filling for a touch of sweetness. This balancing flavor can enhance the overall taste experience, creating a delightful contrast!
-
Savory Enhancements: Toss in sun-dried tomatoes or olives into the filling for an extra pop of flavor. These additions can elevate your Swirled Garlic Herb Bread into a Mediterranean-inspired loaf!
-
Roasted Garlic: Instead of fresh garlic, use roasted garlic for a sweeter, less sharp taste. Roasting mellows the flavor wonderfully, giving you a new layer of depth in every bite.
Pair your bread with a comforting bowl of Country French Garlic or take a moment to enjoy alongside a slice of Alfredo Garlic Bread for double the experience! Let your imagination run wild with these variations. Happy baking!
Storage Tips for Swirled Garlic Herb Bread
Room Temperature: Keep the bread in an airtight container for up to 3 days to maintain its freshness and softness.
Freezer: For longer storage, wrap the cooled bread tightly in plastic wrap and then foil; it can be frozen for up to 3 months.
Reheating: To warm up slices, place them in a preheated oven at 350°F (175°C) for about 10-15 minutes, allowing the flavors of the Swirled Garlic Herb Bread to come alive again.
Thawing: When ready to enjoy, thaw the bread in the refrigerator overnight before reheating, ensuring a beautifully soft texture.
Swirled Garlic Herb Bread Recipe FAQs
What should I look for when selecting herbs for my bread?
Absolutely! For the freshest flavor, choose vibrant herbs with bright green leaves and no dark spots. Smell them too; fresh herbs should have a strong, pleasant aroma. Avoid any wilted or discolored foliage to ensure the best taste in your Swirled Garlic Herb Bread.
How should I store leftover Swirled Garlic Herb Bread?
Store your bread at room temperature in an airtight container for up to 3 days. This keeps it soft and delicious! If you have leftovers beyond that, wrap it tightly in plastic wrap and then foil to freeze; it will keep for up to 3 months.
Can I freeze my Swirled Garlic Herb Bread?
Of course! Once your bread has cooled completely, tightly wrap it in plastic wrap, followed by aluminum foil to prevent freezer burn. When you’re ready to enjoy, thaw it in the refrigerator overnight before reheating at 350°F (175°C) for about 10-15 minutes to restore its fresh-baked goodness.
What if my dough doesn’t rise?
If your dough isn’t rising, check the yeast’s freshness—expired yeast will not activate. Also, ensure that your milk wasn’t too hot (it should be around 110°F). If your dough isn’t rising after 1 hour, try moving it to a warmer location, like an oven preheated to the lowest temperature for a brief moment, then turned off—this can help create a cozy environment for yeast to do its magic.
Are there any dietary considerations for this recipe?
Yes! This Swirled Garlic Herb Bread is vegetarian, making it a great option for meat-free diets. If you need dairy-free alternatives, substitute the milk with a non-dairy option like almond or oat milk, and replace butter with olive oil. Also, ensure you’re using dairy-free cheese if lactose is a concern.
How can I make my bread more visually appealing?
To enhance the visual appeal of your Swirled Garlic Herb Bread, consider sprinkling some additional herbs or cheese on top before baking. You can also brush an egg wash (1 egg mixed with a tablespoon of water) on the surface to give it a beautiful golden color once baked!
Swirled Garlic Herb Bread
Ingredients
Equipment
Method
- Combine 1 cup of warm milk, 2 ¼ teaspoons of instant yeast, and 2 tablespoons of honey in a mixing bowl. Let sit for 5 to 10 minutes until foamy.
- Add 2 eggs, 3 ½ cups of all-purpose flour, and 1 teaspoon of salt to the bowl. Mix until combined.
- Gradually knead in 4 tablespoons of softened butter until the dough is smooth and elastic, about 5 minutes.
- Shape the dough into a ball and place it in a greased bowl. Cover it and let it rise for 1 hour or until doubled in size.
- Mix 4 tablespoons softened butter, 3 cloves minced garlic, ½ cup grated parmesan cheese, and 2 tablespoons each of chopped fresh basil, thyme, and sage.
- Punch down the risen dough and turn it out onto a floured surface. Roll it into a rectangle (12x18 inches).
- Spread the garlic herb butter over the dough, leaving a half-inch border.
- Roll the dough tightly into a log shape from the long edge. Cut the log lengthwise and twist the two halves together.
- Shape it into an S-form and place on a parchment-lined baking sheet.
- Cover the twisted bread and let it rise for about 45 minutes at room temperature.
- Preheat oven to 350°F (175°C). Bake for 30 to 35 minutes or until golden brown. Brush with melted butter after removing from oven.
Leave a Reply